Single-Location
This document serves as a user guide for the single-location interface of the
Simply Be Found Marketing Platform.
Single User Guide
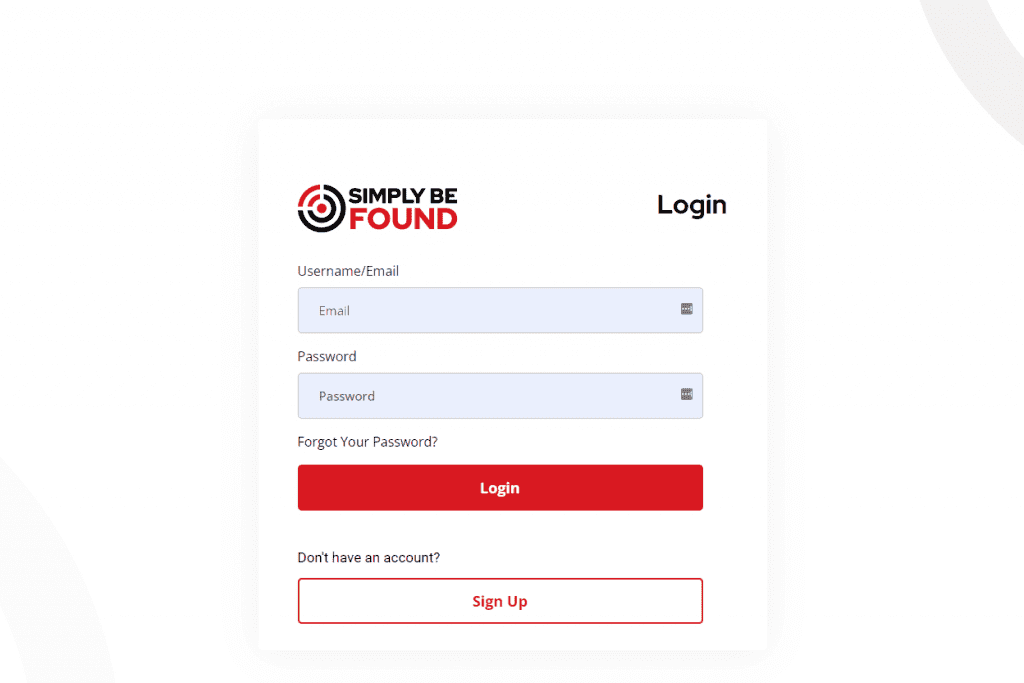
How to Log in to the Platform
Simply Be Found Dashboard
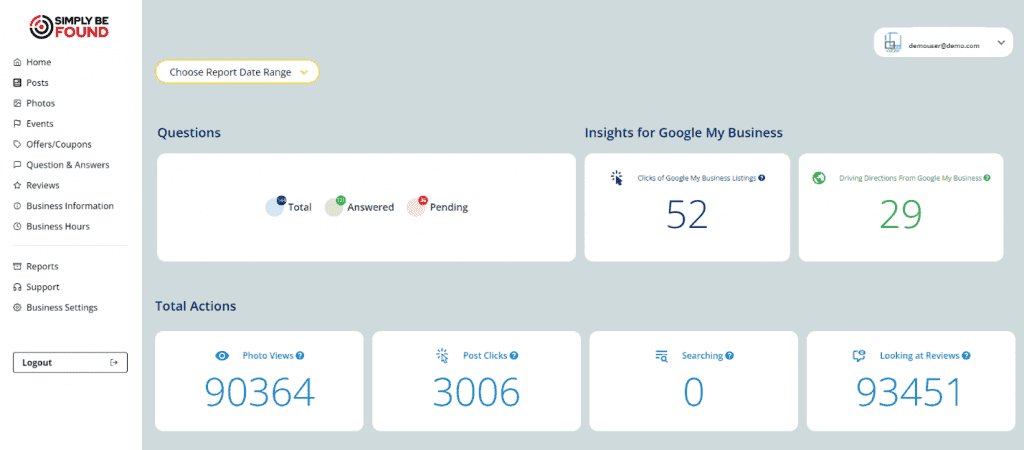
Once you are logged in, you will see the image below. This is your home page.

The Home Page shows the following:
Local SEO Score

This portion shows the current Local SEO Score of your specific business location. The percentage is measured by checking your Local SEO Score on popular networks that Simply Be Found Platform is connected to.
To-Do-List
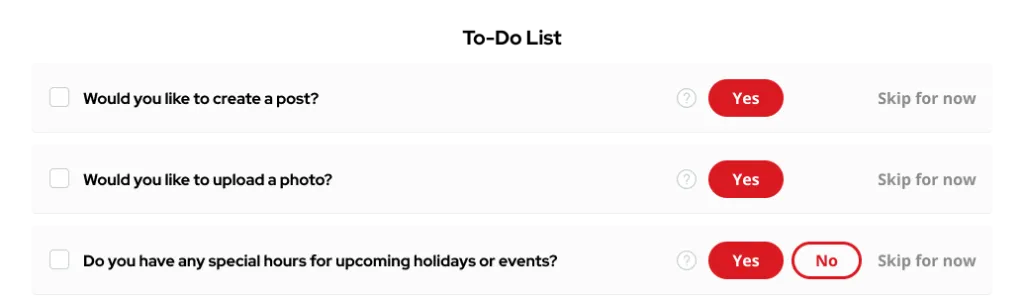
This portion is a To-Do List that we customize based on your specific business location needs at your convenience. The main intention of this list is to help you increase or maintain your Local SEO Score without having to sweat on completing them.
The simple to do list will take about 5 minutes to complete each task. Never has it been that managing your business information, focusing on your local SEO Score, and marketing your business was this simple and efficient. All you need to do is to complete this list and we will do the rest for you on making sure that your business information is updated and published to other networks.
Networks
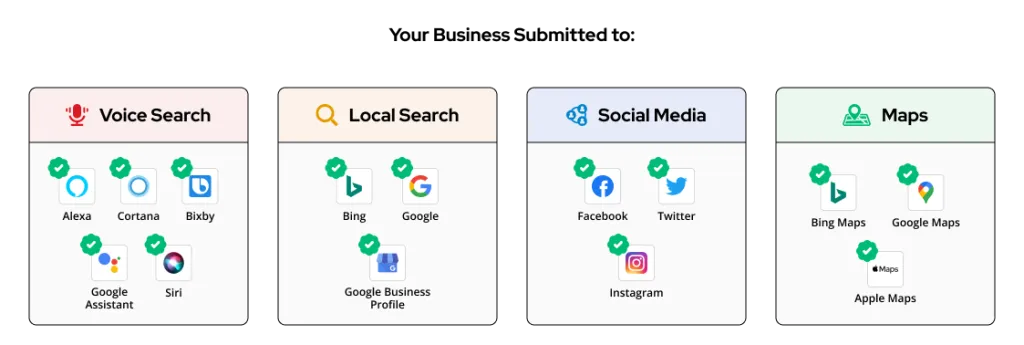
This portion shows all the list of the networks where your business will be listed. Networks shows 4 categories that display all the icons of the platforms where Simply Be Found lists your business.
Simply Be Found Posts
On the left side panel, select “Posts”. This will at once load the Posts Page on your screen.
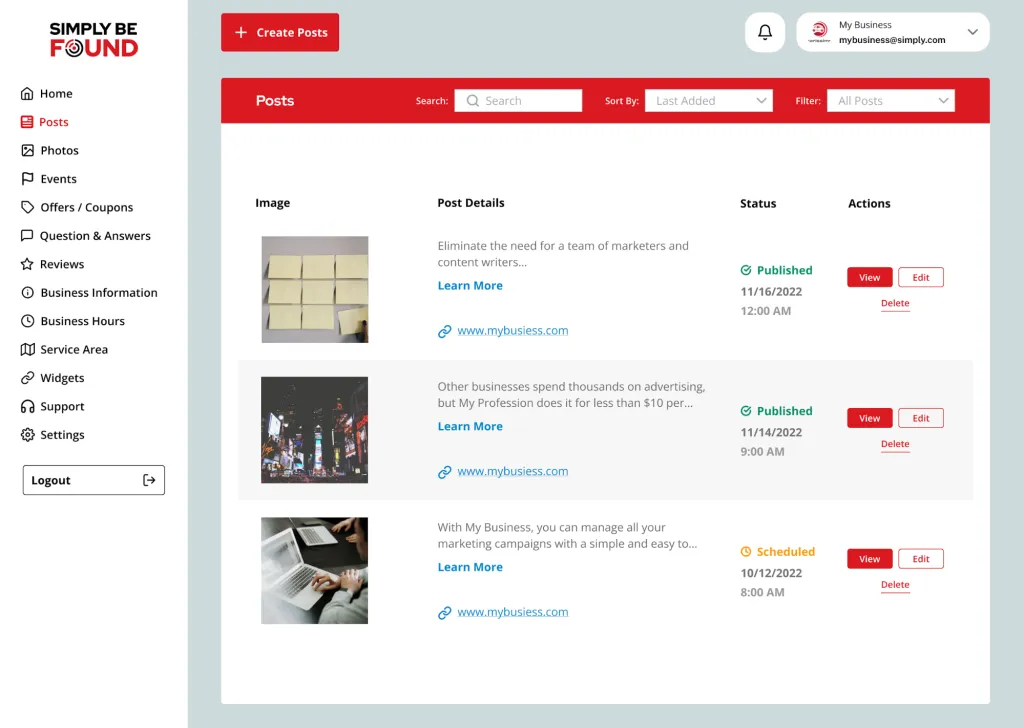
The Posts page has a “Create Posts” button at the top left. It has the list of all the posts created for this business location whether they are on drafted, scheduled, or published status.
Creating a Post
To create a post, select the “Create A Post” button at the top left of the Post Page. Once it has been selected, a pop-up like an example image below will appear.
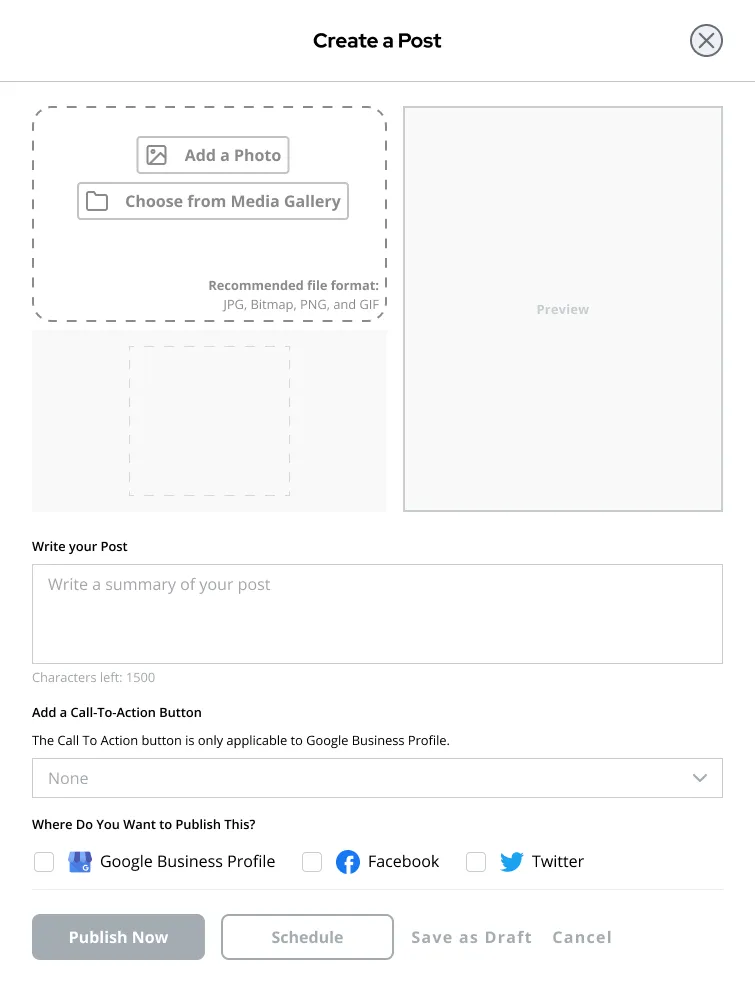
Fill in the required fields to create the post.
Adding a Photo
Select on “Add a Photo” button in the first quadrant. In that same quadrant is where you can choose to add a photo from your Media Gallery. Please note the recommended file format for smoother processing of images.
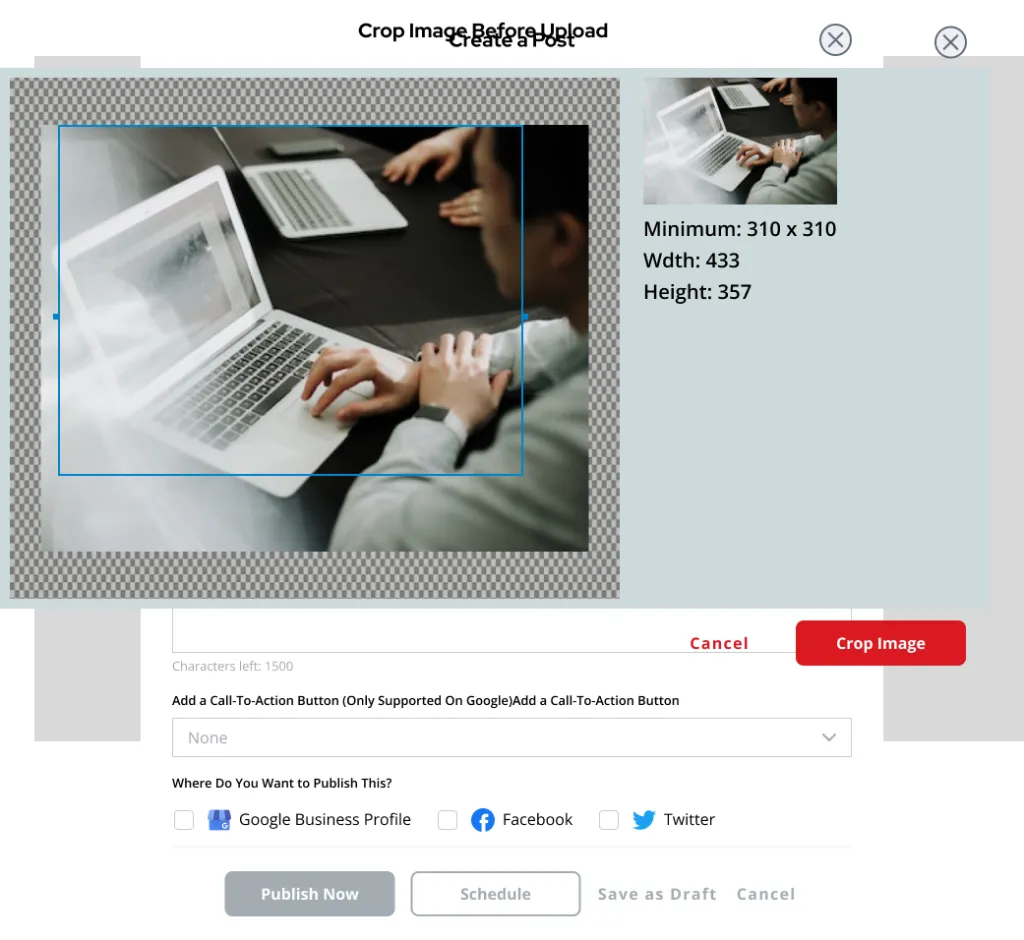
When the “Add a Photo” button is selected, a photo can be uploaded from the computer. Once the photo has been selected, there is an option to crop the image before it uploads. See the example shown above. After selecting the frame of preference, select “Crop Image”. It will then save the photo
Note:
Once, the post has been published, it will automatically generate the photo in the media gallery as a separate upload. It is recommended to go to the Photos Page and add name/title to the photo you just used in the post. It can be re-used for future purposes as its own photo post or using the “Add Media from Gallery” option when creating a post.
Disclaimer:
When the name/title of the photo is updated, it will generate another photo in the gallery hence, it will reflect on the Google My Business (GMB) profile. To remove this, simply delete the photo from the platform and it will delete it in the GMB as well.
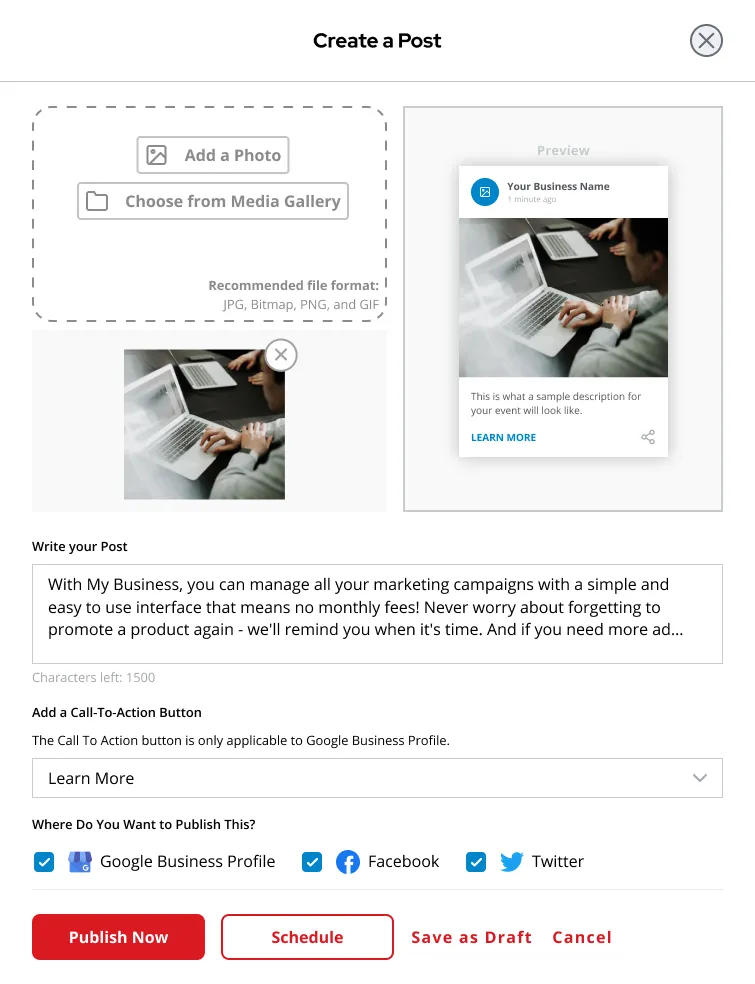
- The second quadrant is where the post preview will show.
- At the bottom half is the place where you can add the details of the post.
- Write a summary of your post in the text box.
- You may also choose to add a Call-to-Action button and choose from the available options in the dropdown menu. Your options are the following:
-
- Book
- Order Online
- Buy
- Learn More
- Sign Up
- Call Now
A redirect link will be required if any of those Call-to-Action button is chosen except “Call Now” which will then automatically add the company number that is registered in the business profile.
- Where do you want to publish this?
-
- Google Business Profile
- At the very bottom of the pop-up are options on what can be done with the post. Your options are the following:
-
- Publish Now – It will immediately publish the post.
- Schedule – It will schedule the post later depending on the time chosen.
- Save Draft – It will save the post as a Draft that you can come back to.
- Cancel – It will discard all the information you just added in the pop-up.
Sorting and Filtering

There are two options to sort the post: “Most Recent” or “Oldest to Newest”.

There are 4 options to filter the posts: “All Posts”, “Published Posts”, “Scheduled Posts”, and “Drafted Posts”.
Posts List and Post Details
The Posts List shows all the created posts for this business location whether they are on drafted, scheduled, or published status.

On this view you will see the following:
- Attached image to the post
- Post Details – to provide a brief overview of what the post is about
- Post Status – can be “Published” “Scheduled” or “Drafted”. Below it is the time of its creation
- Actions – actionable buttons that you can select.
Post Actionable Buttons
1. View Button
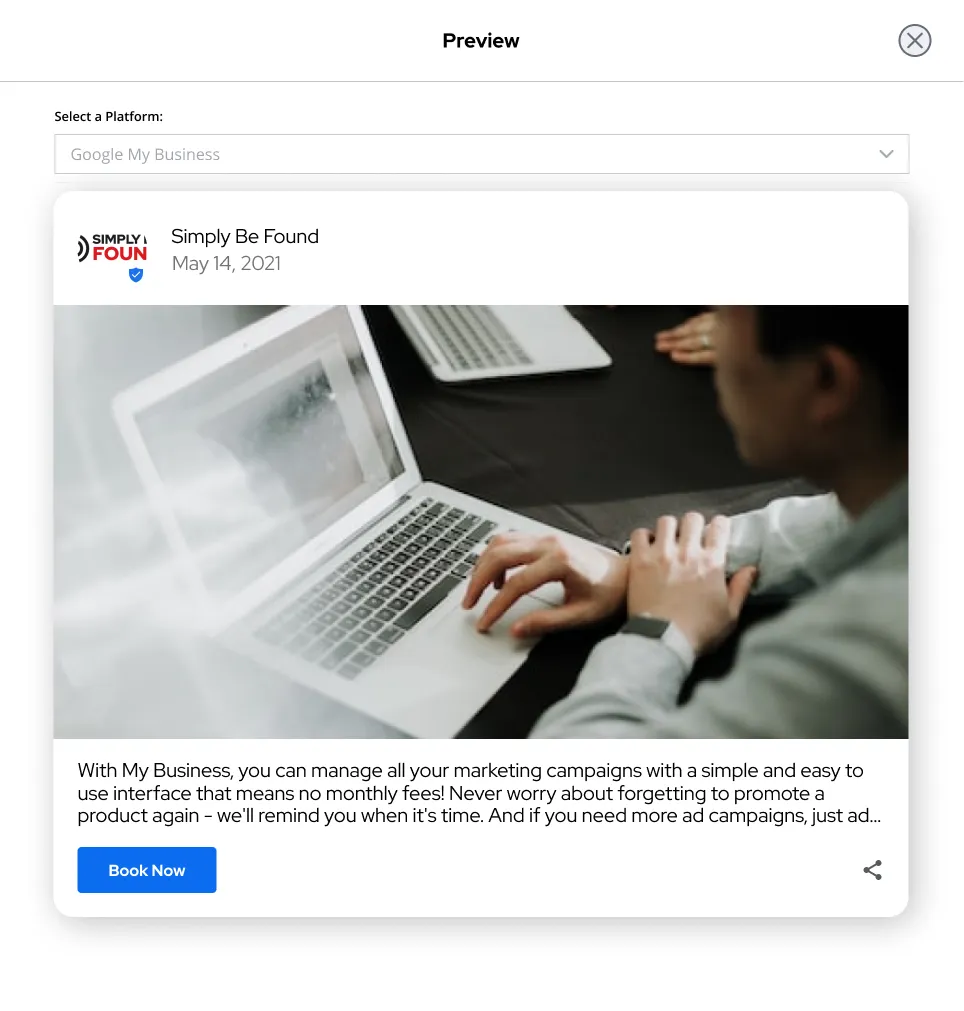
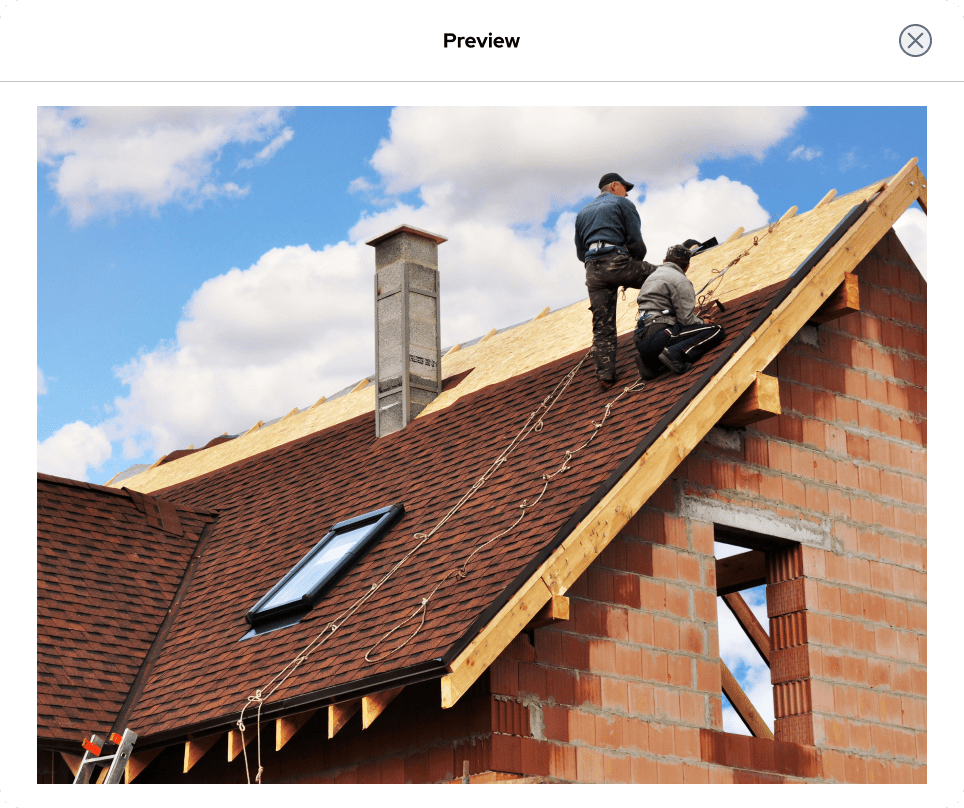
When the “View” button is selected, it will show a preview of the post as shown in the example image below.
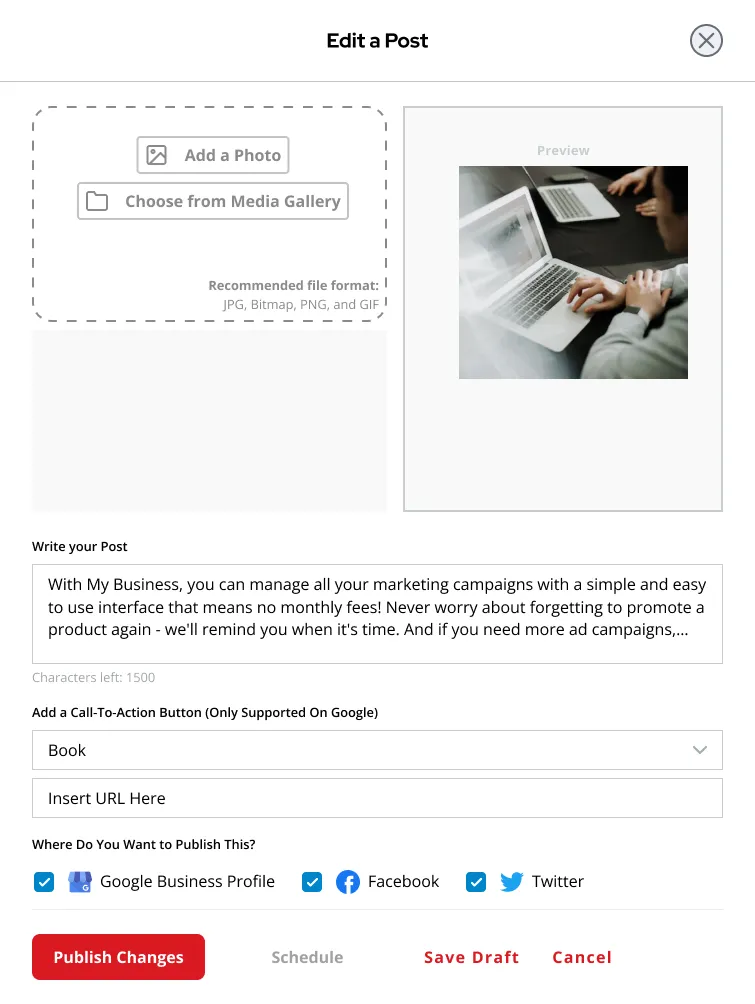
2. Edit Button
When the “Edit” button is selected, a pop-up of “Edit a Post” will appear, and the post details can be updated from here. See the example image below.
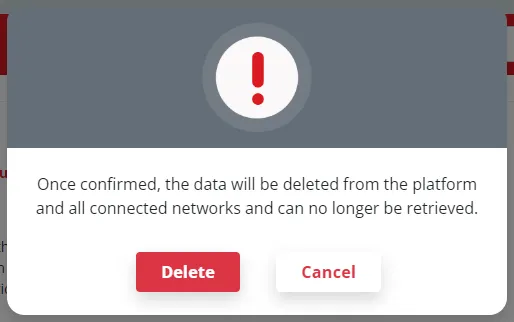
3. Delete Button
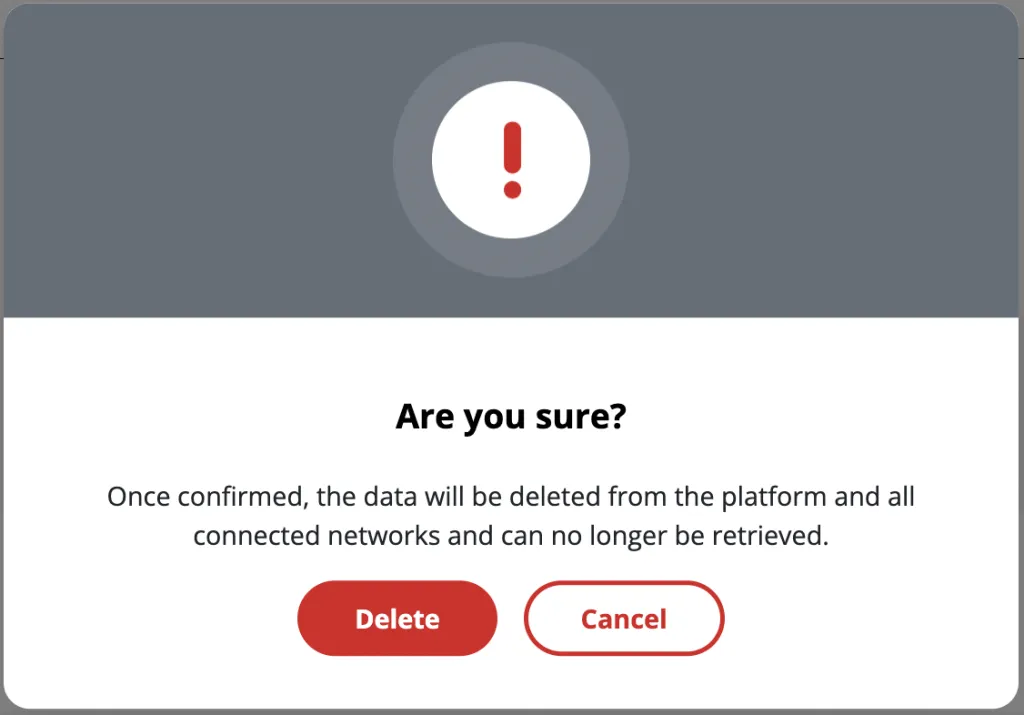
When the “Edit” button is selected, a pop-up like an example below will appear. This is to ensure that no posts will be accidentally deleted at one click.

Simply Be Found Photos
On the left side panel, select “Photos”. This will at once load the Photos Page on your screen.
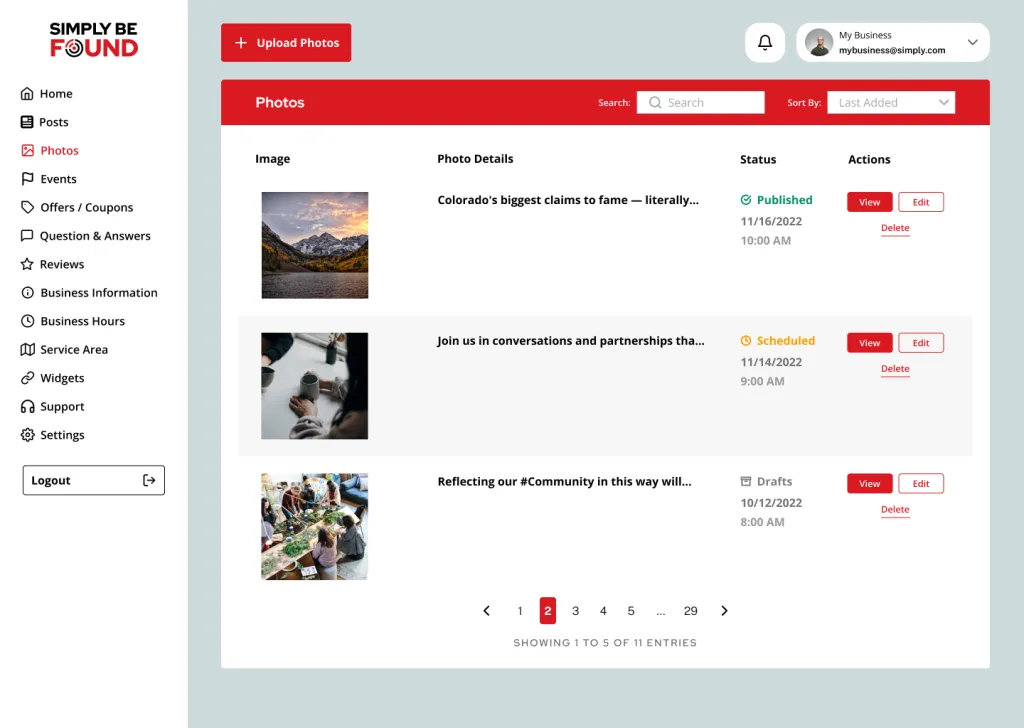
On this page is where the list of all uploaded photos can be found. At the top left is the “Upload a Photo” button.
Uploading a Photo
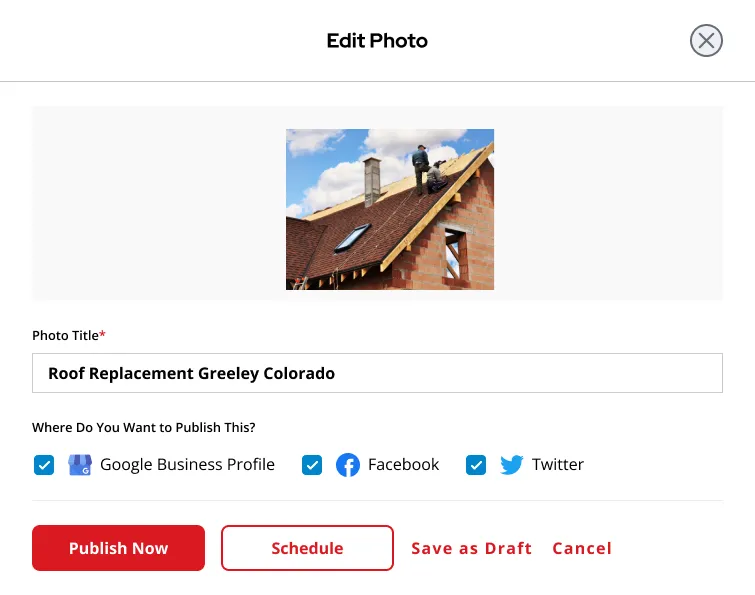
To upload a photo, select the “Upload A Photo” button at the top left of the Photos Page. Once it has been selected, a pop-up like an example image below will appear.
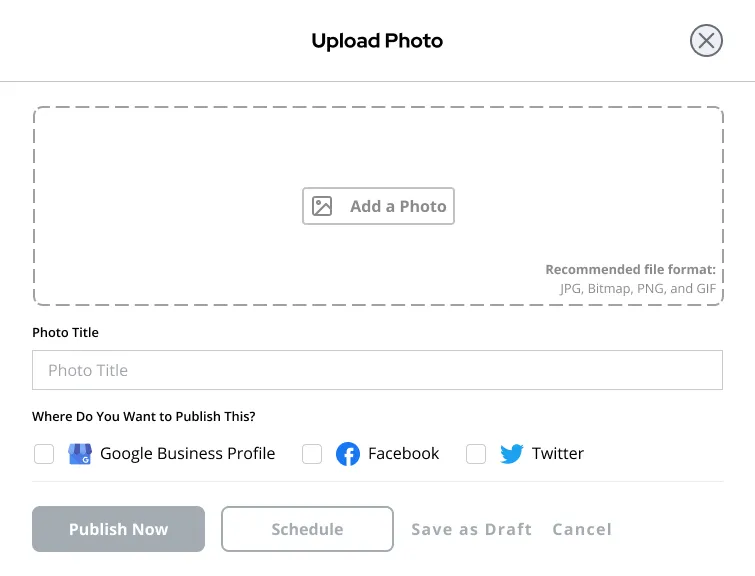
Fill in the required fields to upload a photo.
- To add a photo, select “Add a Photo”. Please note the recommended file format for smoother processing of images.
- Below that is the text box to add a Photo Title.
- After that, click the box on Where you want to publish the photo.
- At the very bottom of the pop-up are options on what can be done with the photo. Your options are the following:
- Publish Now – It will immediately publish the photo.
- Schedule – It will schedule the photo later depending on the time chosen.
- Save Draft – It will save the photo as a Draft that you can come back to.
- Cancel – It will discard all the information you just added in the pop-up.
Disclaimer:
When the name/title of the photo is updated, it will generate another photo in the gallery hence, it will reflect on the Google Business Profile (GBP) profile. To remove this, simply delete the photo from the platform and it will delete it in the GBP as well.
Sorting and Filtering

There are two options to sort the Photos: “Most Recent” or “Oldest to Newest”.

There are 4 options to filter the Photos: “All Photos”, “Published Photos”, “Scheduled Photos”, and “Drafted Photos”.
Photos List and Photos Details
The Photos List shows all the uploaded photos for this business location whether they are on draft, scheduled, or published status.
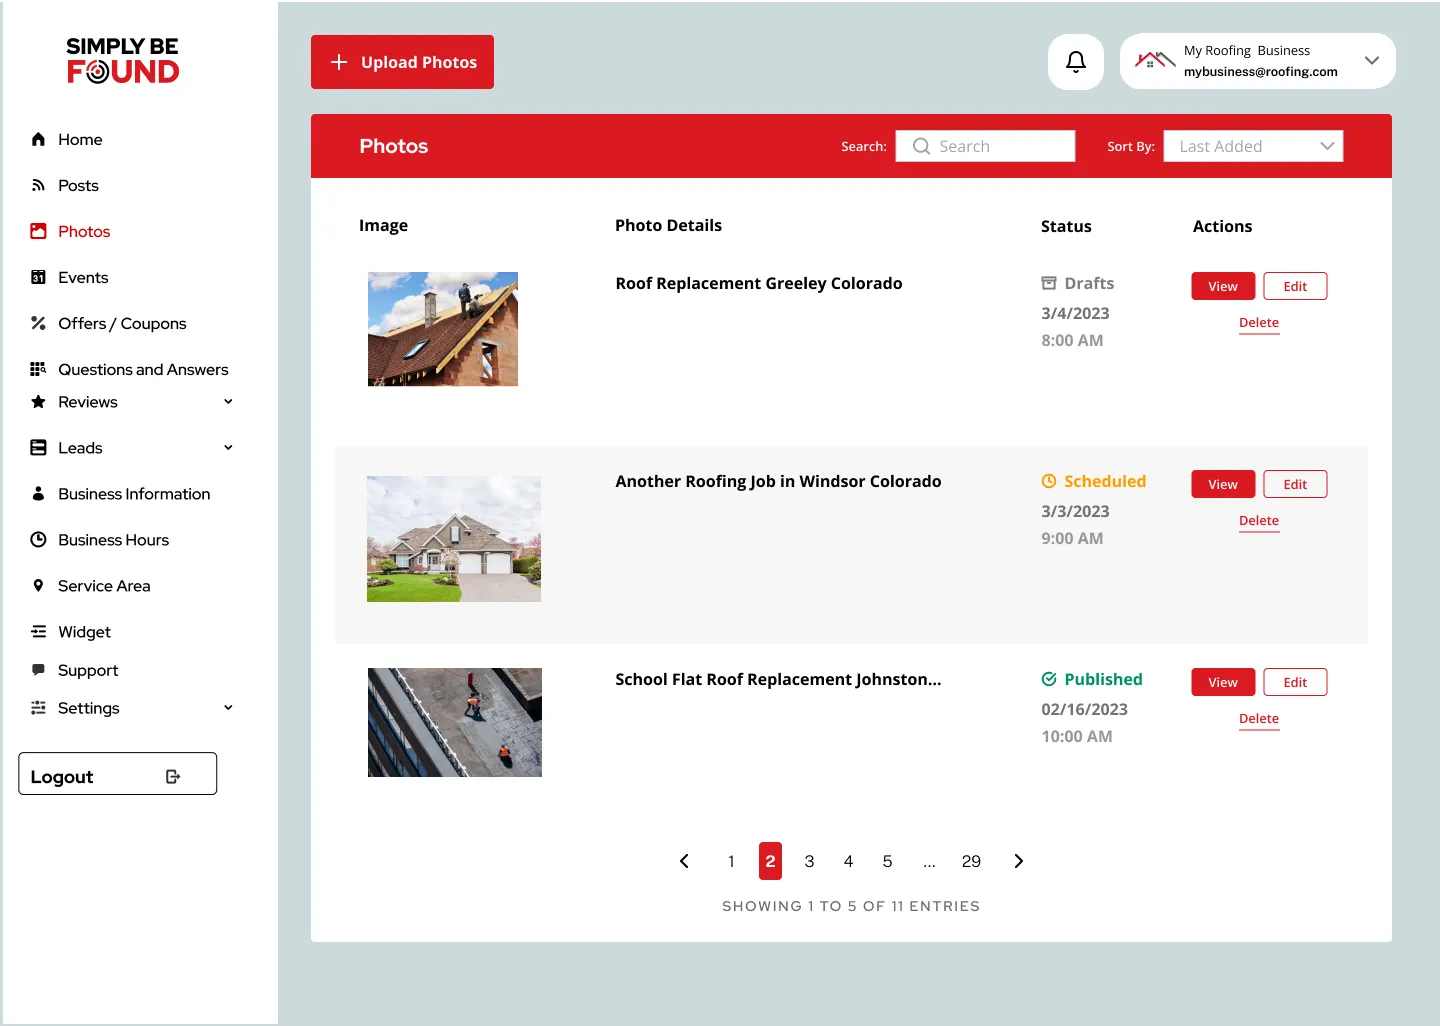
On this view you will see the following:
- Image
- Photo Details – The photo title will display here once it there is a title listed with the photo.
- Photo Status – can be “Published” “Scheduled” or “Drafted”. Below is the time of its creation.
- Actions – actionable buttons that you can select.
Photos Actionable Buttons
1. View Button
When the “View” button is selected, it will show a preview of the photo as shown in the example image below.
2. Edit Button
When the “Edit” button is selected, a pop-up of “Edit a Photo” will appear, and the photo details can be updated from here. See the example image below.
3. Delete Button
When the “Delete” button is selected, a pop-up like an example below will appear. This is to ensure that no photos will be accidentally deleted at one click.

Simply Be Found Events
On the left side panel, select “Events”. This will at once load the Events Page on your screen.
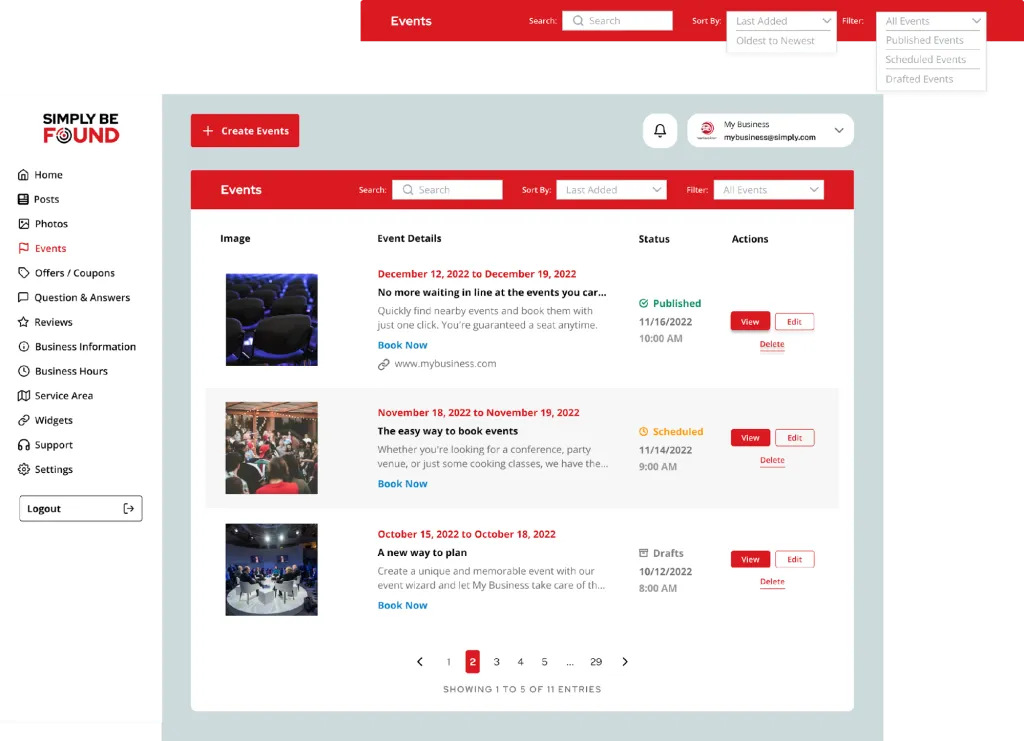
On this page is where the list of all Events can be found. At the top left is the “Create Events” button.
Creating an Event
To create an event, select the “Create Events” button at the top left of the Events Page. Once it has been selected, a pop-up like an example image below will appear.
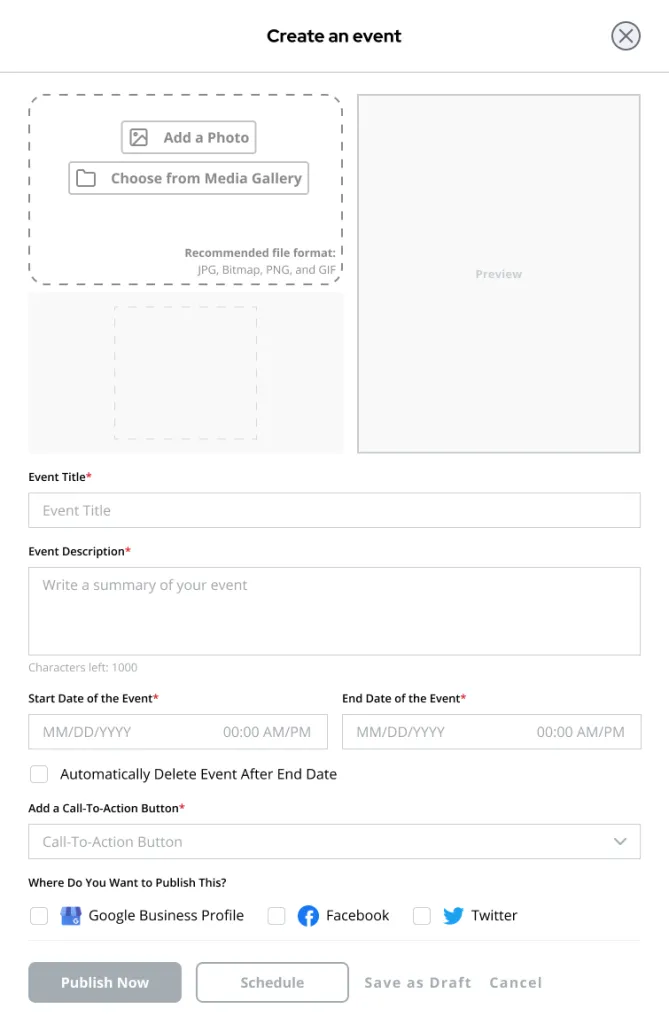
Fill in the required fields to create an event.
- To add a photo, select “Add a Photo” Or “Choose from Media Gallery”. Please note the recommended file format for smoother processing of images.
- Right next to that quadrant is where the Event’s preview will show.
- After that, add the Event title.
- Then on the text box below the Event title, add the Event description.
- You can select the Start Date and End Date of the Event.
- Scroll down and add the “Call to Action” Button” and choose from the available options in the dropdown menu. Your options are the following:
- Book
- Order Online
- Buy
- Learn More
- Sign Up
- Call Now
- At the very bottom of the pop-up are options on what can be done with the Event. Your options are the following:
- Publish Now – It will immediately publish the event.
- Schedule – It will schedule the event later depending on the time chosen.
- Save Draft – It will save the event as a Draft that you can come back to.
- Cancel – It will discard all the information you just added in the pop-up.
Sorting and Filtering

There are two options to sort the Events: “Most Recent” or “Oldest to Newest”.

There are 4 options to filter the Events: “All Events”, “Published Events”, “Scheduled Events”, and “Drafted Events”.
Events List and Events Details
The Events List shows all events for this business location whether they are on drafted, scheduled, or published status.
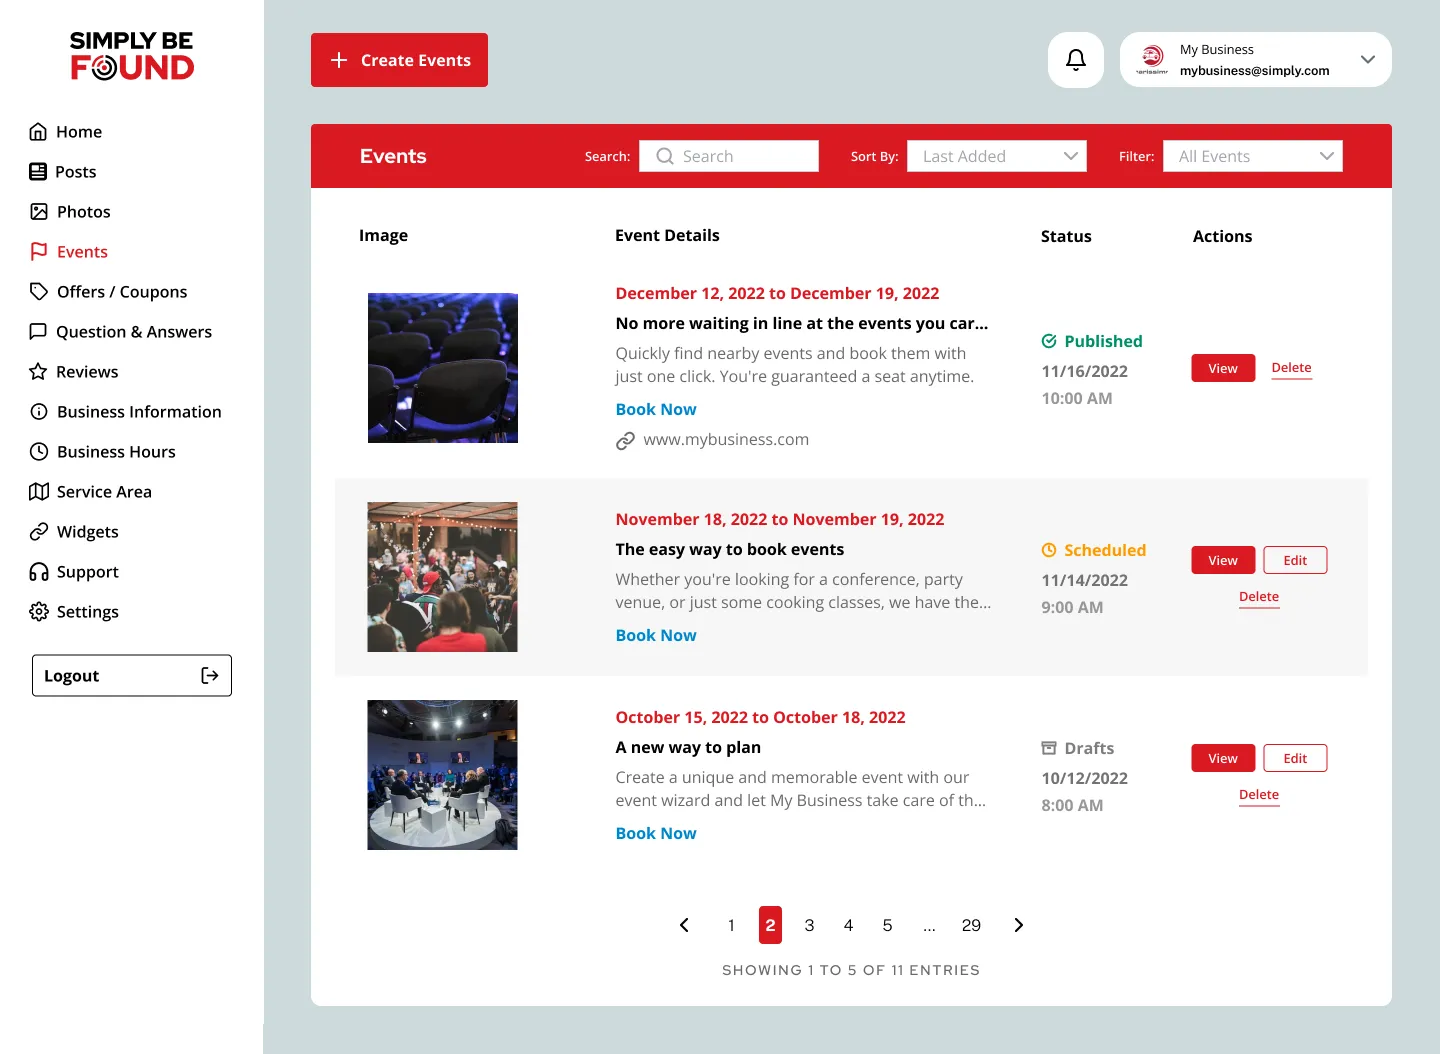
On this view you will see the following:
- Image
- Event Details – The Event Schedule, title, and description are displayed here.
- Event Status – can be “Published” “Scheduled” or “Drafted”. Below is the time of its creation.
- Actions – actionable buttons that can be selected.
Events Actionable Buttons
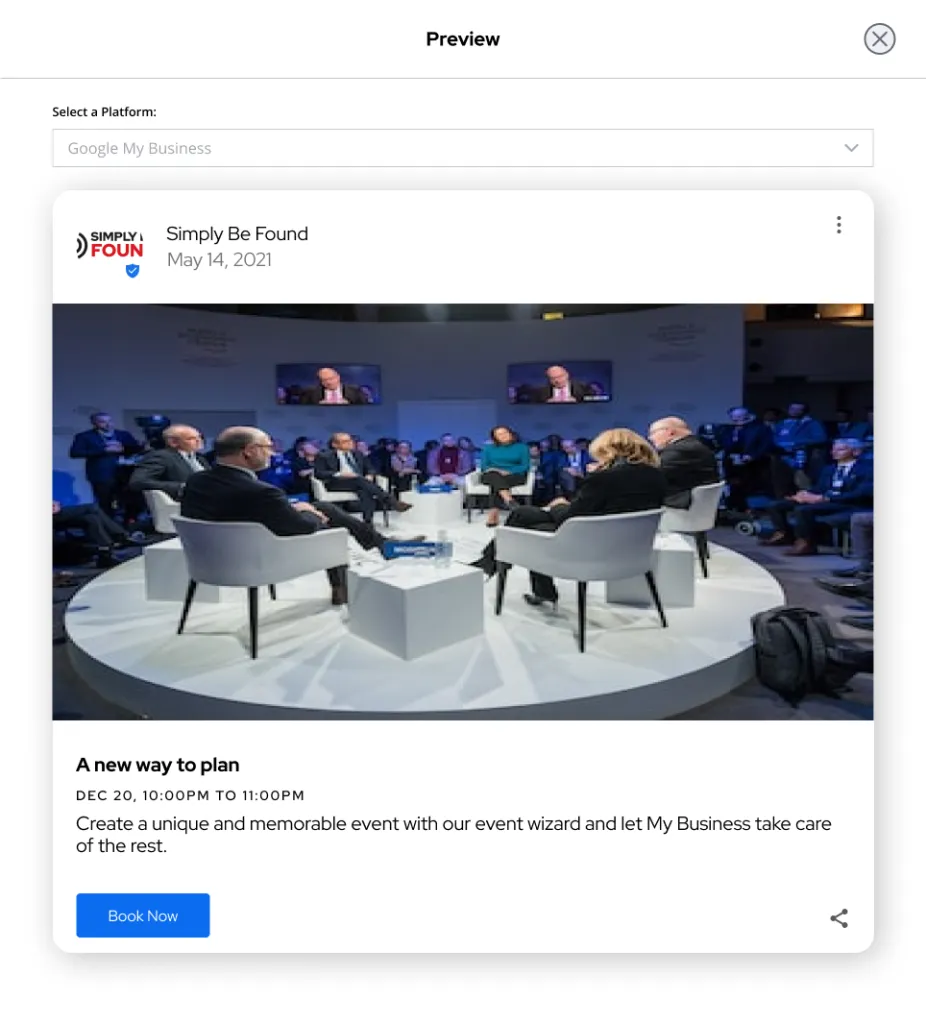
1. View Button
When the “View” button is selected, it will show a preview of the Event as shown in the example image below.
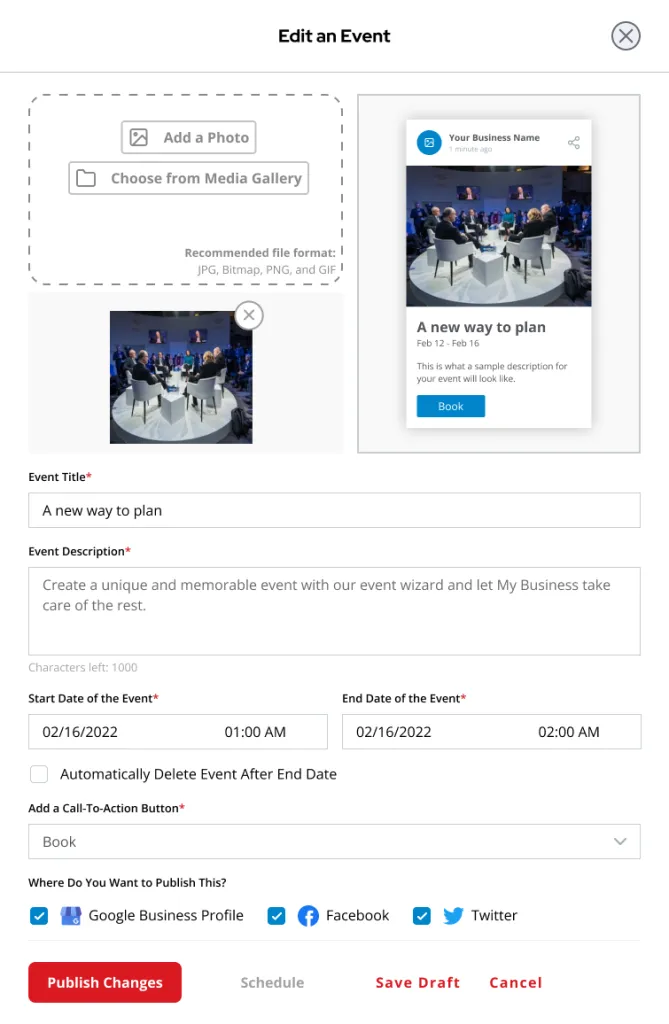
2. Edit Button
When the “Edit” button is selected, a pop-up of “Edit an Event” will appear, and the event details can be updated from here. See the example image below.
3. Delete Button
When the “Delete” button is selected, a pop-up like an example below will appear. This is to ensure that no events will be accidentally deleted at one click.

Simply Be Found Offers and Coupons
On the left side panel, select “Offers/Coupons”. This will at once load the Offers/Coupons Page on your screen.
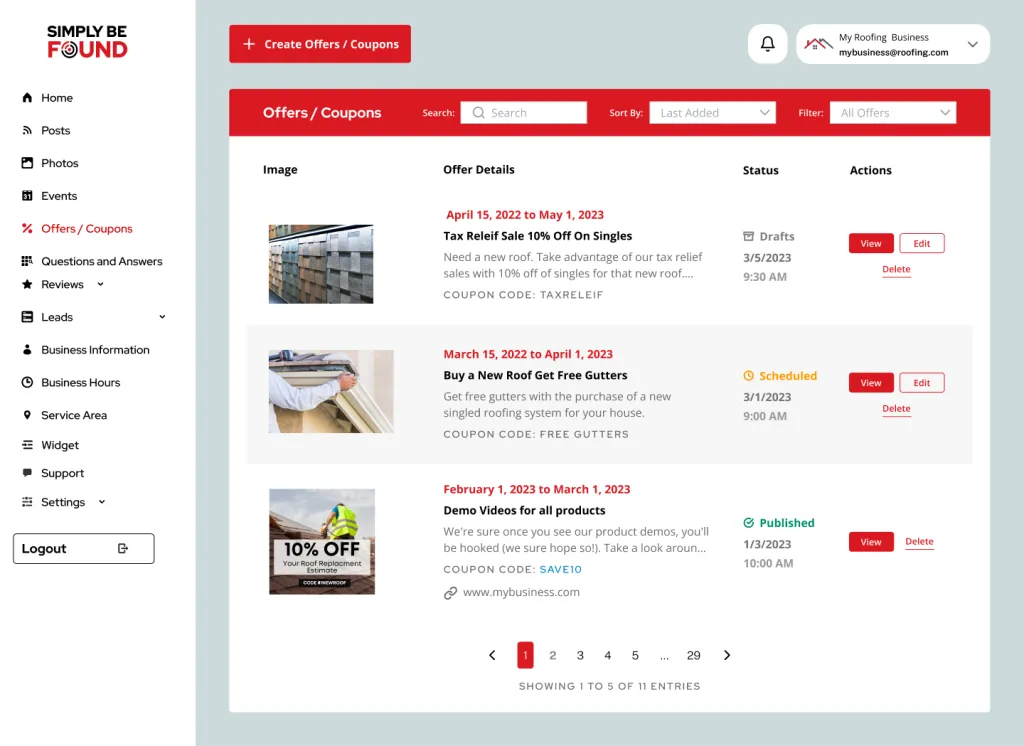
On this page is where the list of all Offers and Coupons can be found. At the top left is the “Create Offers” button.
Creating An Offer
To create an offer, select the “Create Offers” button at the top left of the Offer/Coupons Page. Once it has been selected, a pop-up like an example image below will appear.
Fill in the required fields to create an offer.
- To add a photo, select “Add a Photo” or “Choose from Media Gallery”. Please note the recommended file format for smoother processing of images.
- On the right side is the Offer Preview.
- Below those, fill in the Offer Title box.
- Describe your Offer.
- Scroll down and add the “Call to Action” Button” and choose from the available options in the dropdown menu. Your options are the following:
- Book
- Order Online
- Buy
- Learn More
- Sign Up
- Call Now
- Create Coupon Code.
- After that, scroll down on the pop-up and it will show a text box to add the “Link to Redeem Offer”.
- Add the Terms and Conditions.
- Finally, add the start and end date of the offer.
- At the very bottom of the pop-up are options on what can be done with the photo. Your options are the following:
- Publish Now – It will immediately publish the Offer.
- Schedule – It will schedule the Offer later depending on the time chosen.
- Save Draft – It will save the Offer as a Draft that you can come back to.
- Cancel – It will discard all the information you just added in the pop-up.
Sorting and Filtering

There are two options to sort the Offers: “Most Recent” or “Oldest to Newest”.

There are 4 options to filter the Offers: “All Offers”, “Published Offers”, “Scheduled Offers”, and “Drafted Offers”.
Offers List and Offers Details
The Offers List shows all the Offers for this business location whether they are on drafted, scheduled, or published status.

On this view you will see the following:
- Image
- Offer Details – Date of its effectivity, description, and coupon code.
- Offer Status – can be “Published” “Scheduled” or “Drafted”. Below is the time of its creation.
- Actions – actionable buttons that you can select.
Offers/Coupons Actionable Buttons
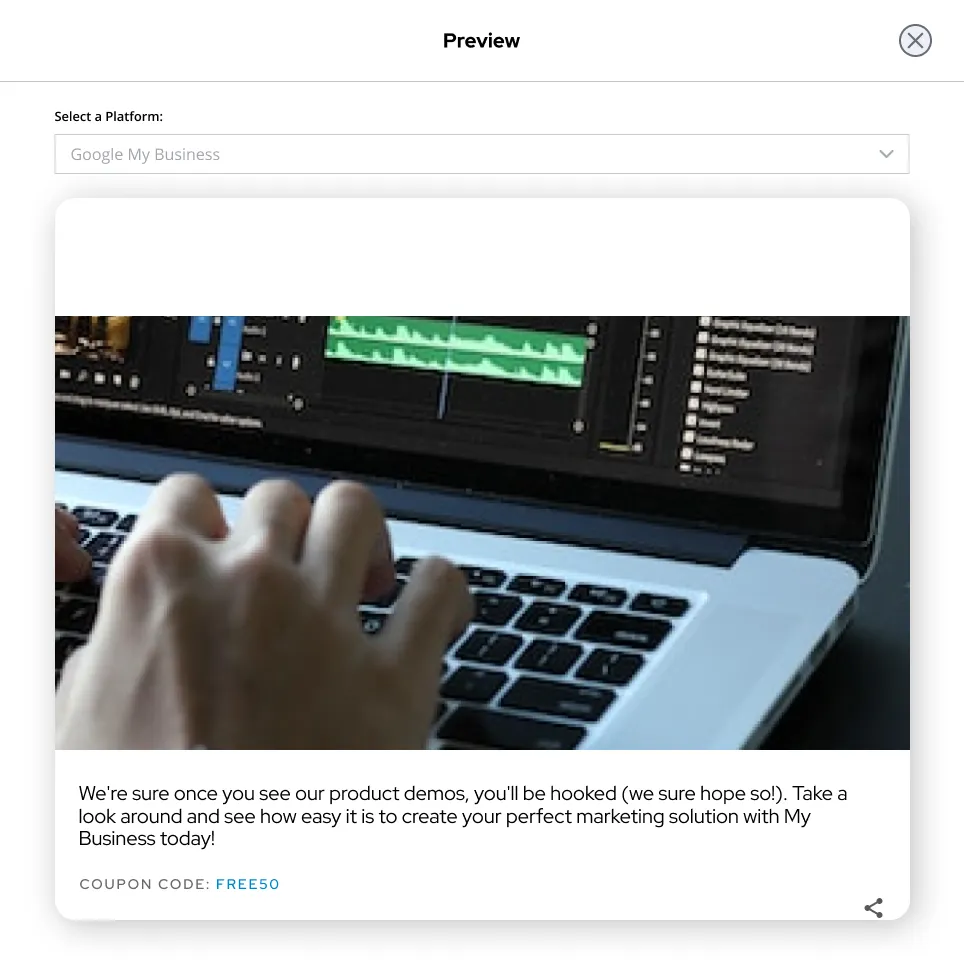
1. View Button
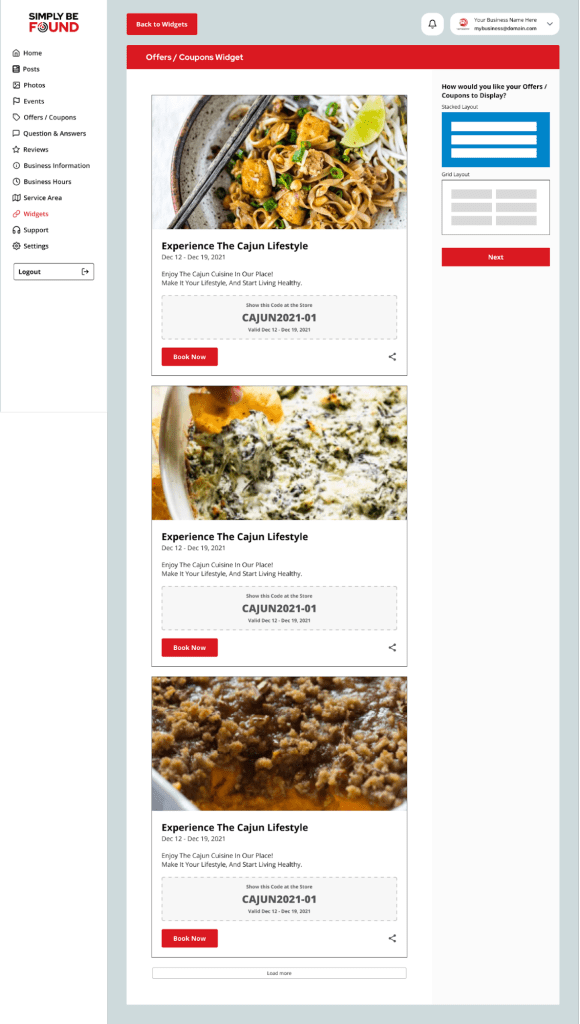
When the “View” button is selected, it will show a preview of the Offer as shown in the example image below.
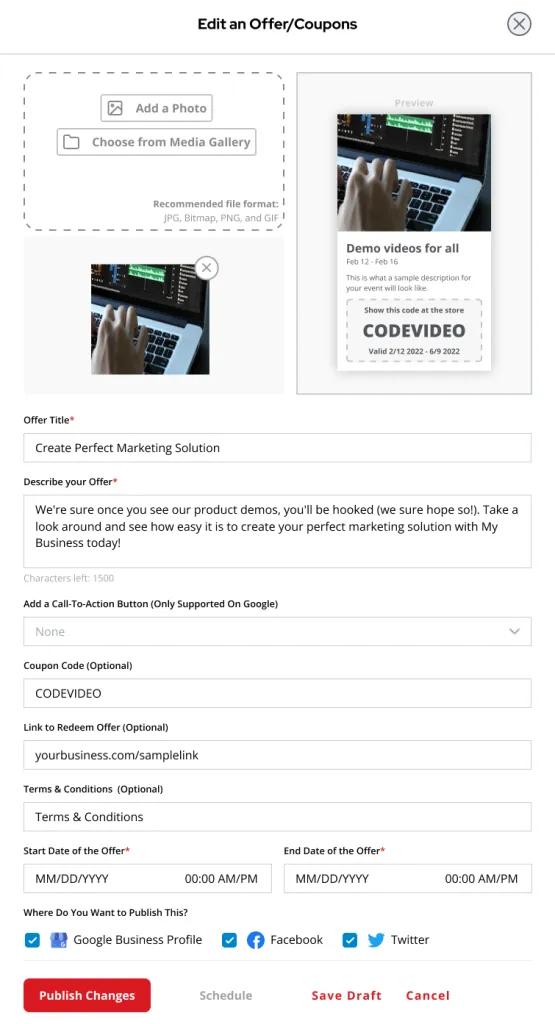
2. Edit Button
When the “Edit” button is selected, a pop-up of “Edit an Offer” will appear, and the Offer details can be updated from here. See the example image below.
3. Delete Button
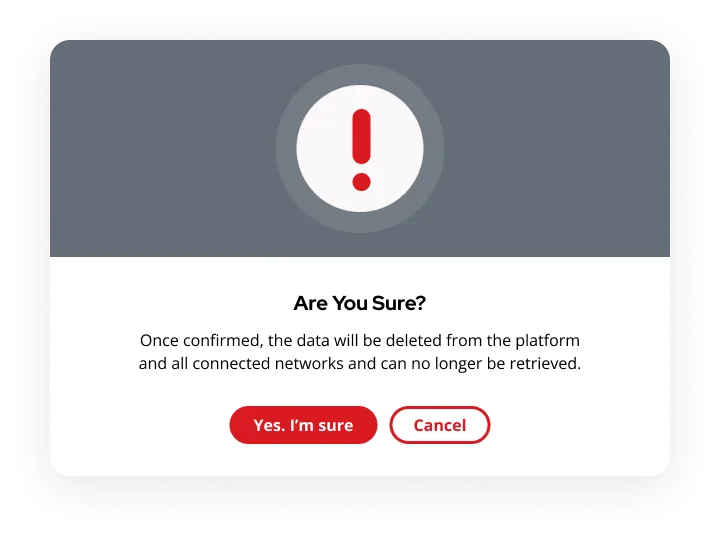
When the “Delete” button is selected, a pop-up like an example below will appear. This is to ensure that no Offers will accidentally be deleted at one click.
Simply Be Found Questions and Answers
On the left side panel, select “Questions and Answers”. This will at once load the Questions and Answers Page on your screen.
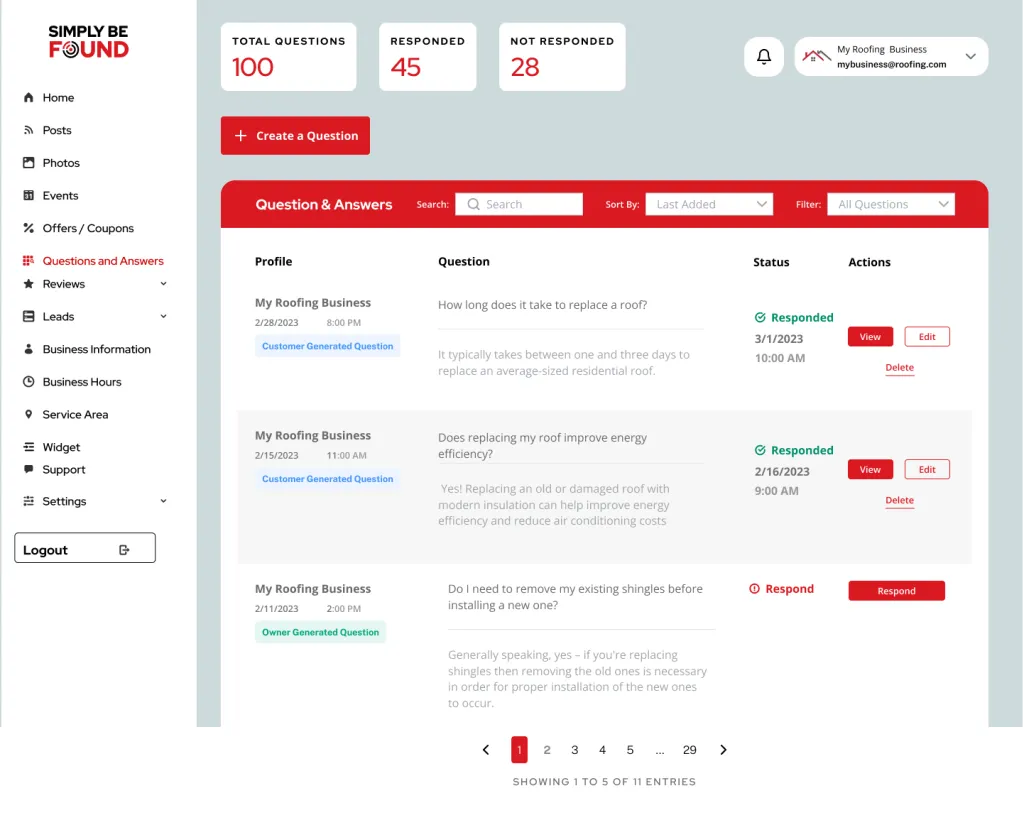
On this page is where the list of all Questions and Answers can be found. At the top left is the summary of your Question and Answers data. Below that is the “Create A Question” button.
Owner-Generated Question – This is a question that was asked/generated by the owner on your business profile.
Customer-Generated Question – This is a question that was asked/generated by the customer.
Creating A Question
To create a Question, select the “Create a Question” button at the top left of the Question and Answers Page. Once it has been selected, a pop-up like an example image below will appear.
This is a question that was asked/generated by the customer.
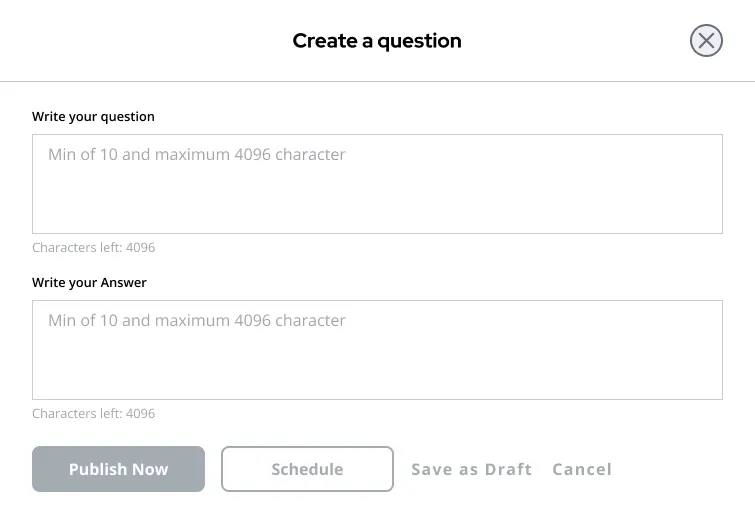
Fill in the required fields to create a question.
- Write your Question in the Question text box.
- Write your Answer in the Answer text box.
- At the very bottom of the pop-up are options on what can be done with the Question and Answer. Your options are the following:
- Publish Now – It will immediately publish the Question-and-Answer.
- Schedule – It will schedule the Question-and-Answer later depending on the time chosen.
- Save Draft – It will save the Question-and-Answer as a Draft that you can come back to.
- Cancel – It will discard all the information you just added in the pop-up.the pop-up.
Sorting and Filtering

There are two options to sort the Questions: “Most Recent” or “Oldest to Newest”.
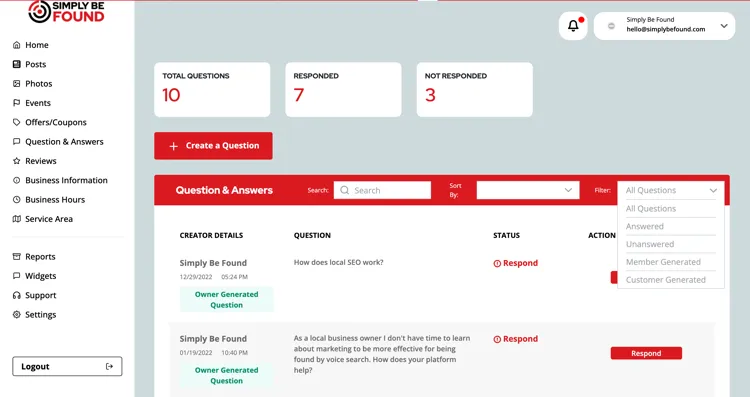
There are 5 options to filter the Questions: “All Questions”, “Answered”, “Unanswered”, “Member Generated” and “Customer Generated”.
Questions List and Details
The Questions List shows all the Questions for this business location whether they have been responded to or not. If the status is showing “Responded” in green font, it means that the question has already been answered. If the status reads “Respond” in red font, it means the question is yet to be answered.

On this view you will see the following:
- Creator Details – Name of the person who asked the question and whether it is a customer-generated question or owner-generated question.
- Question – Question asked
- Status – can be “Responded” or “Respond”. Below it is the time of its creation.
- Actions – actionable buttons that you can select to “Review”, Edit Response” or “Delete”.
Questions Actionable Buttons
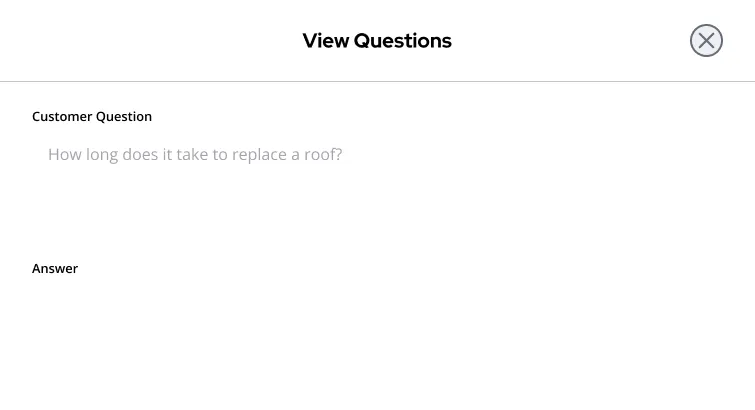
1. View Button
When the “View” button is selected, it will show a preview of the Question asked and Your Answer as shown in the example image below.
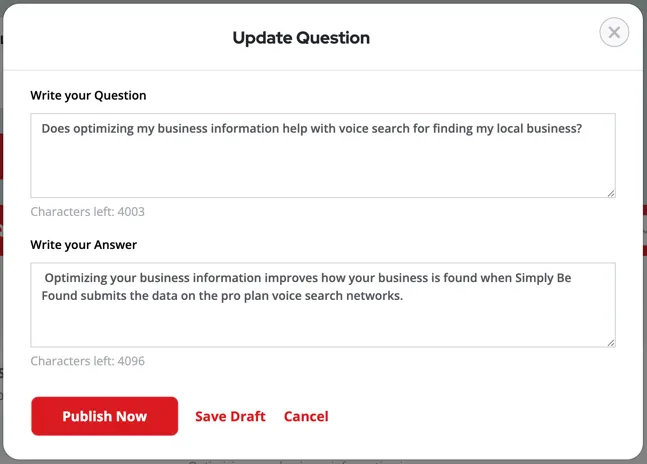
2. Edit Response Button
When the “Edit” button is selected, a pop-up of “Edit Response” will appear, and the Question-and-Answer details can be updated from here. You may change/update the question if it is an owner-generated question. See the example image below.
3. Delete Button
When the “Delete” button is selected, a pop-up like an example below will appear. This is to ensure that no Question-and-answer will be accidentally deleted at one click.
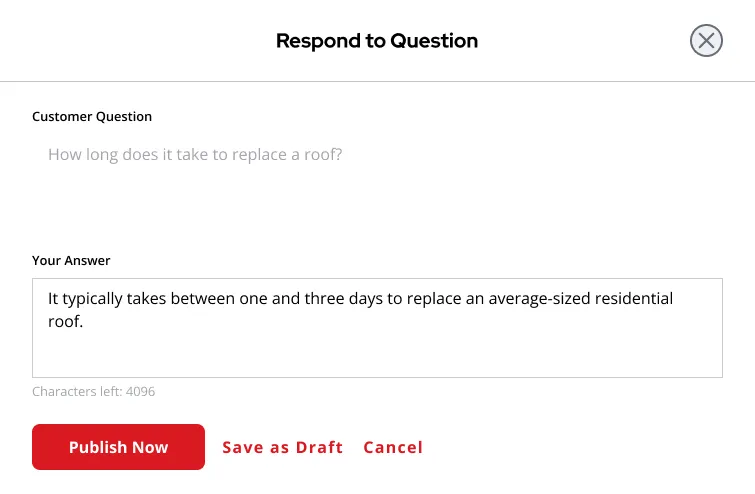
4. Respond
When the “Respond” button is selected, a pop-up like the example below will appear. In this pop-up you can write your answer to the Question then publish it, save as draft or cancel.
Simply Be Found Reviews
On the left side panel, select “Reviews”. This will at once load the Reviews Page on your screen.
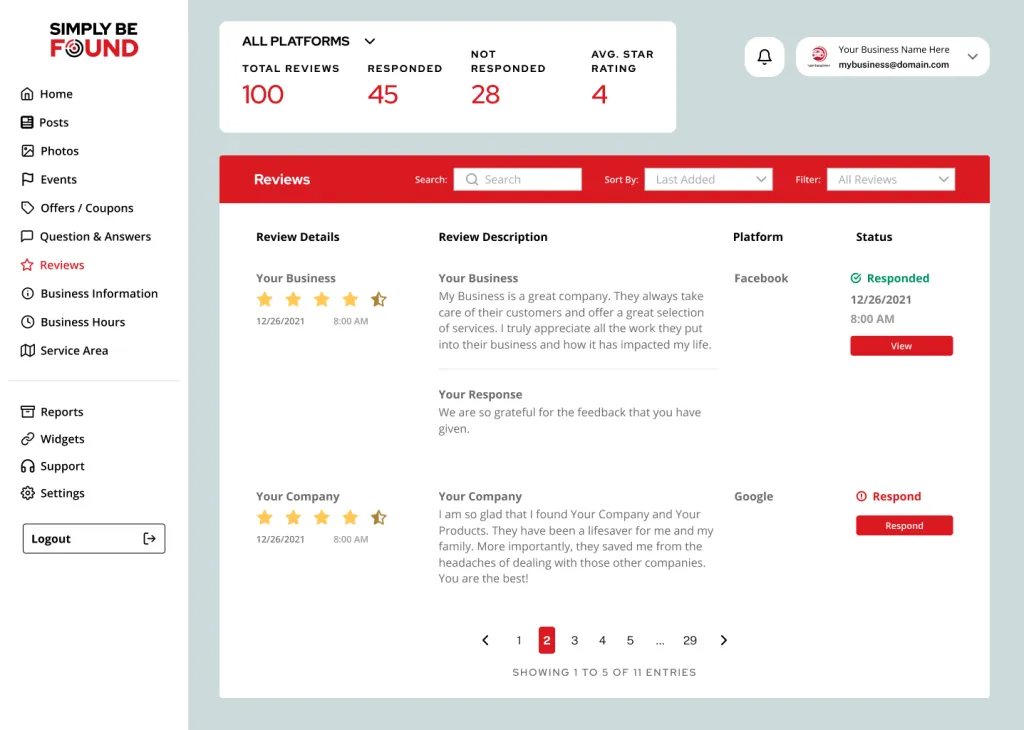
This page is where the list of all Reviews can be found. At the top left is the summary of your Reviews data and the option which platform reviews you want to view.
Sorting and Filtering
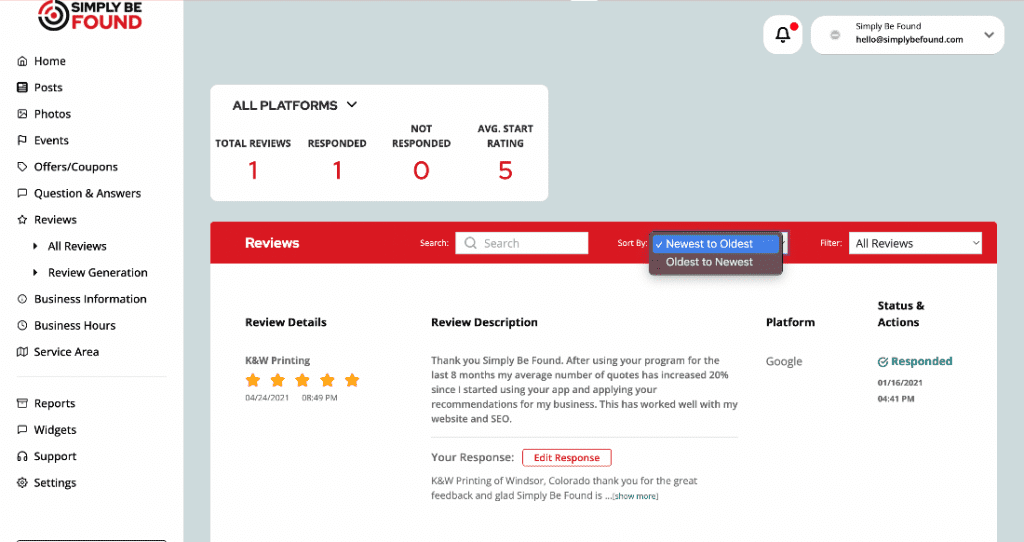
There are two options to sort the Reviews: “Newest to Oldest” or “Oldest to Newest”.
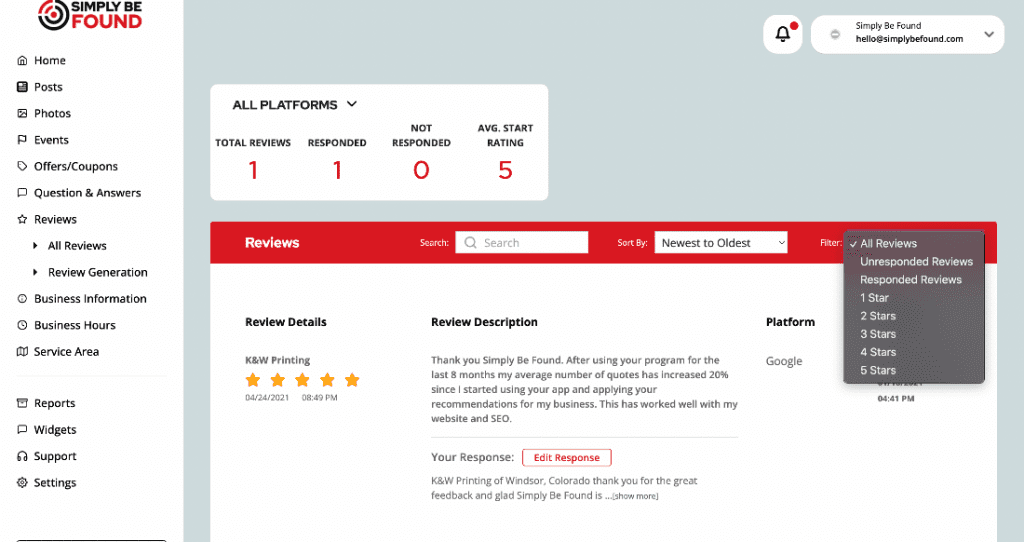
Reviews List and Details
The Reviews List shows all the Reviews for this business location whether they have been responded to or not. If the status shows “Responded” in green font, it means that the review has already been responded to. If the status reads “Respond” in red font, it means the review has not been responded to.

On this view you will see the following:
- Review Details – Name of the person who asked the question, the rating and when it was given.
- Review Description – Review details
- Status – can be “Responded” or “Respond”. Below it is the time of its creation.
- Actions – actionable buttons that you can select.
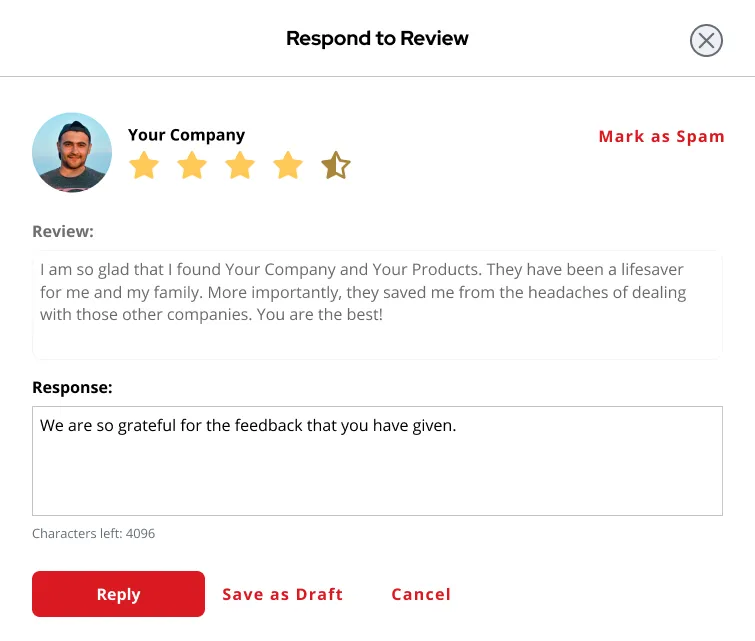
Review Actionable Buttons
1. Respond/Edit Response Button
When the “Respond” button is selected, it will show a preview of the Review and Response. You will also be able to edit your response here as shown in the example image below.
Review Generation
On the left side panel, select “Reviews” then click on “Review Generation”. This will at once load the Review Generation Page on your screen.
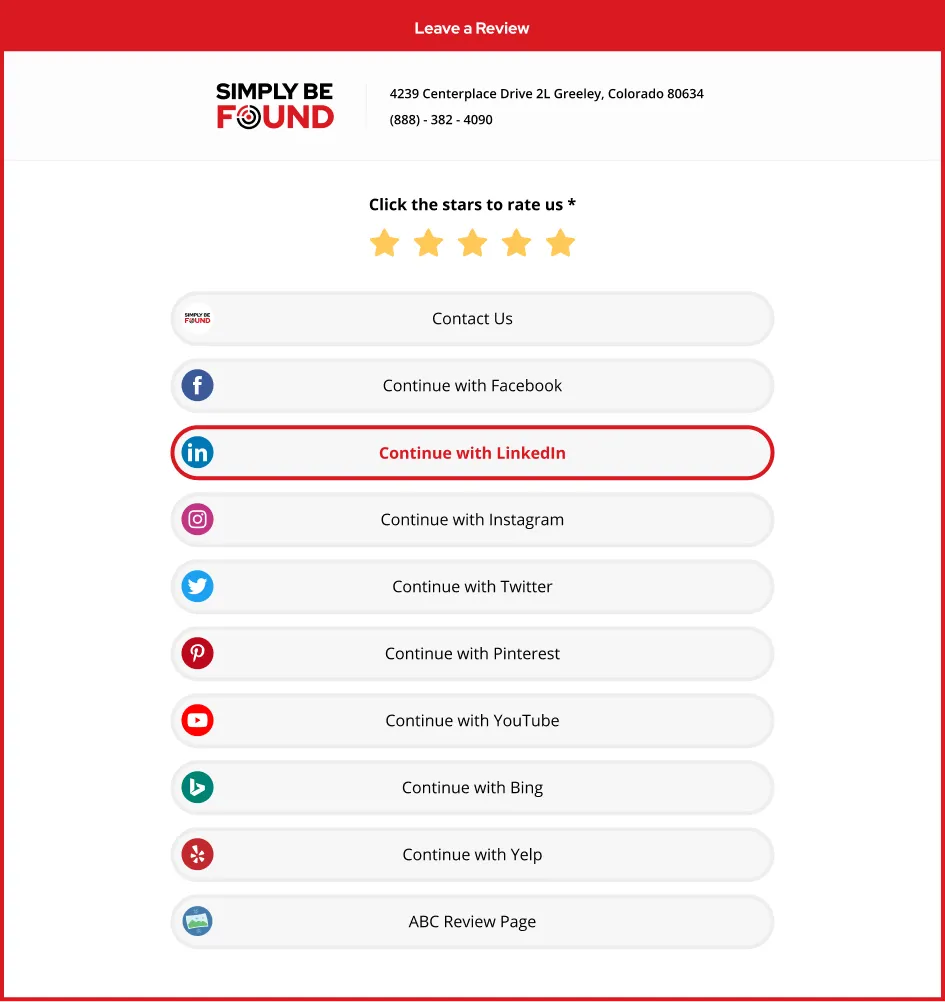
This tool allows you to create a Review Request Page that you can share with your customers to ask for a review via URL or QR Code.
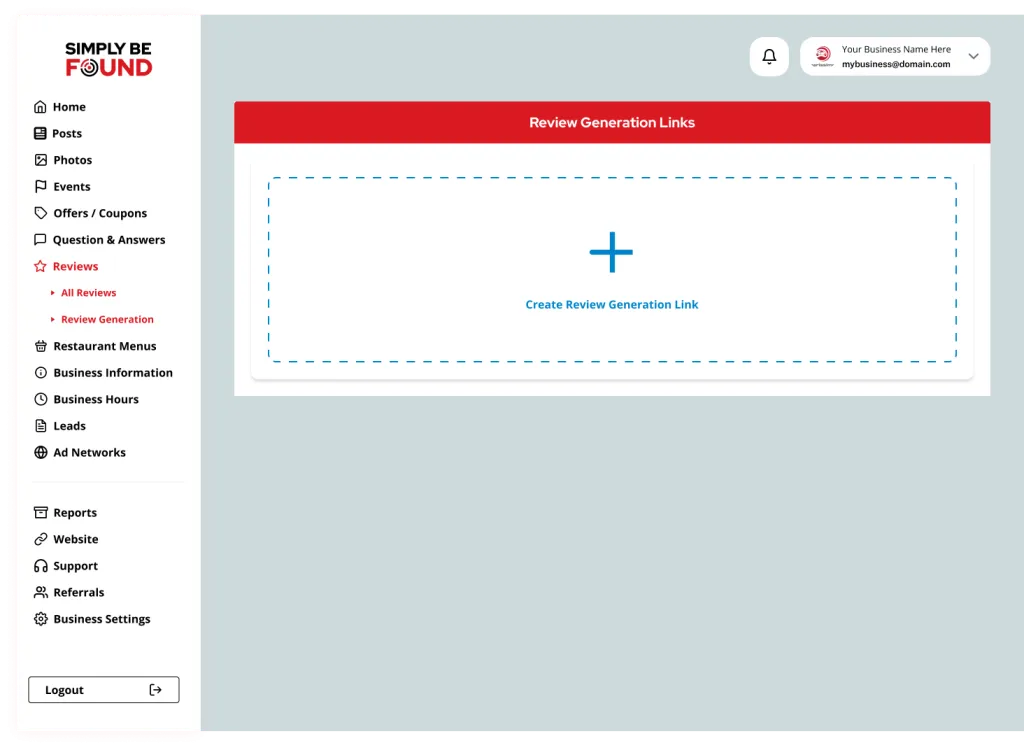
On this view you will see the following:
- Review Generation Title – The title will be displayed on the top part of the review page.
- Review Generation Link
- Actions – actionable buttons that you can select.
- Copy Link Item
- Download QR Code
- Edit
- Delete
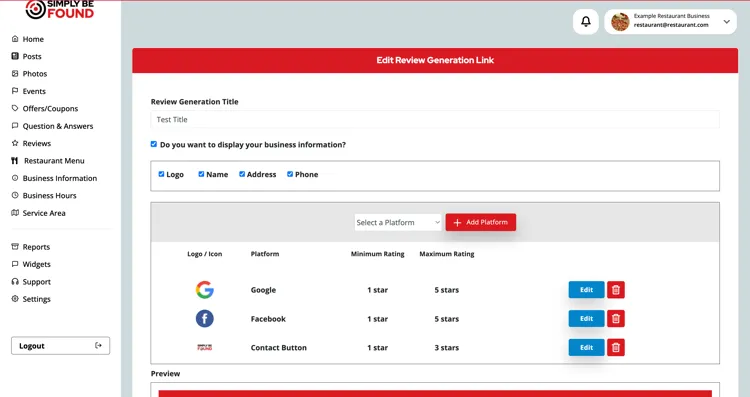
Creating Review Generation Page
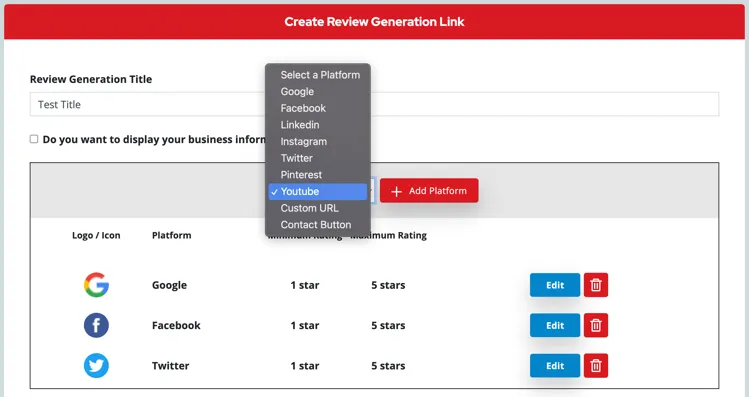
To create a Review Generation Page, click the “Create a Review Request page” button at the center of the screen and you will be redirected to the Create Review Generation Link Page.
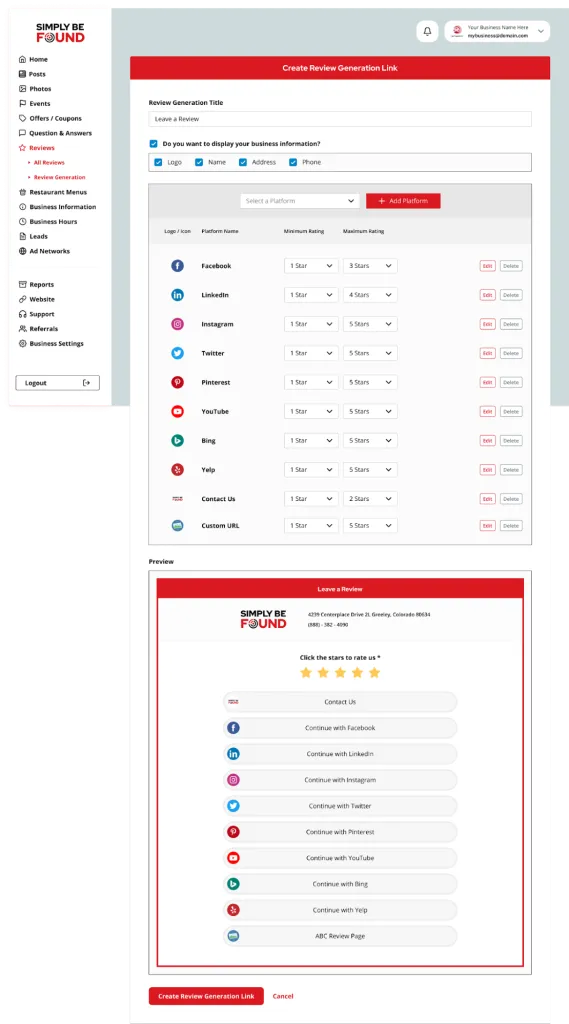
Fill in the required fields to create the Review Page.
- Write your Review Page Title in the Review Generation Title text box.
- You can have the option to display your business information via ticking the “Do you want to display your business information?”
- Logo
- Name
- Address
- Phone
- Add Platform – This will let you select a platform where you want to receive your review

The Logo/Icon section lets you change your own image.
Minimum Rating and Maximum Rating is the range wherein this platform will be displayed once the customer rates your business.
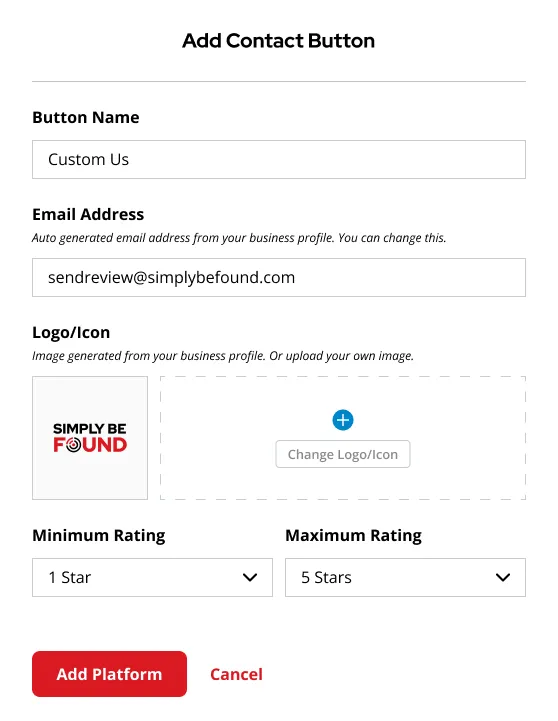
You can also add a Contact button wherein your customers can reach out to you directly if they have any concerns.
For this sample, we have set the Maximum Rating to 3 stars. The button will only appear when the customer rates you from 1 – 3 stars.
- At the bottom of the screen, there’s a section for you to preview your Review Generation Page.
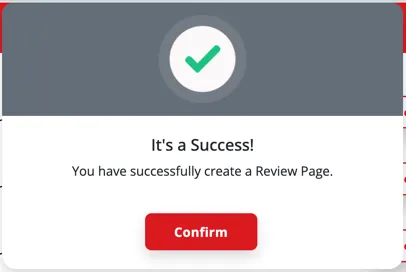
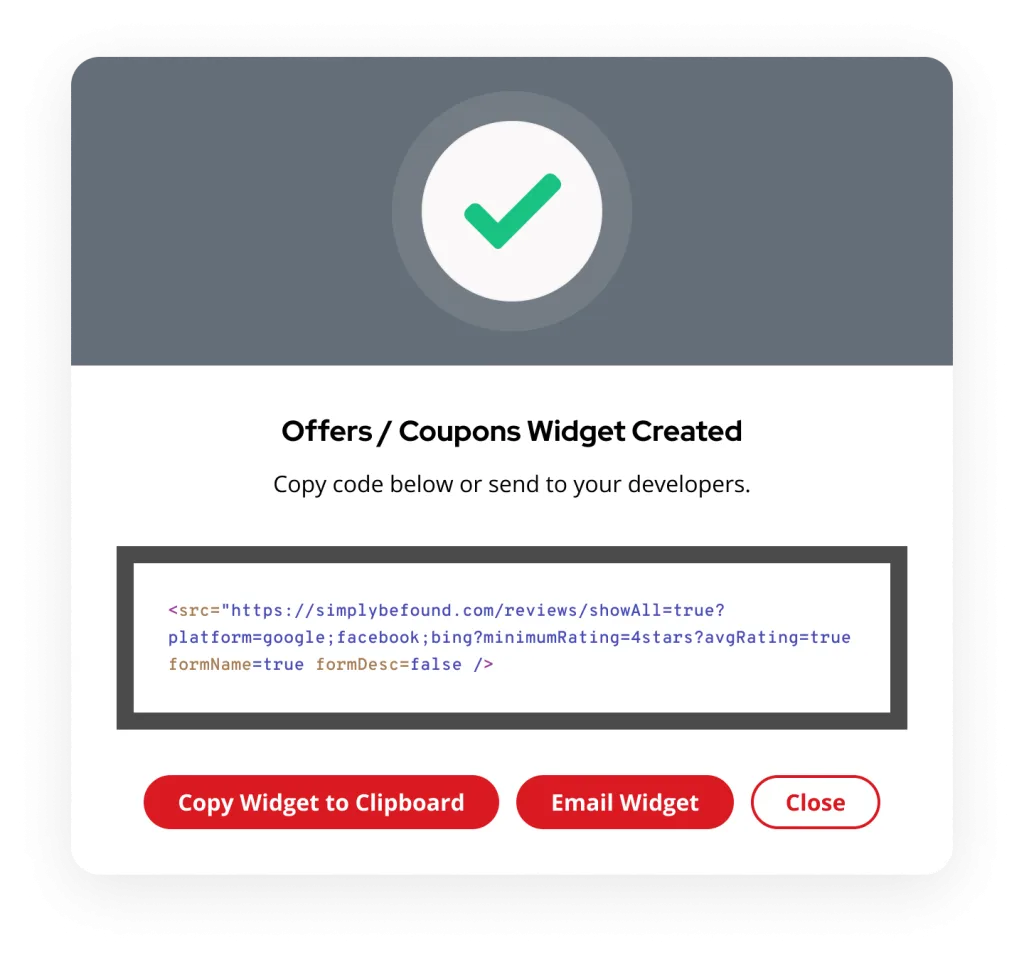
- Click “Create Review Generation Link” and a pop-up will display for successful creation.
Review Generation Actionable Buttons
- Copy Link Item Button
When the “Copy Link Item” button is selected, the Review Request Page link will be copied to the clipboard.
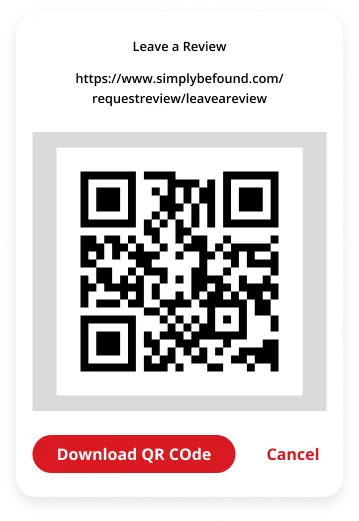
2. Download QR Code Button
When the “Download QR Code” button is selected, a pop-up window of the QR Code will be displayed and can be downloaded by clicking the “Download” button.
3. Edit Button
When the “Edit” button is selected, you will be redirected to the Edit Review Generation Link Page. You may change/update the details of the Review Request Page. See the example image below.
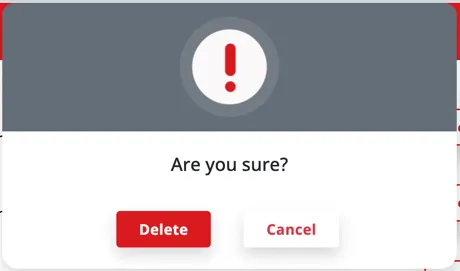
3. Delete Button
When the “Delete” button is selected, a pop-up like an example below will appear. This is to ensure that no Review Request Page will be accidentally deleted with one click.
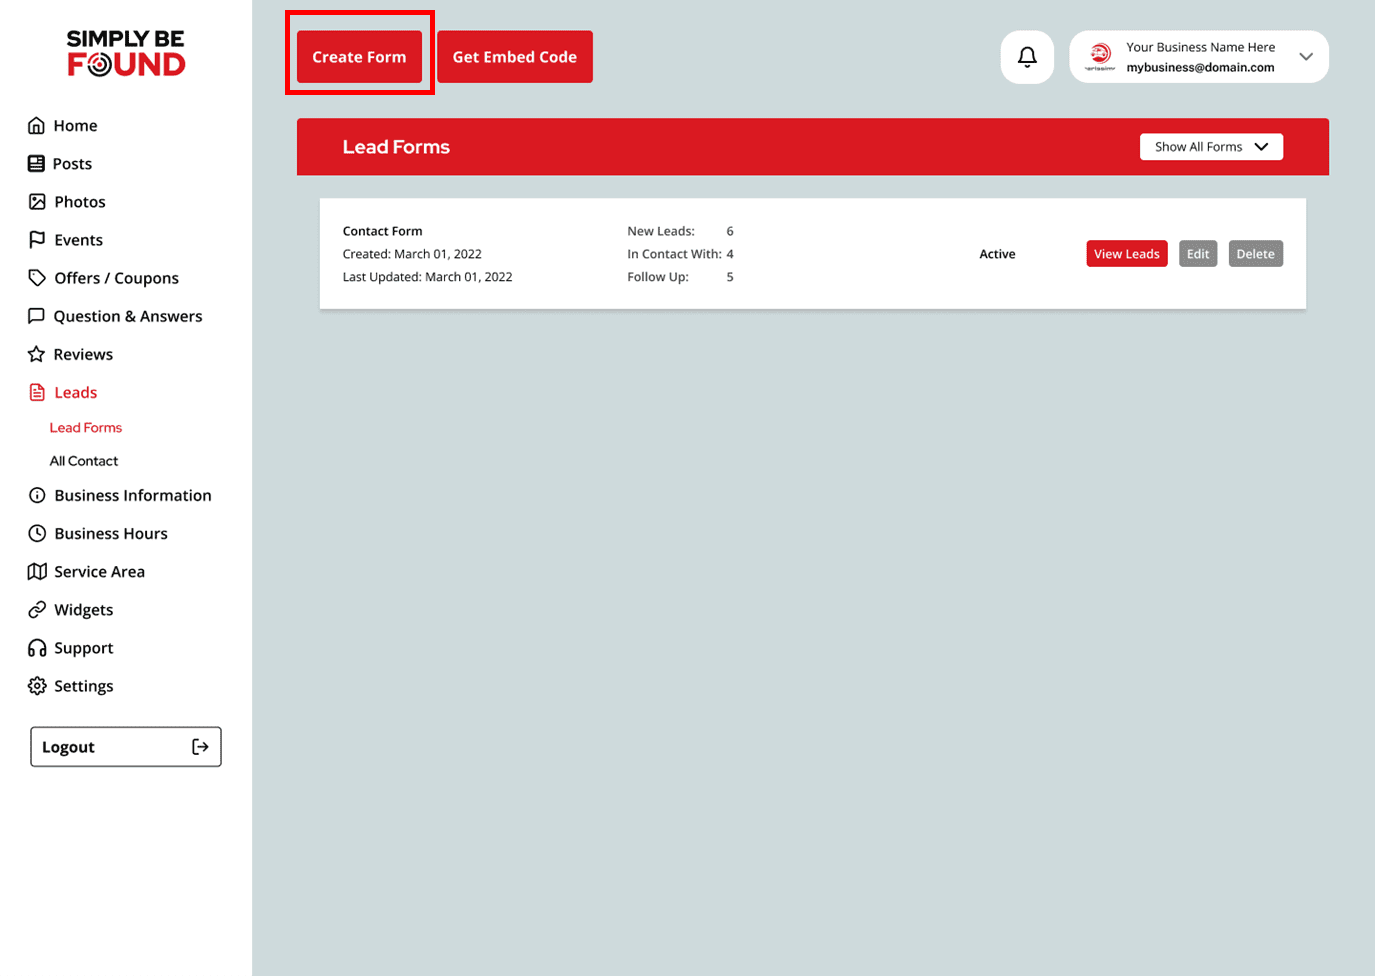
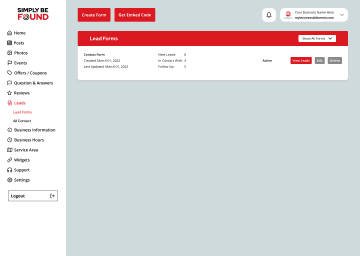
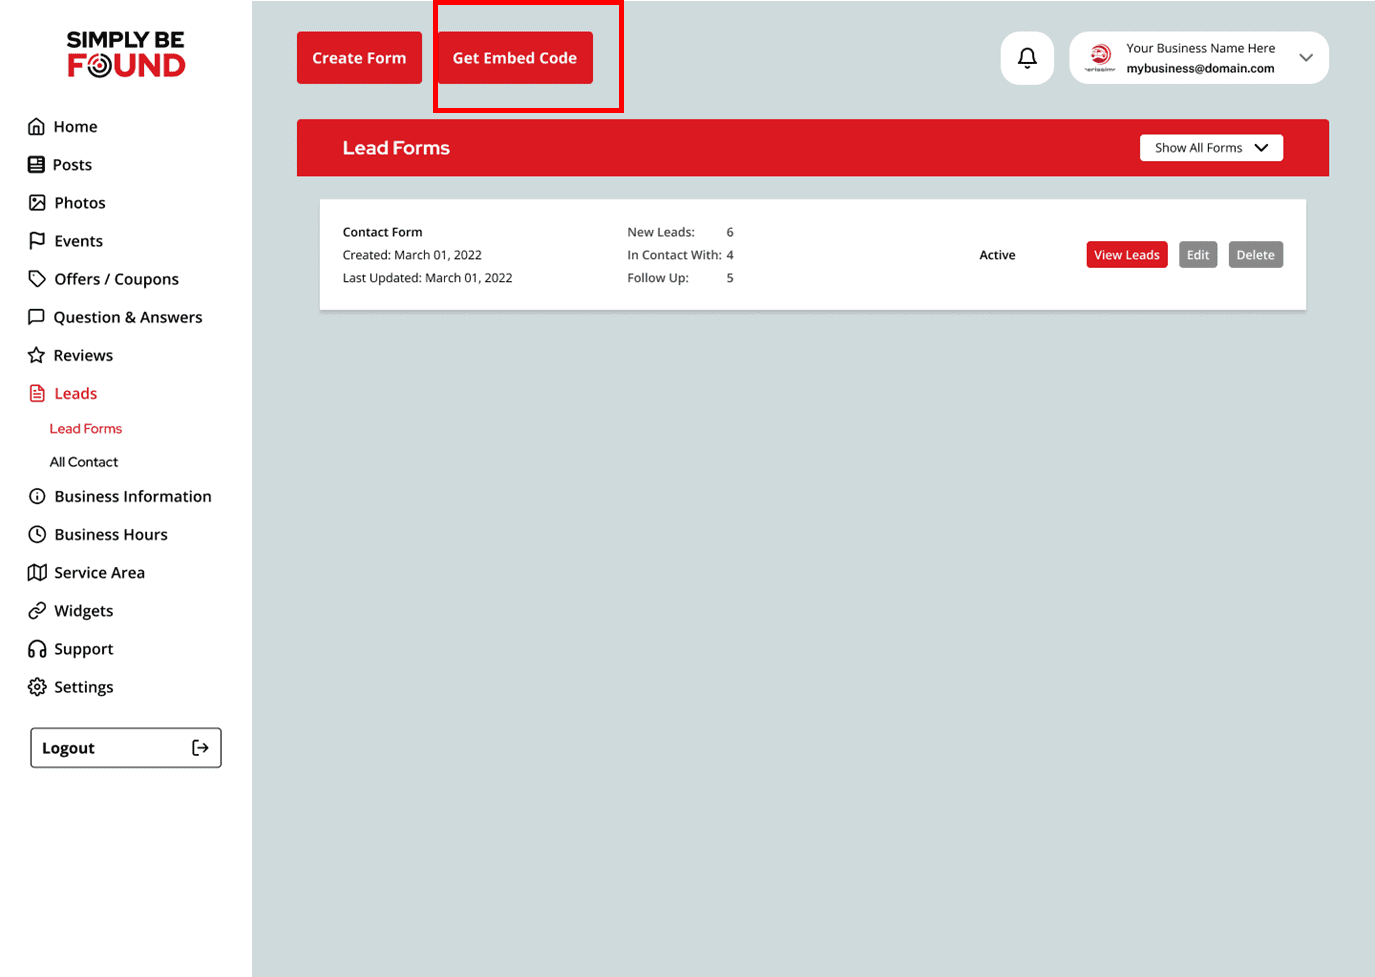
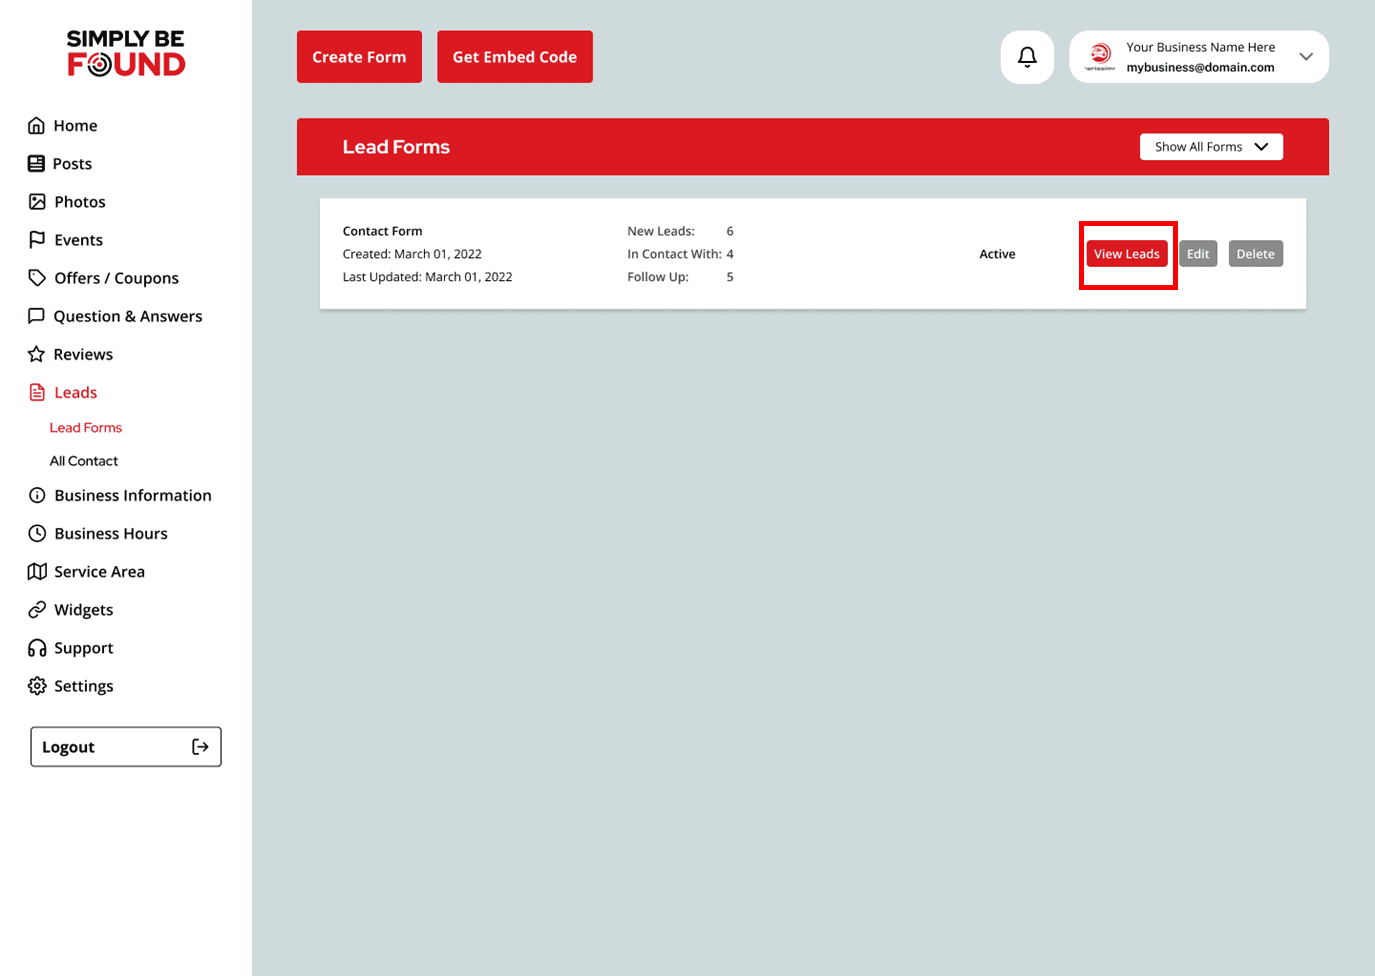
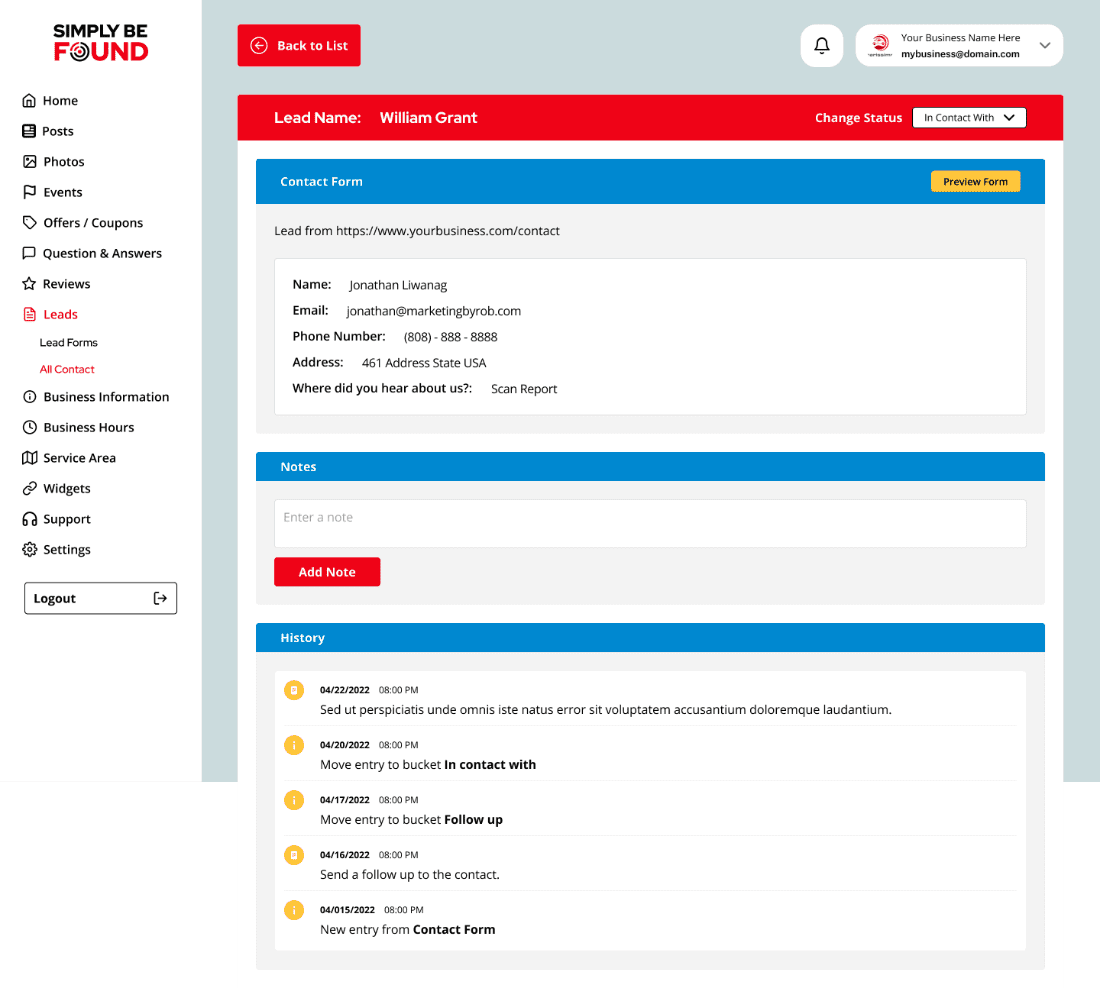
Simply Be Found Business Leads
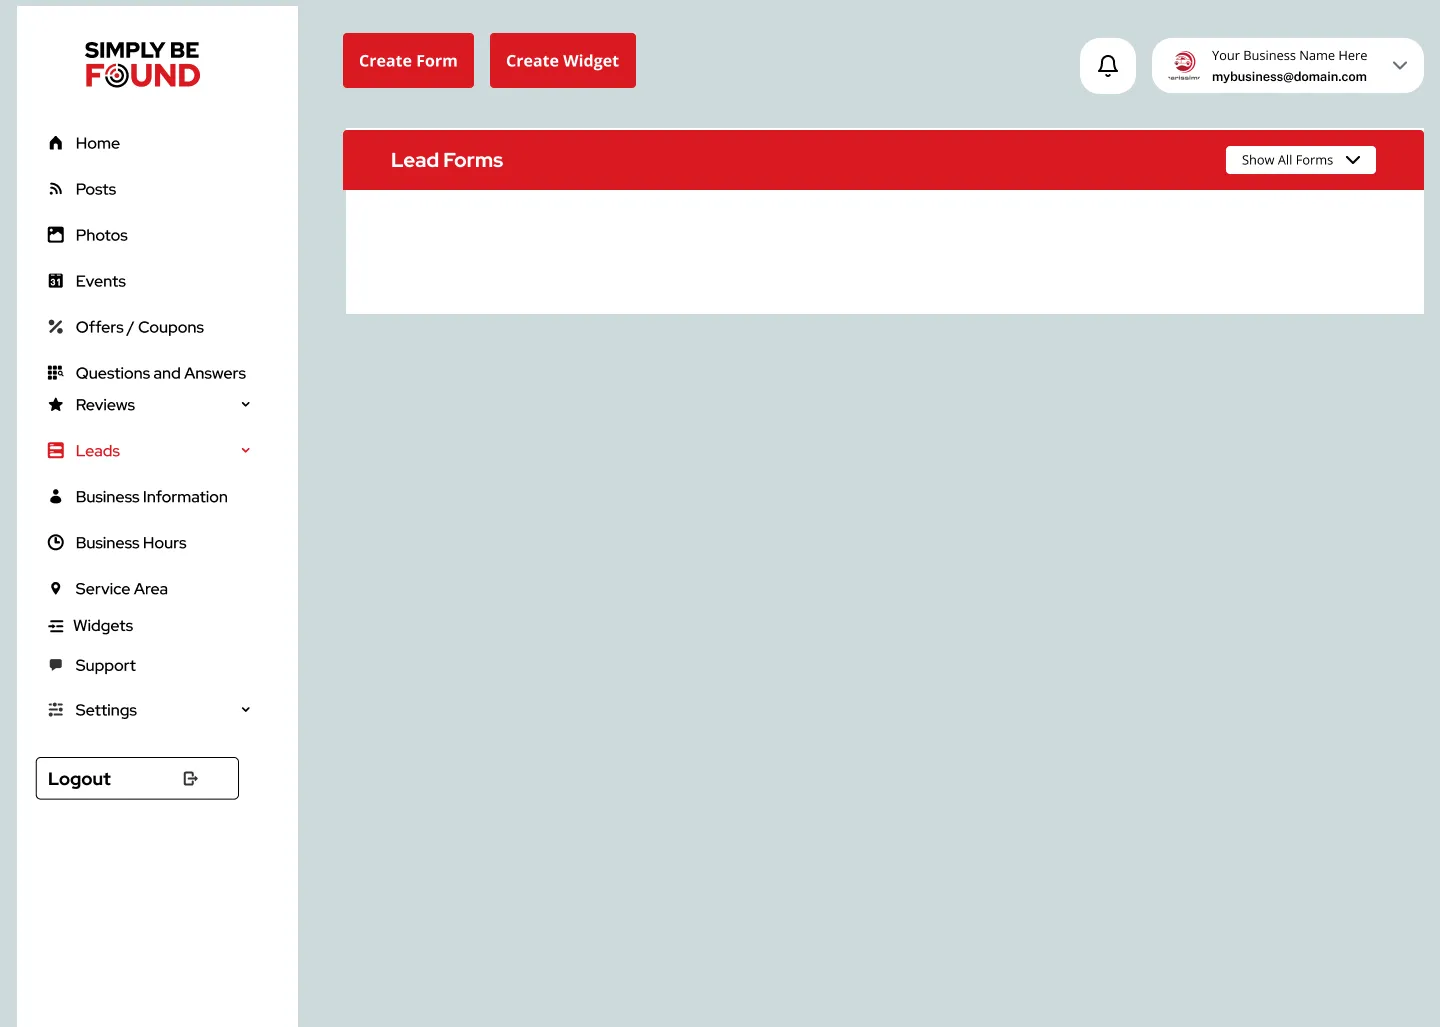

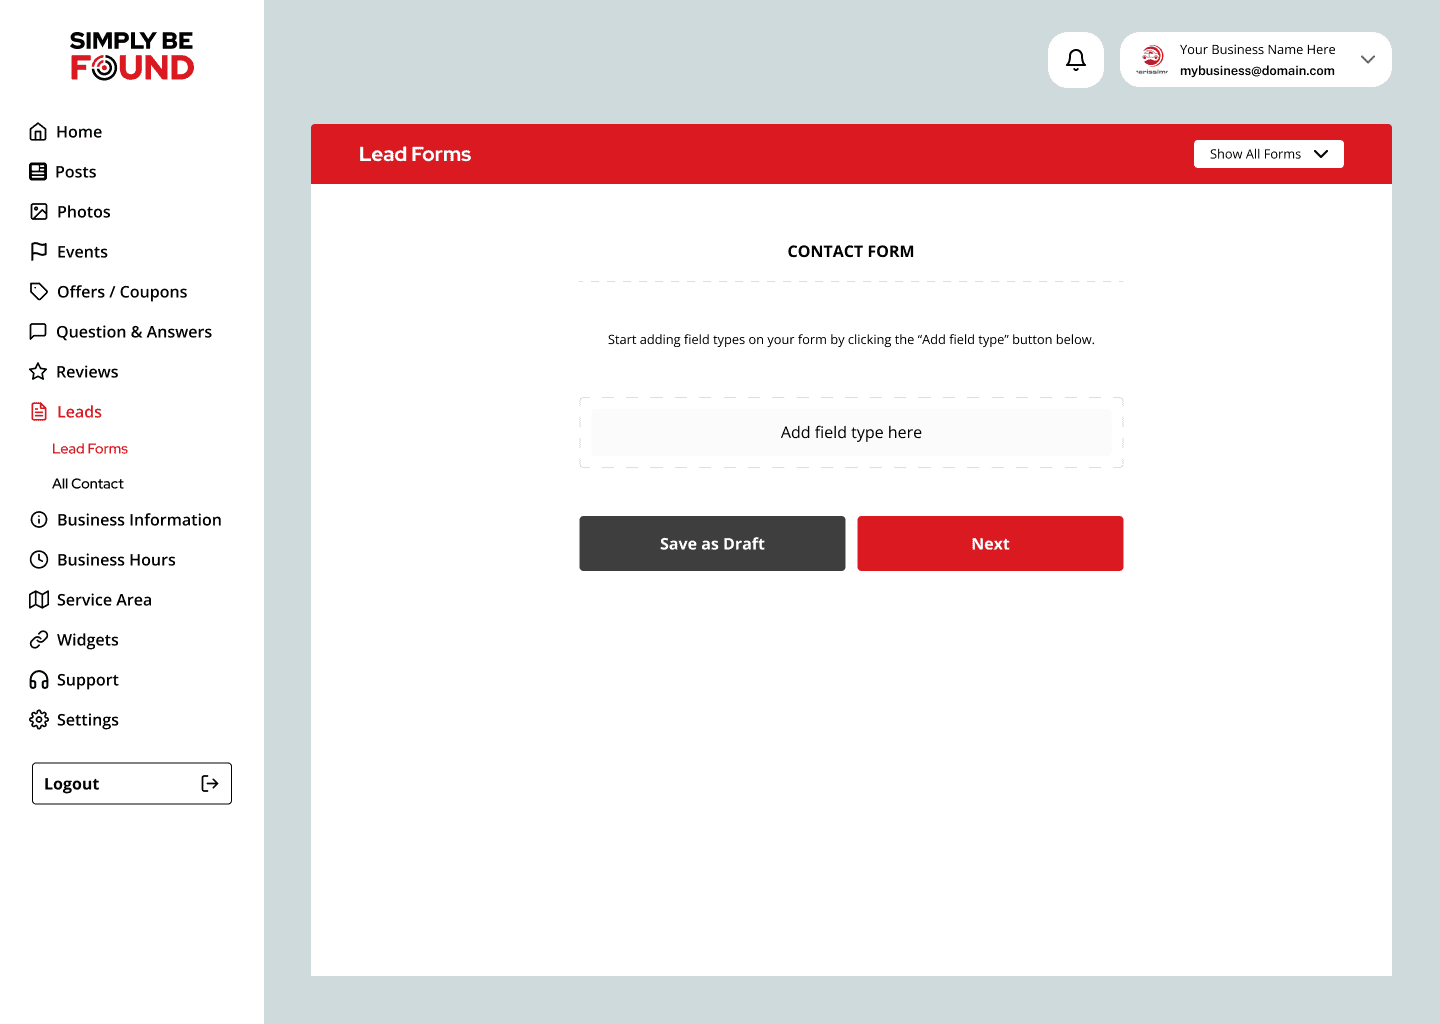
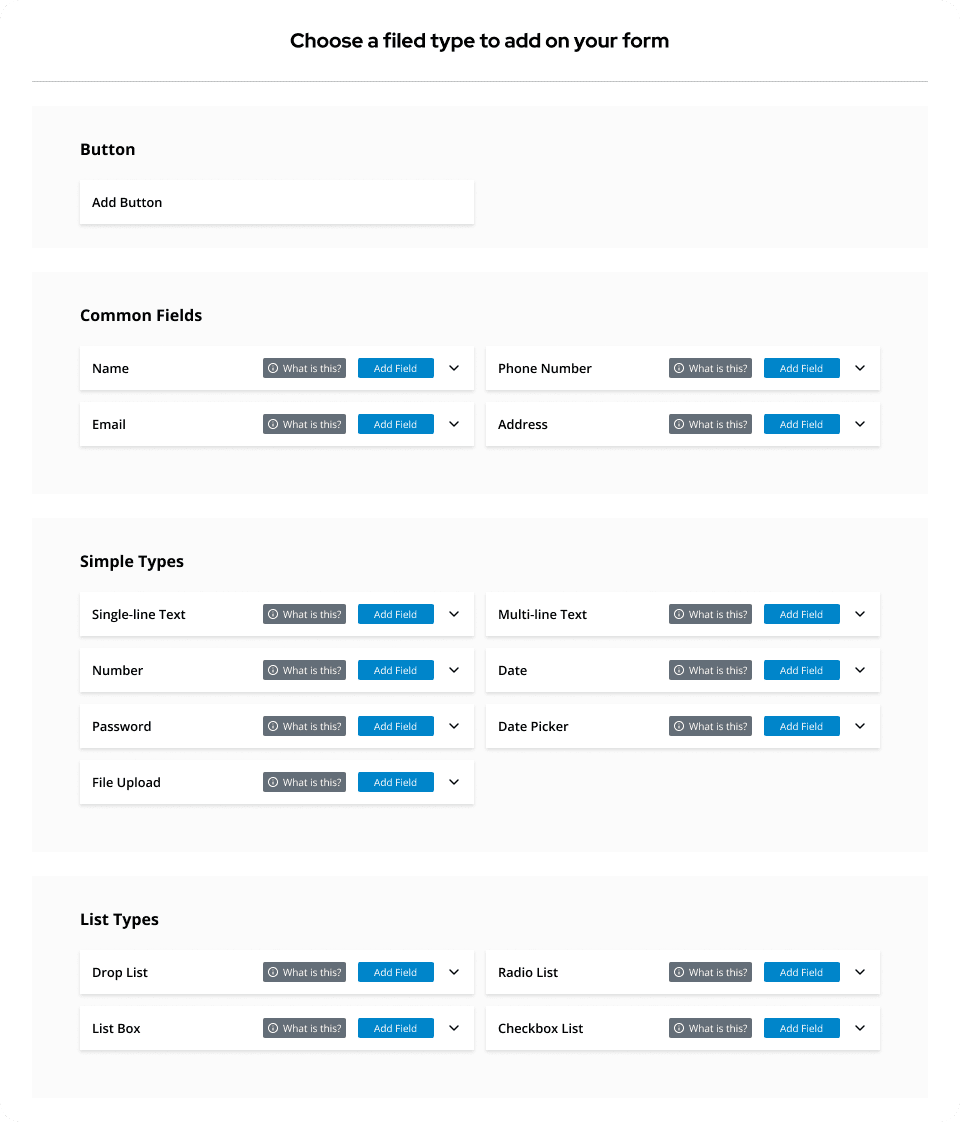
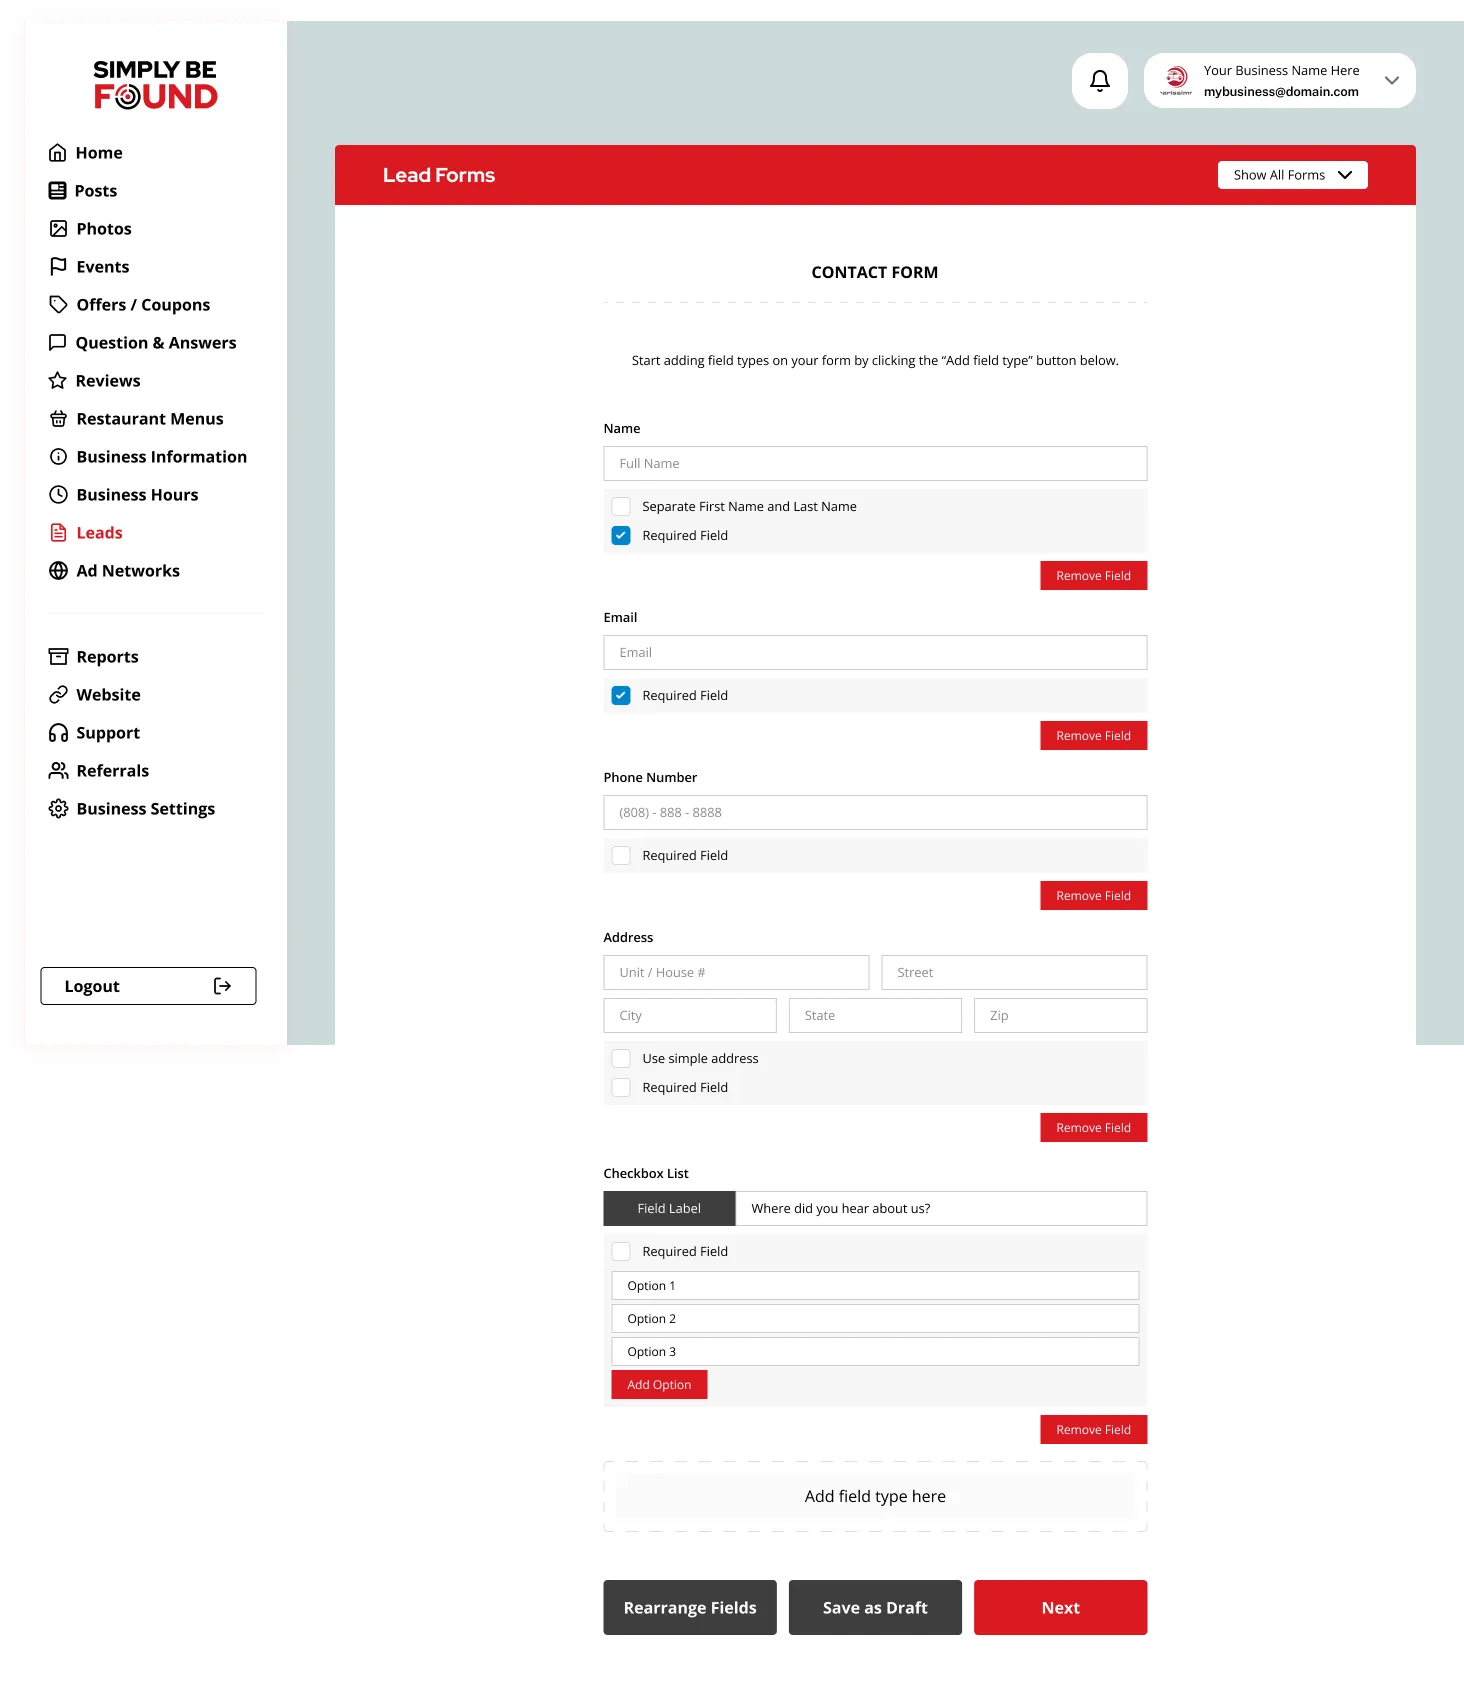
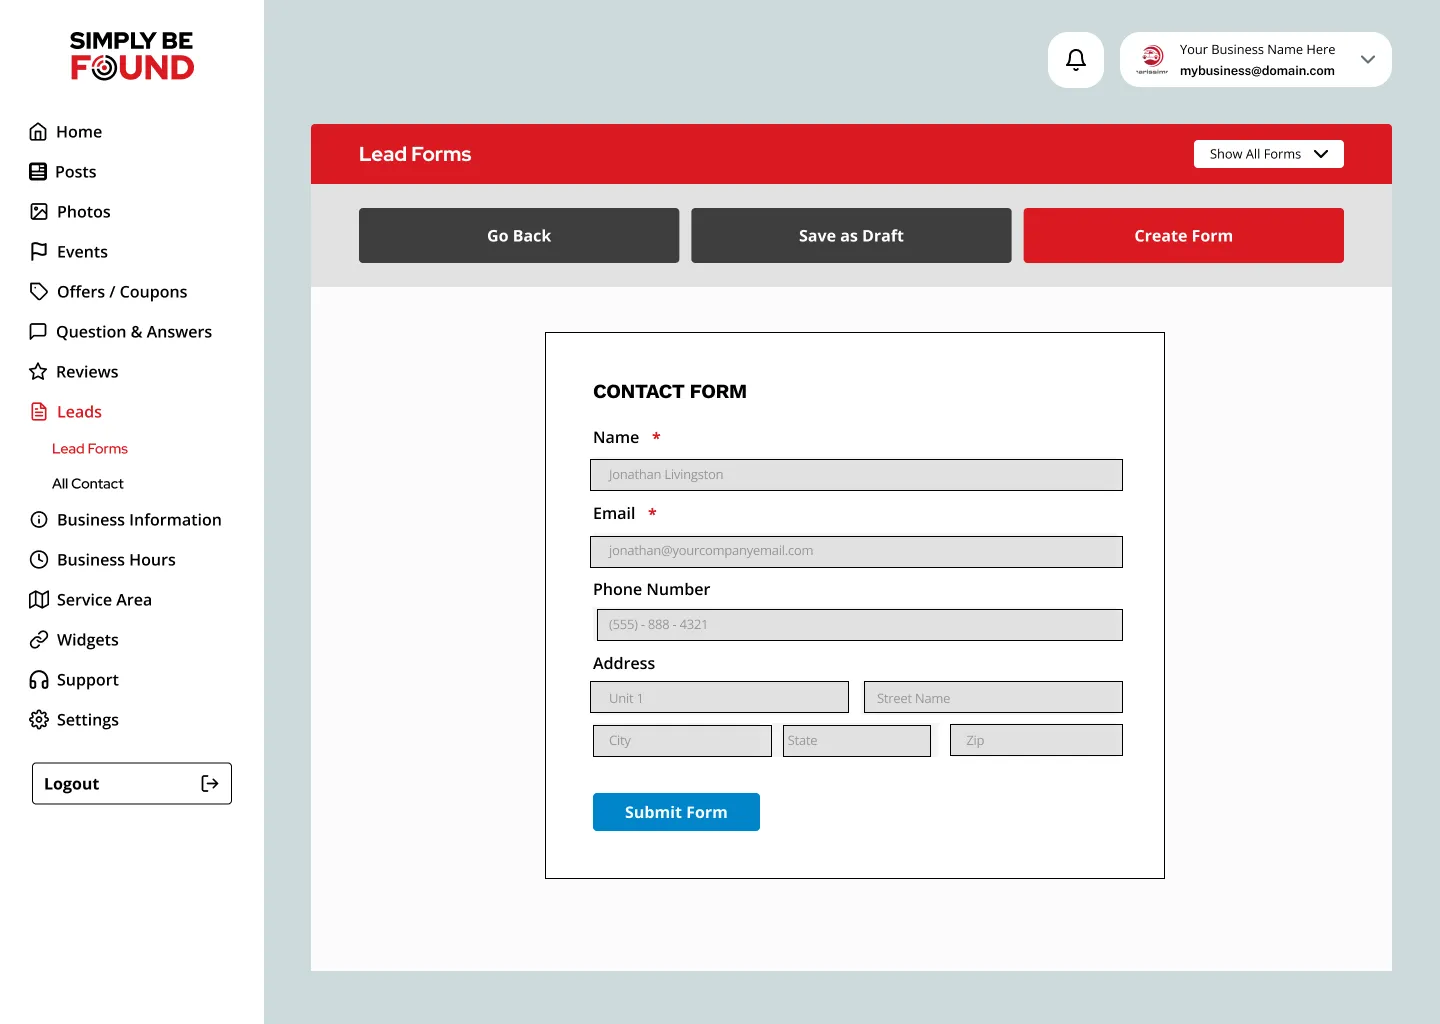
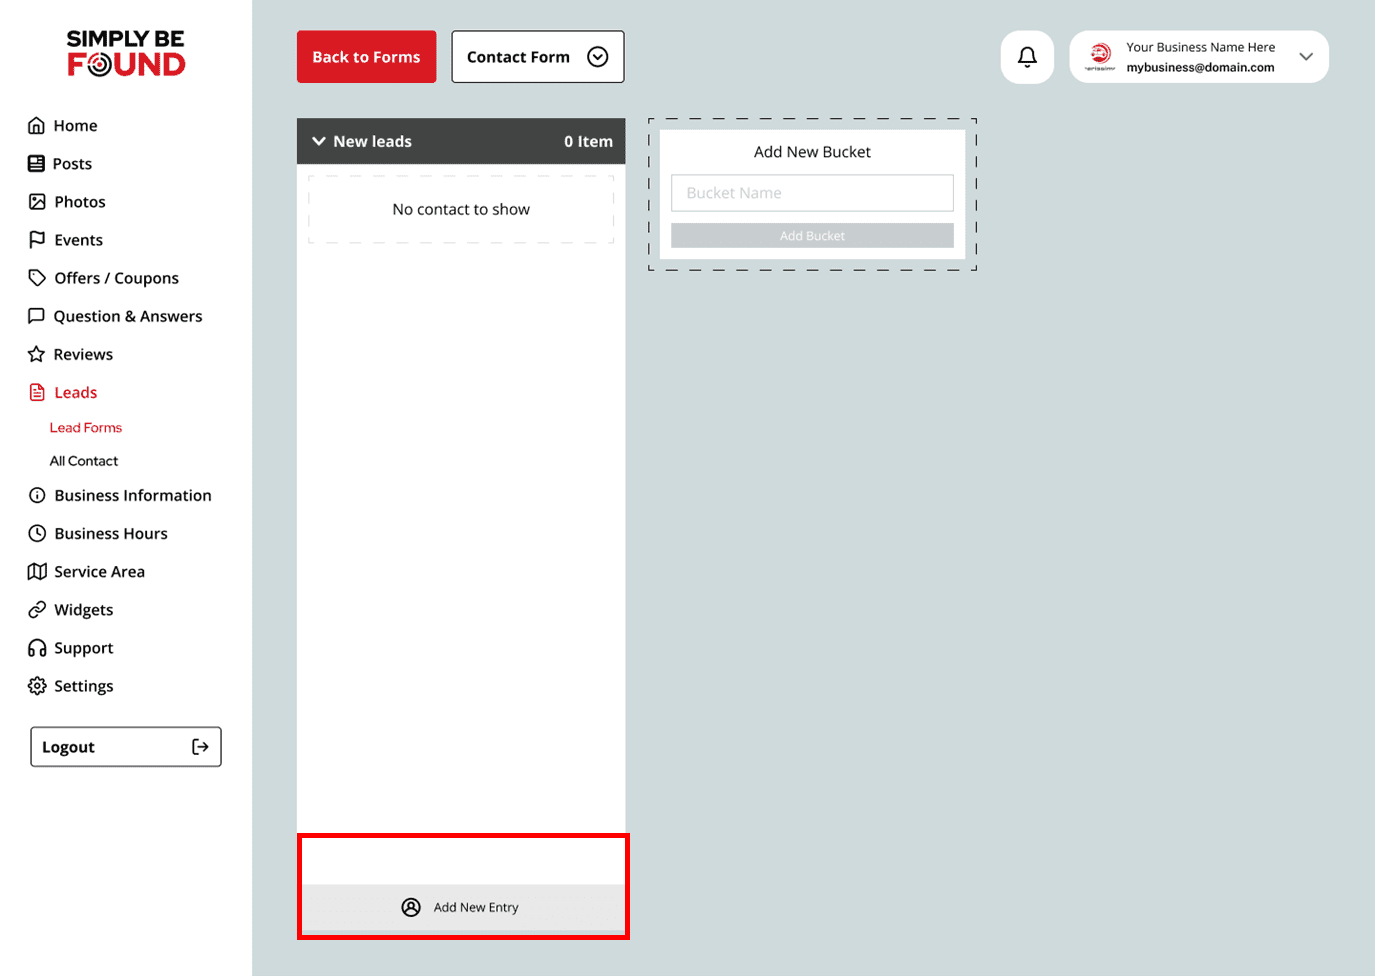
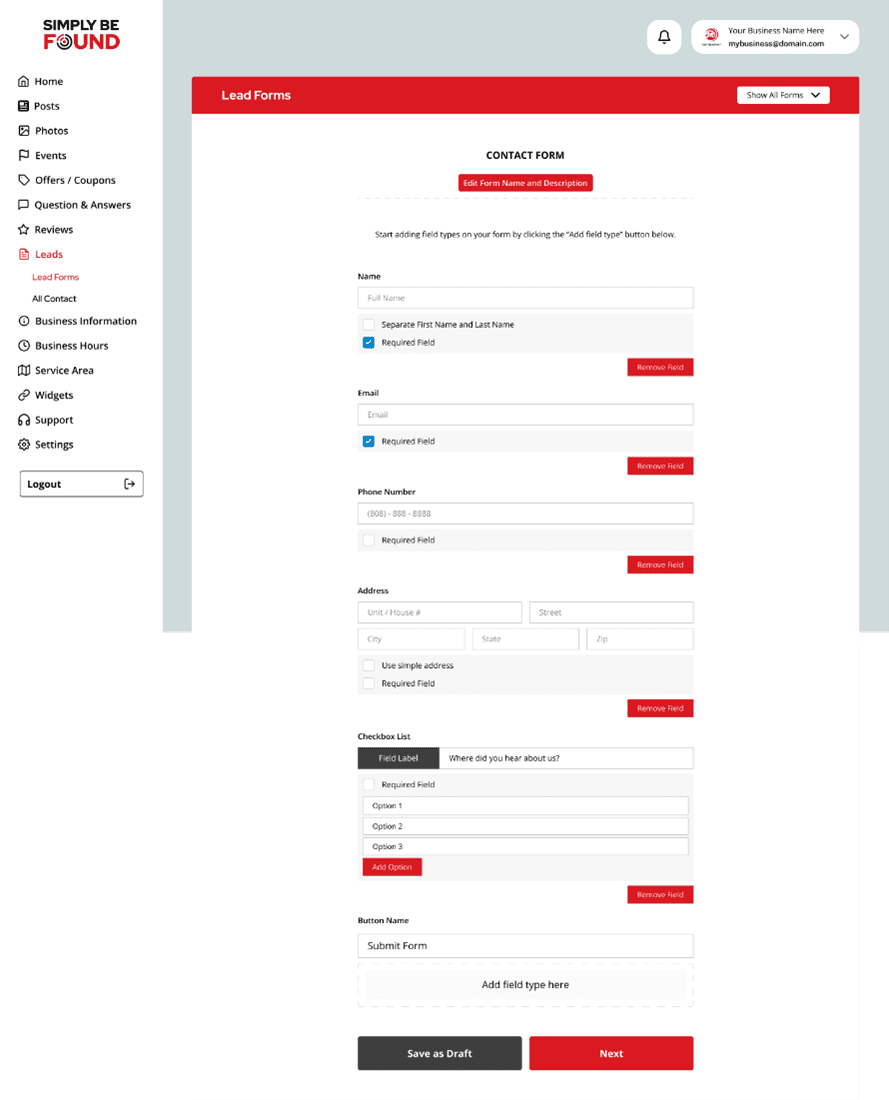
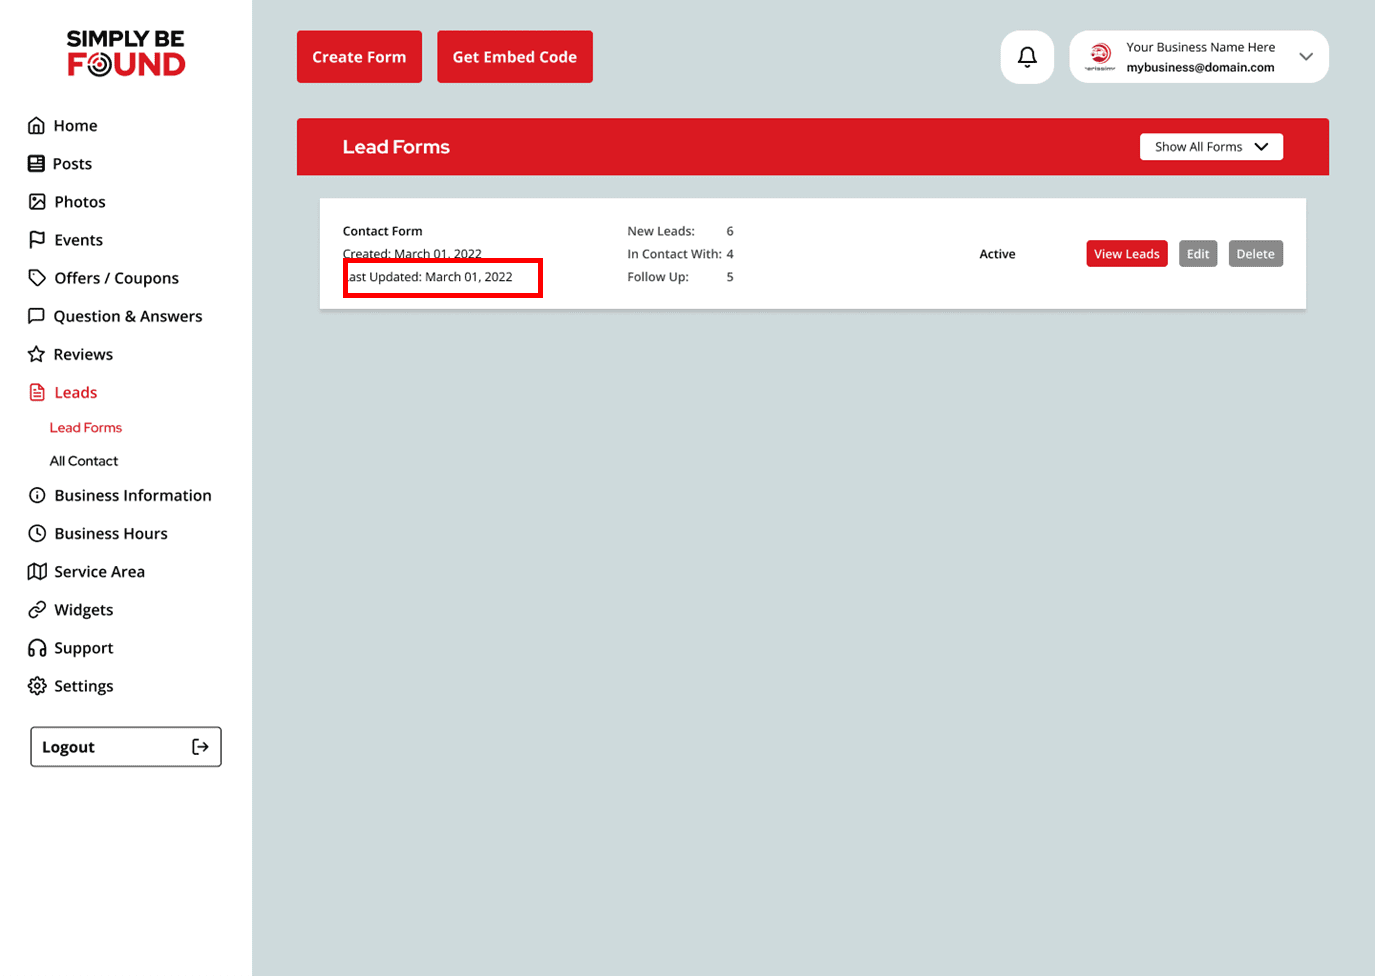
Lead Forms
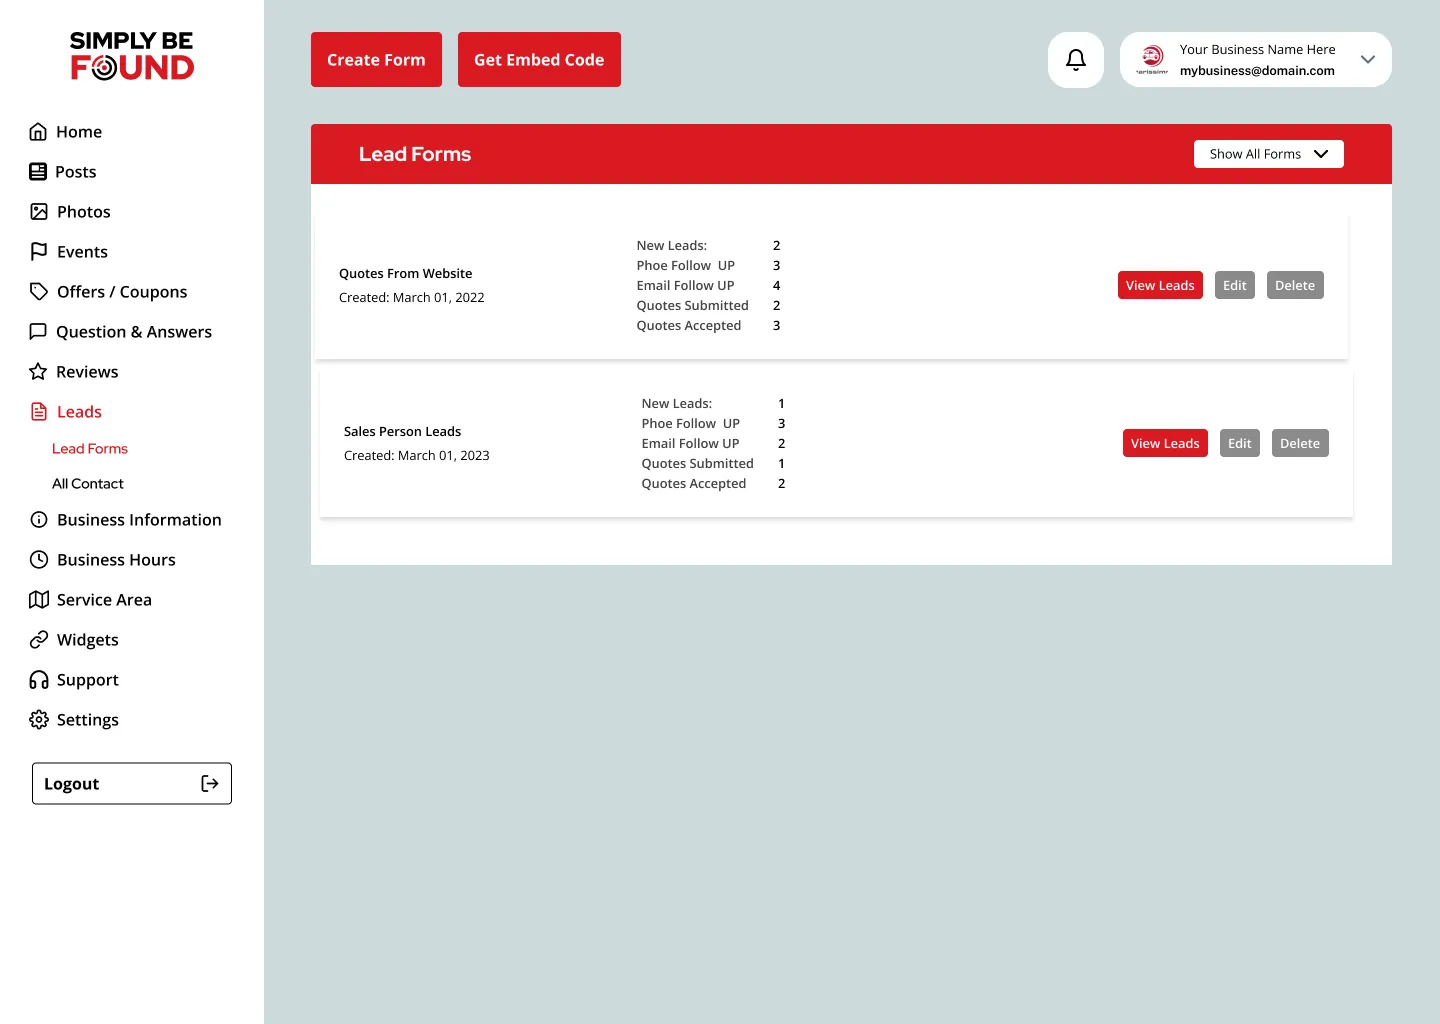
- Form Name – This column will show the name of the forms created

- Form Creation Date – This displays the date when the form was created.
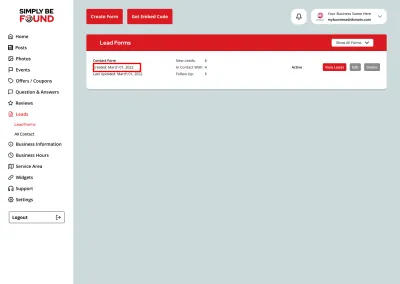
- New Leads – This column shows the number of leads per bucket inside the form.
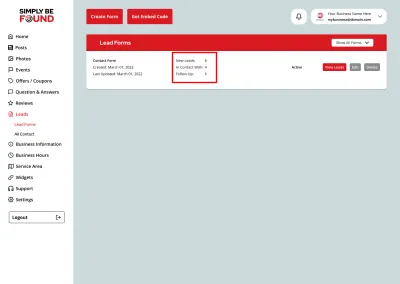
- Status of Form – Form status can be Active or Draft
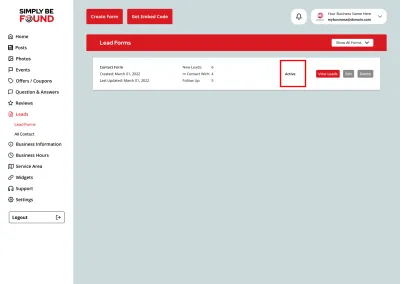
- View Leads – Once clicked, this will show the list of all the leads and the buckets created inside the form.

- Add New entry – Enables you to add a new lead

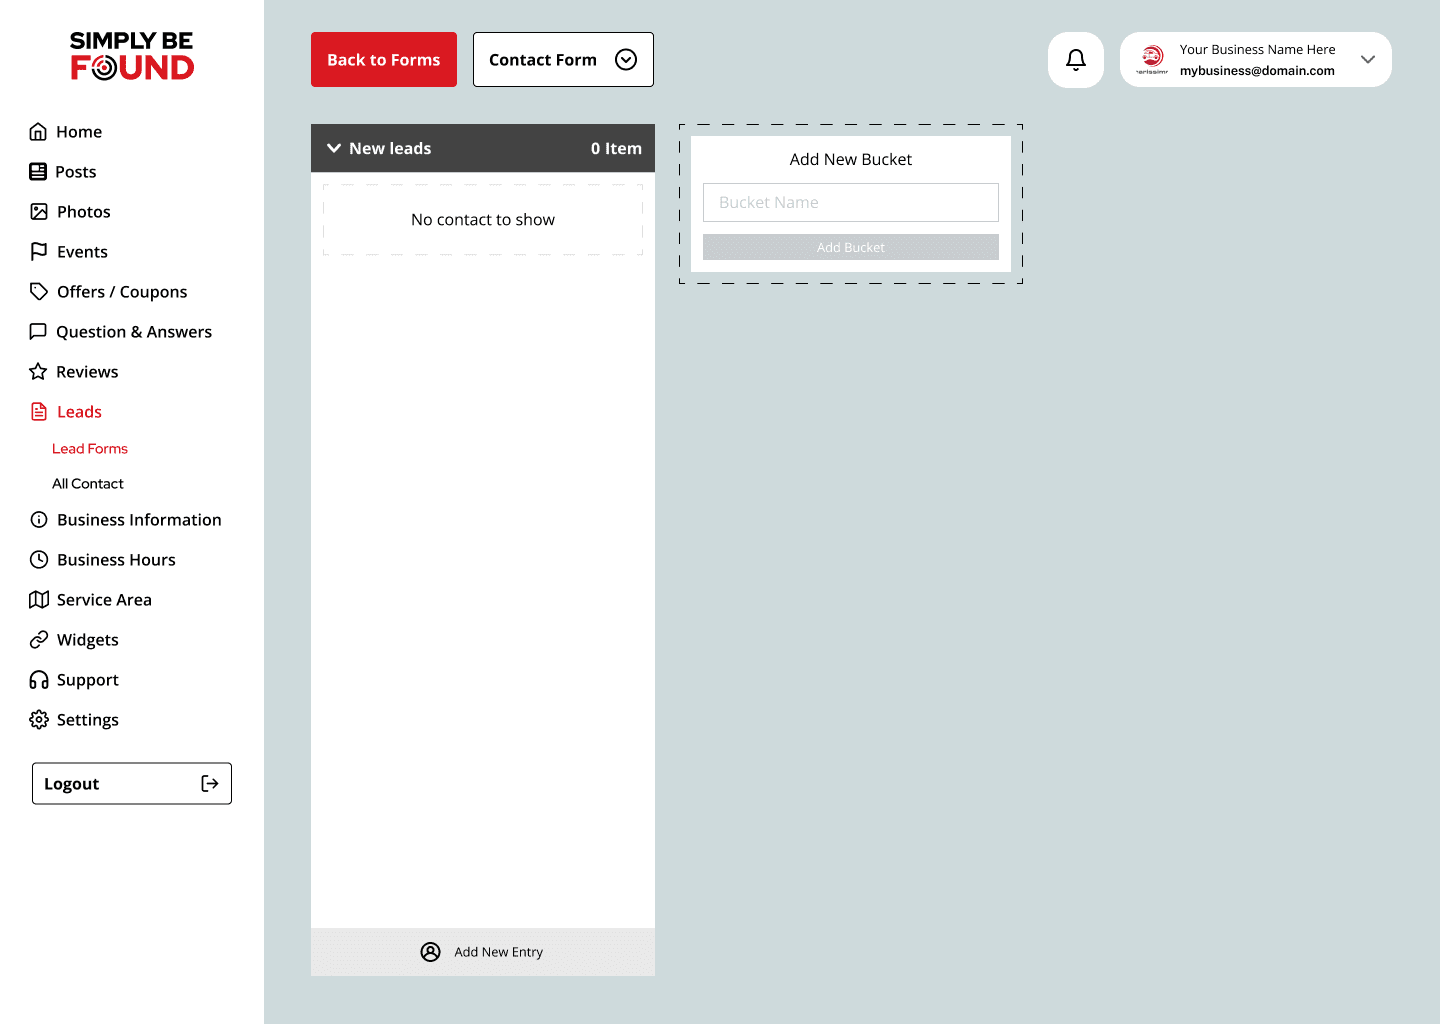
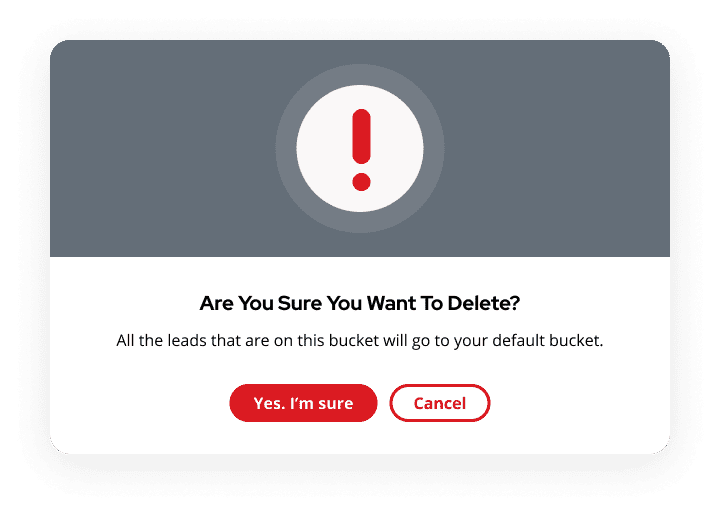
- Delete – This button will delete the form created along with the leads inside the form.

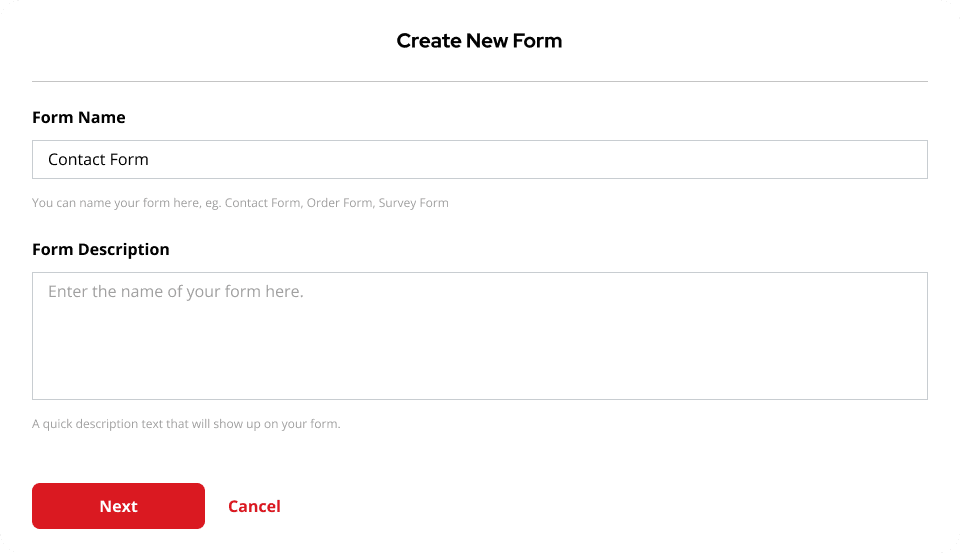
Create Form
Step to Create Form
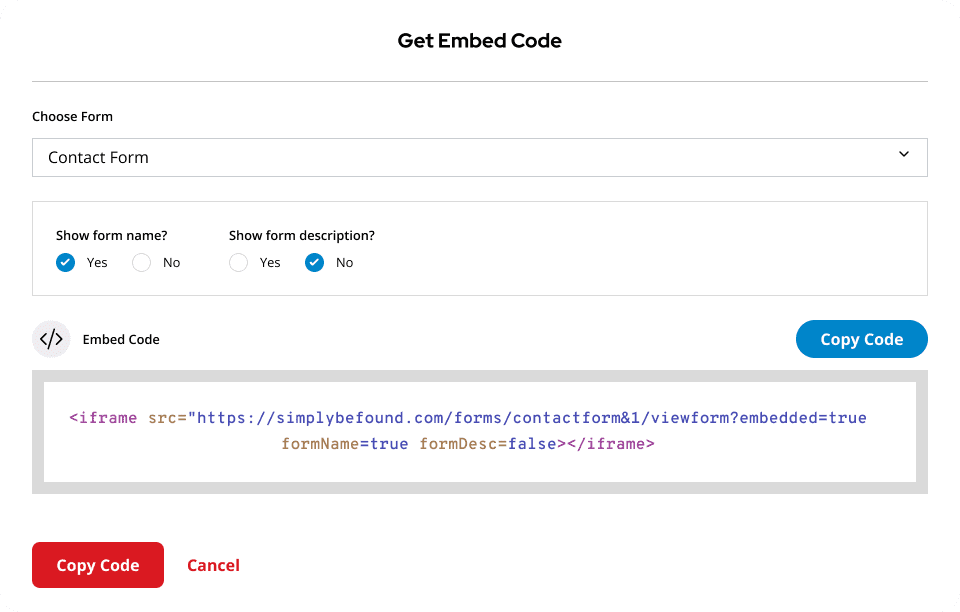
Get Embed Code
View Leads
Step to Add New Leads


Steps to Edit Form

All Contacts
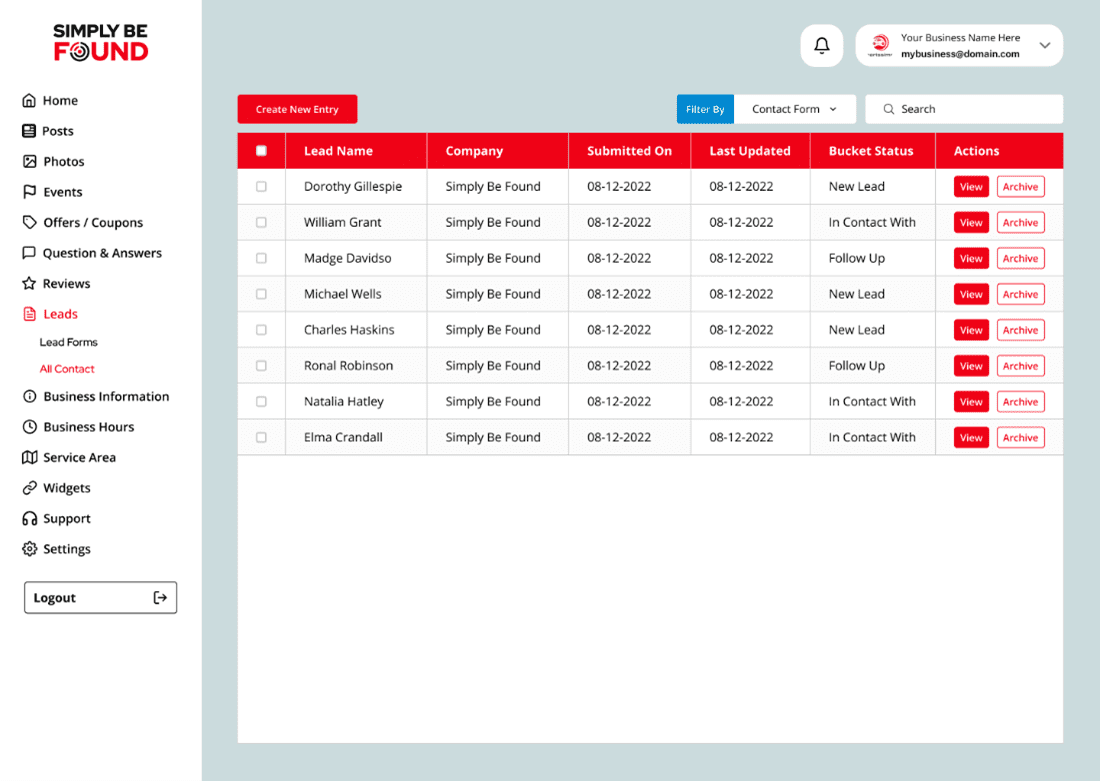
- Create New Entry – This is the button to click should you want to add leads
- Company – This column displays the company name of the lead added
- Submitted On – This column shows the date the lead was added
- Last Updated – Should the information on the lead got updated, this will show the date the lead was updated
- Bucket Status – This column will show in what bucket the lead is currently in
- Actions – Actions column has two buttons, the View and Archive. Once View button is clicked it will show all the details and the update on the leads
Simply Be Found Business Information
On the left side panel, select “Business Information”. This will at once load the Business Information Page on your screen.
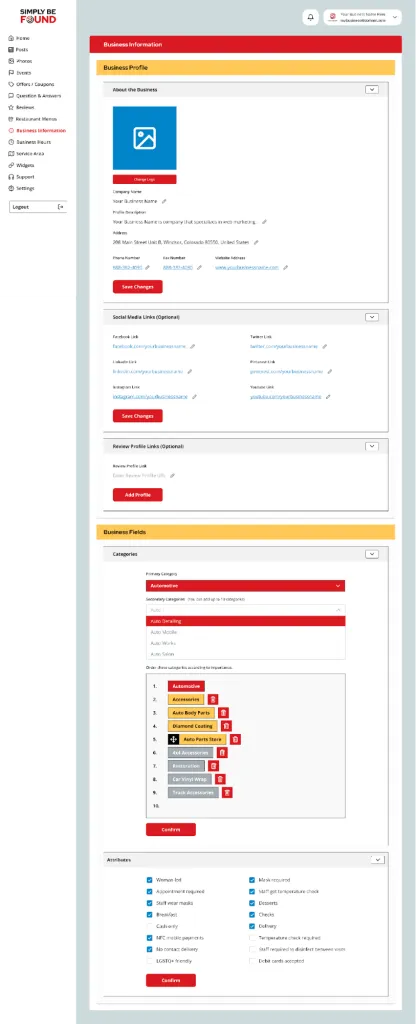
The Business Information Page shows the following:
Business Profile
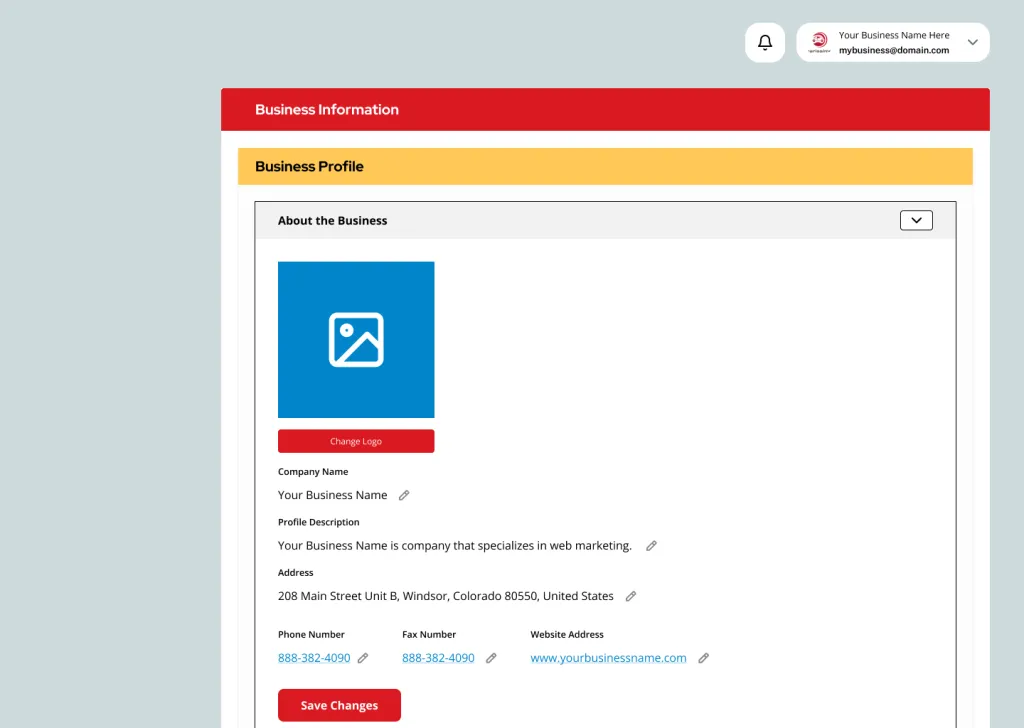
In the Business Profile section: About the Business, you can add the following information:
- Company Logo – Sits above the company name
- Company Name
- Profile Description
- Address
- Phone Number
- Fax Number
- Website
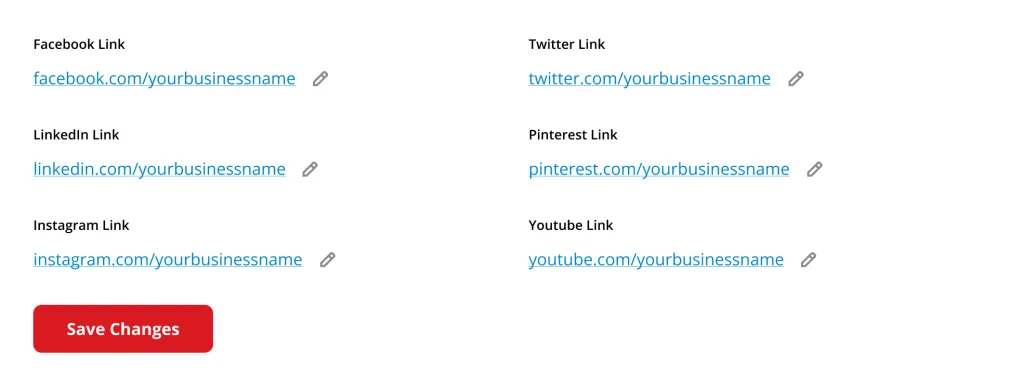
- Facebook Link
- Instagram Link
- LinkedIn Link
- Twitter Link
- YouTube Link
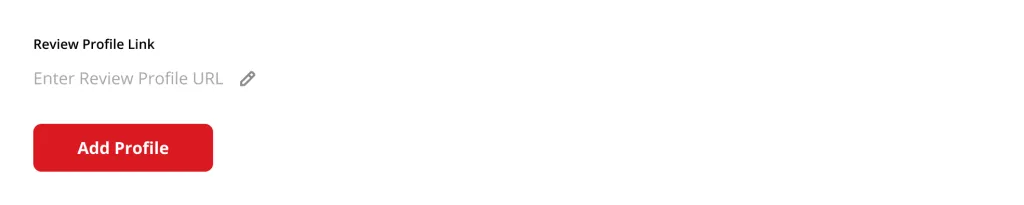
In the Business Profile section: Review Profile Links, these are the URLs for the sites that you want to monitor reviews from
Business Fields
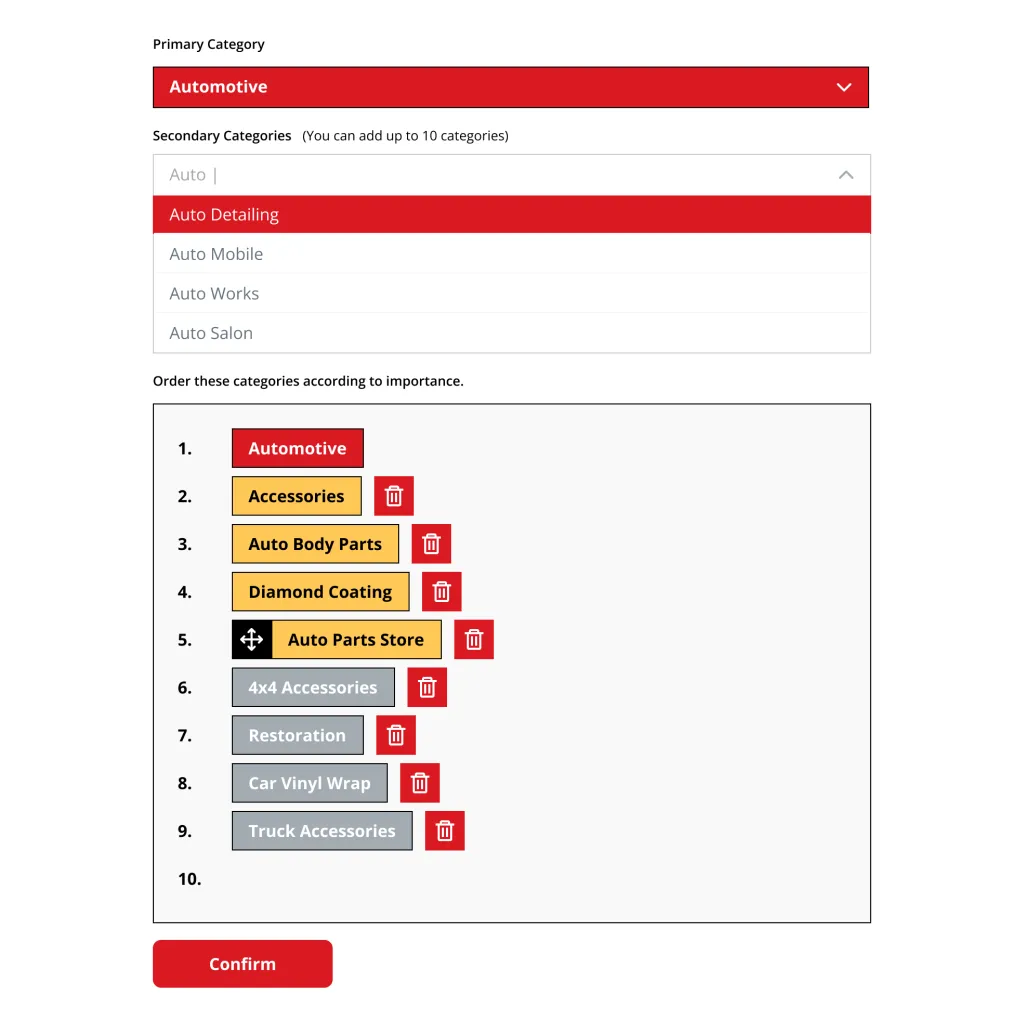
In the Business Fields section: Categories, you can add the following information:
- Primary Category of Your Business.
- Secondary Categories of Your Business.
- Arrange the above categories in order of importance.
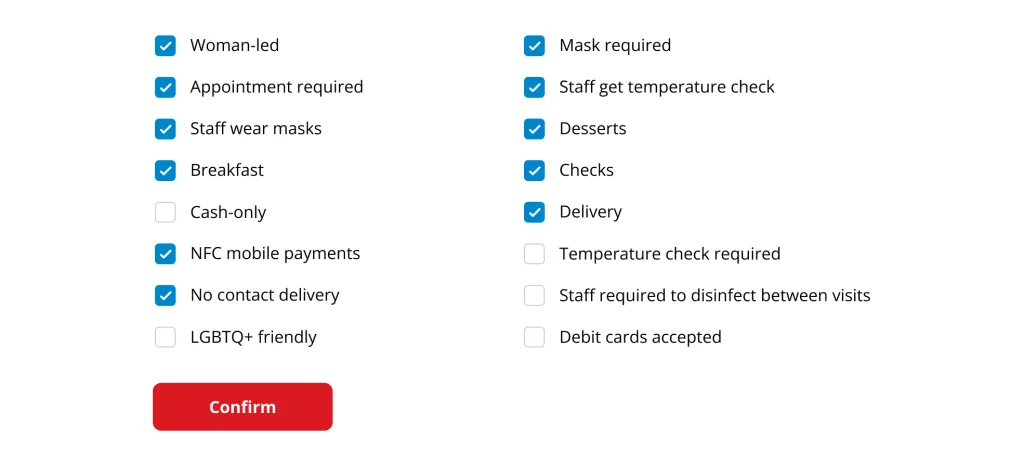
In the Business Fields section: Attributes, you can click and unclick attributes that are appropriate to your company.
Simply Be Found Business Hours
On the left side panel, select “Business Hours”. This will at once load the Business Hours Page on your screen.

As shown in the image above, you can update your Regular Business Hours and Special Hours on the Business Hours Page.
Simply Be Found Service Area
The service area tool allows the user to specify what areas that a business location services. It can be a Zip code, County, or City. Up to 20 different areas can be included.
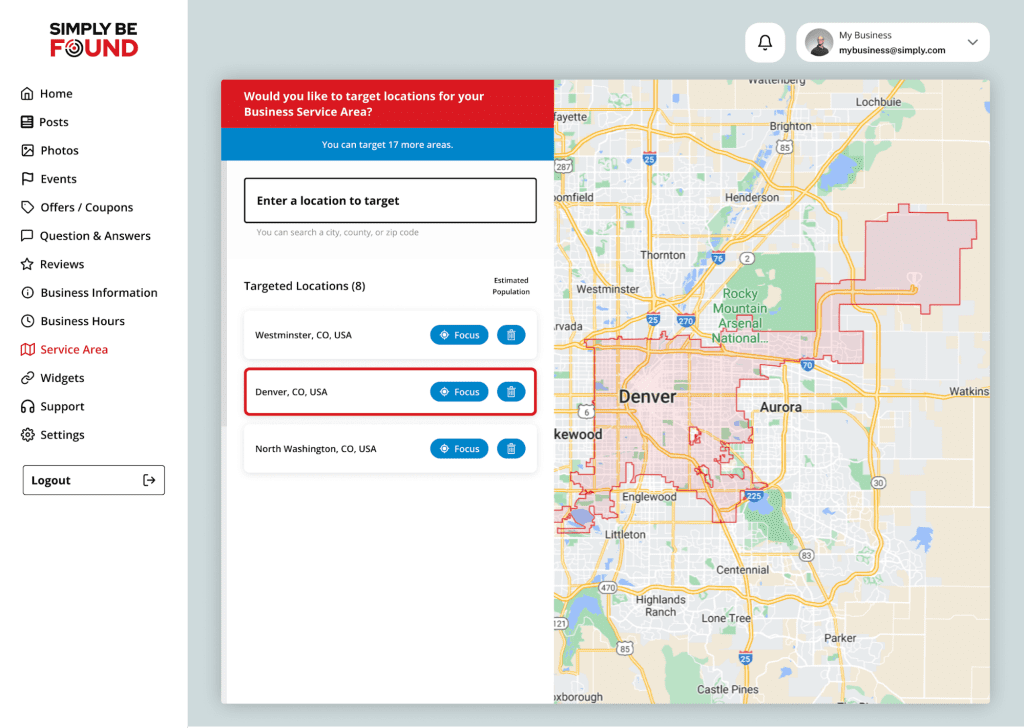
To add a new area, start to type in the location you would like to add in the “Enter a location to target” box. Options will appear and select the one you wish to add. The new area will appear in the list below.
To remove an area, just click on the trashcan icon directly to the right.
“Focus All Locations” Will highlight all service areas that the location services.
Clicking the “Focus” button to the right of the area will high light that specific area.
Simply Be Found Reports
On the left side panel, select “Reports”. This will at once load the Reports Page on your screen.
On this page displays the Reports Page has the summary of your Business Profile data.
There are 6 filter options to view the Report Date Range. When the “Choose Report Date Range” drop-down at the top left of the page is selected, it will show the following options:
- Last 30 days
- Last 60 days
- Last 90 days
- Current Year
- Custom Year
- Custom Date
You may choose which view is proper for your current needs.
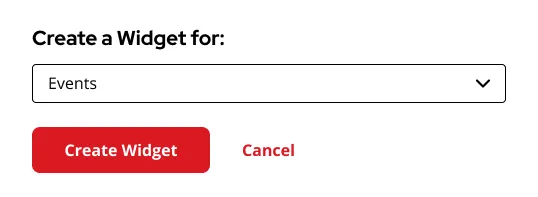
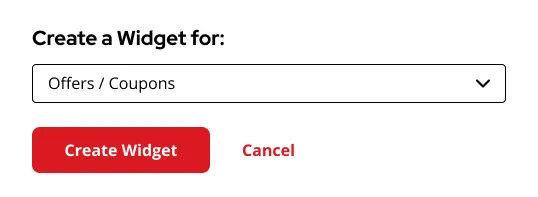
Simply Be Found Widgets
On the left side panel, select “Widgets”. This will at once load the Widgets Page on your screen.
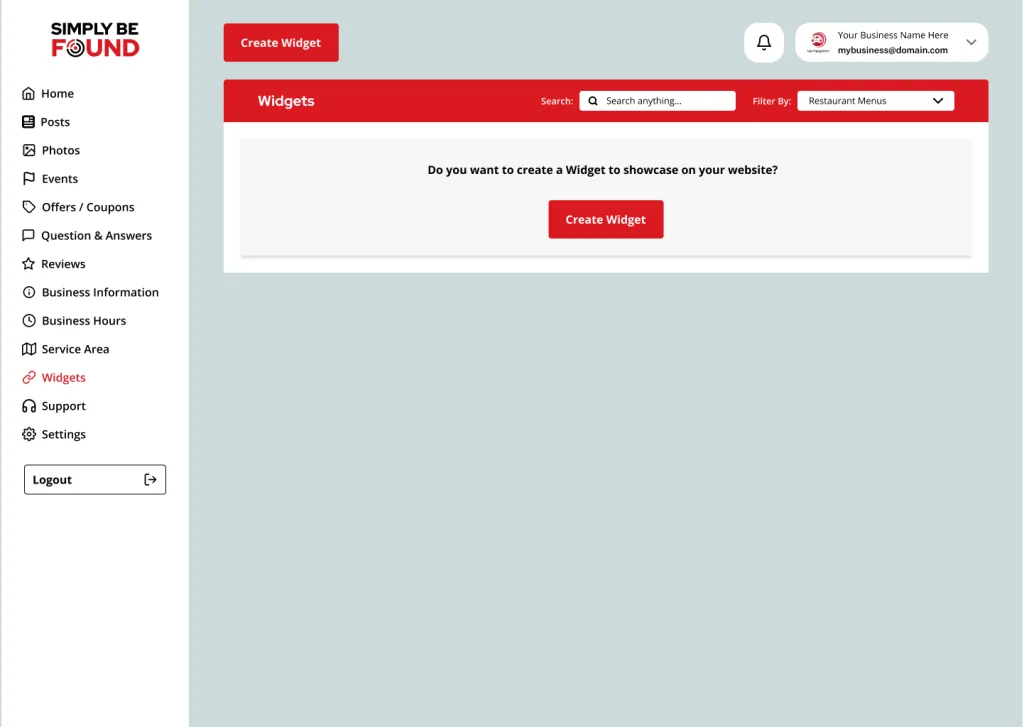
The Simply be found Widgets allow the user to create a custom embedded piece of code that can be placed into their website. This code will dynamically update the website to the most current version of the information that is inside the Simply be found platform. For example, if you create a widget for reviews your website will display the most current reviews that Simply Be Found has collected. If a new review is found and loaded into the system, it will automatically be displayed on the website.

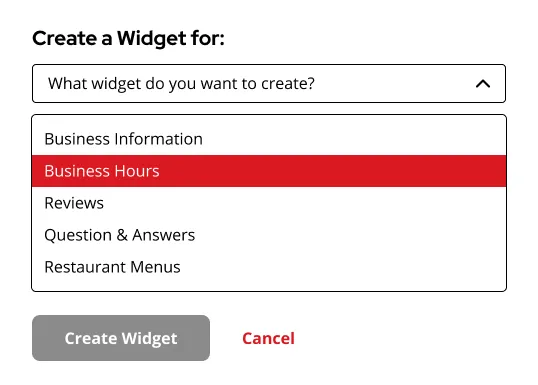
Creating Widgets
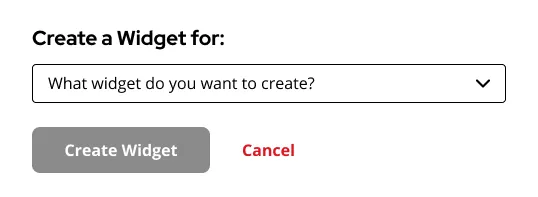
You may select the the following widgets:
- Business Hours
- Business Information
- Reviews
- Questions and Answers
- Food Menu
- Events
- Offers
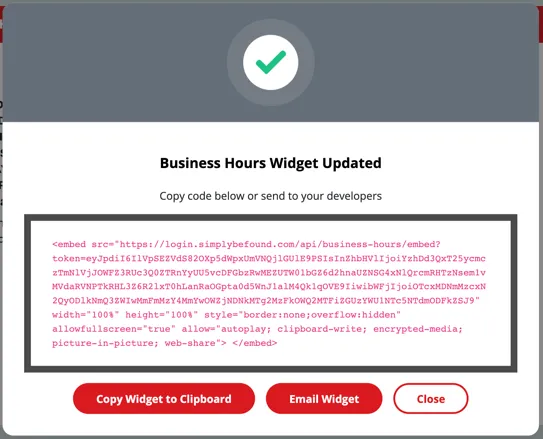
Creating Business Hours Widget

Configure Business Hours Widget:
- Show / Hide Components
- Regular Hours
- Special Hours
- What would you like to name your widget?
- Enter your desired widget name
- Would you like to add a description for your widget?
- Enter your desired widget description
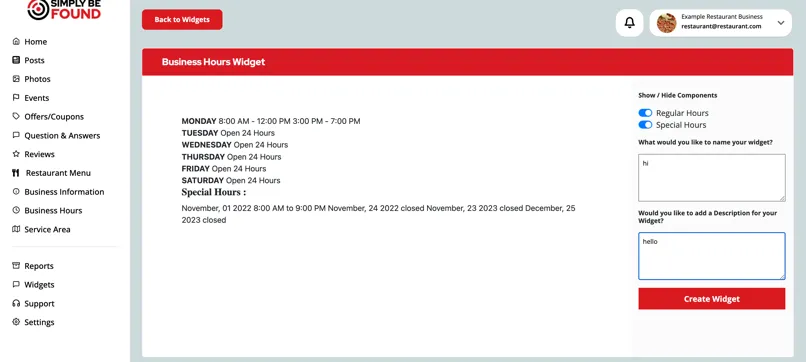
Click Create Widget
Creating Business Information Widget
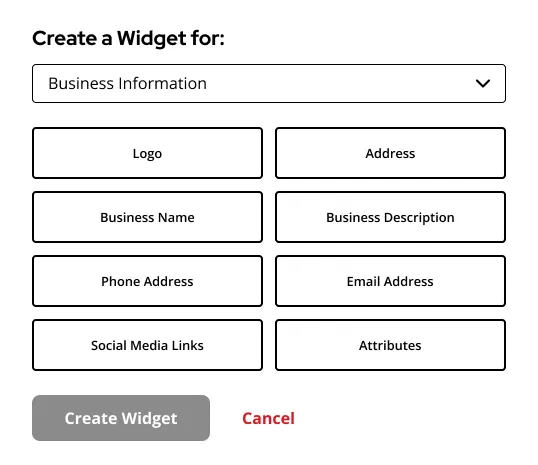
Select the business information that you want to be created:
- Logo
- Address
- Business Name
- Business Description
- Phone Address
- Email Address
- Social Media Links
- Attributes
Click Create Widget
Creating Reviews Widget
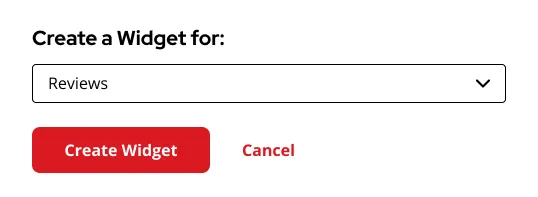
Configure Review Widget
- How would you like your Reviews Widget to display
- Stacked Layout
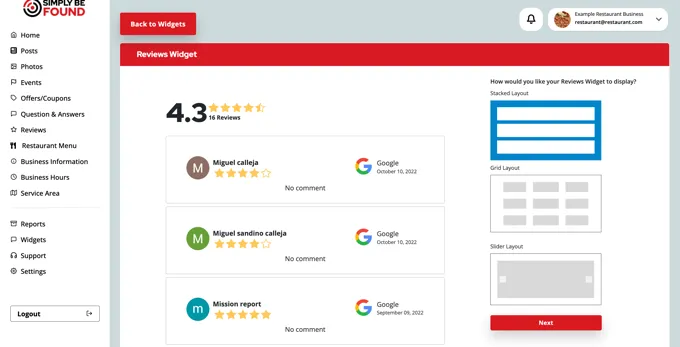
- Grid Layout
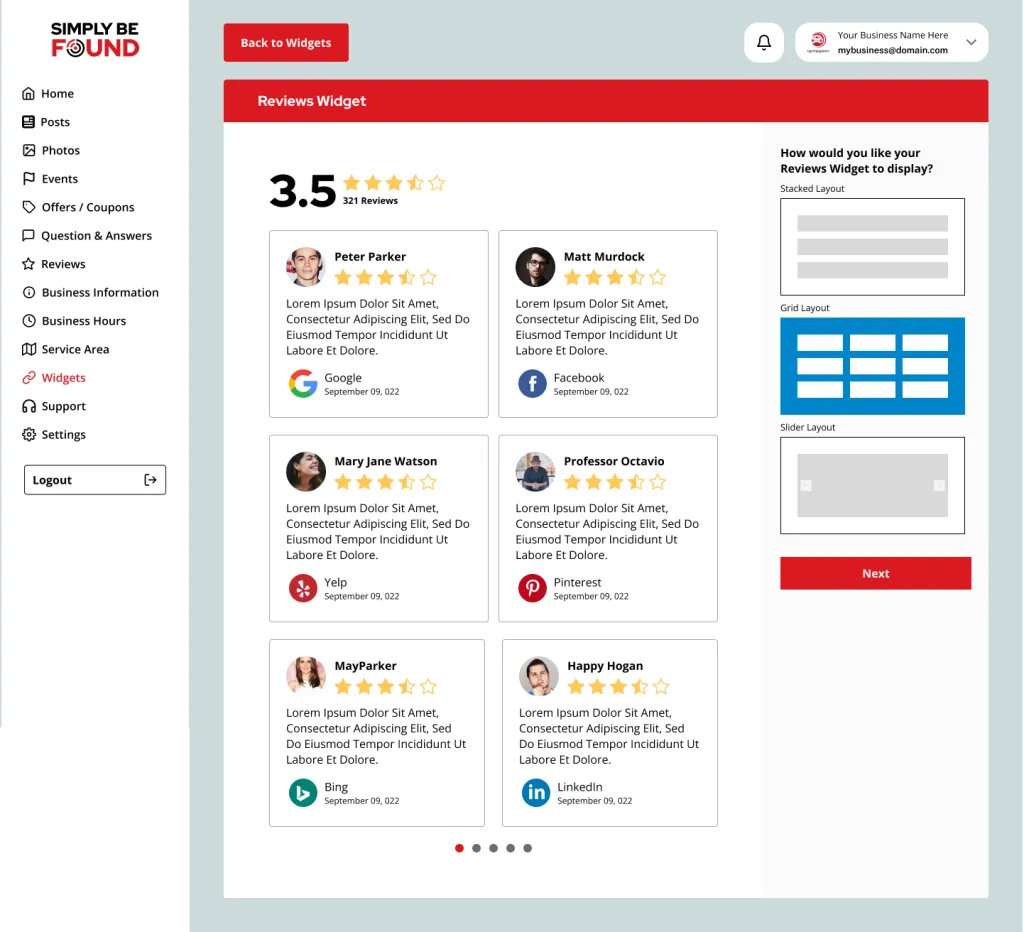
- Slider Layout
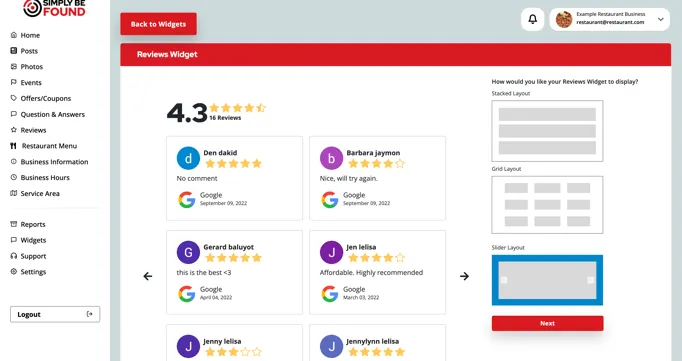
Click Next to setup the following
What is the minimum star rating that you want to show?
- Select from 1 – 5 Stars
How many reviews do you want to display?
- 4 Reviews
- 6 Reviews
- 8 Reviews
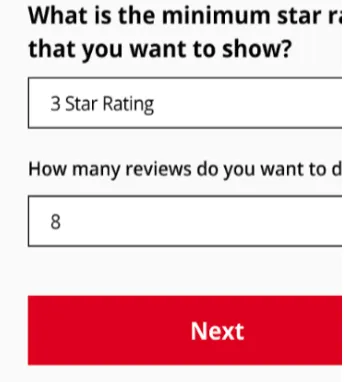
Click Next to setup the following
What would you like to name your widget?
- Enter your desired widget name
Would you like to add a description for your widget?
- Enter your desired widget description
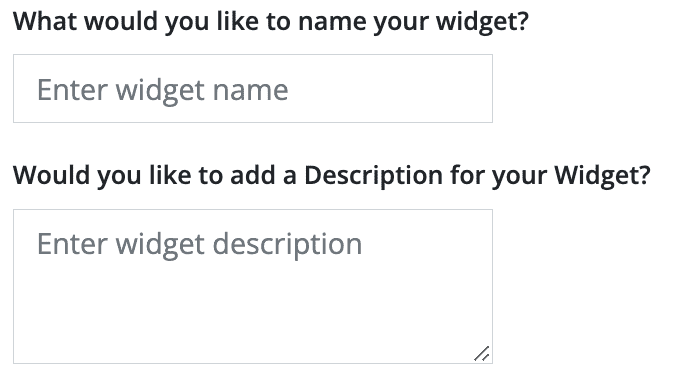
Click Create Widget

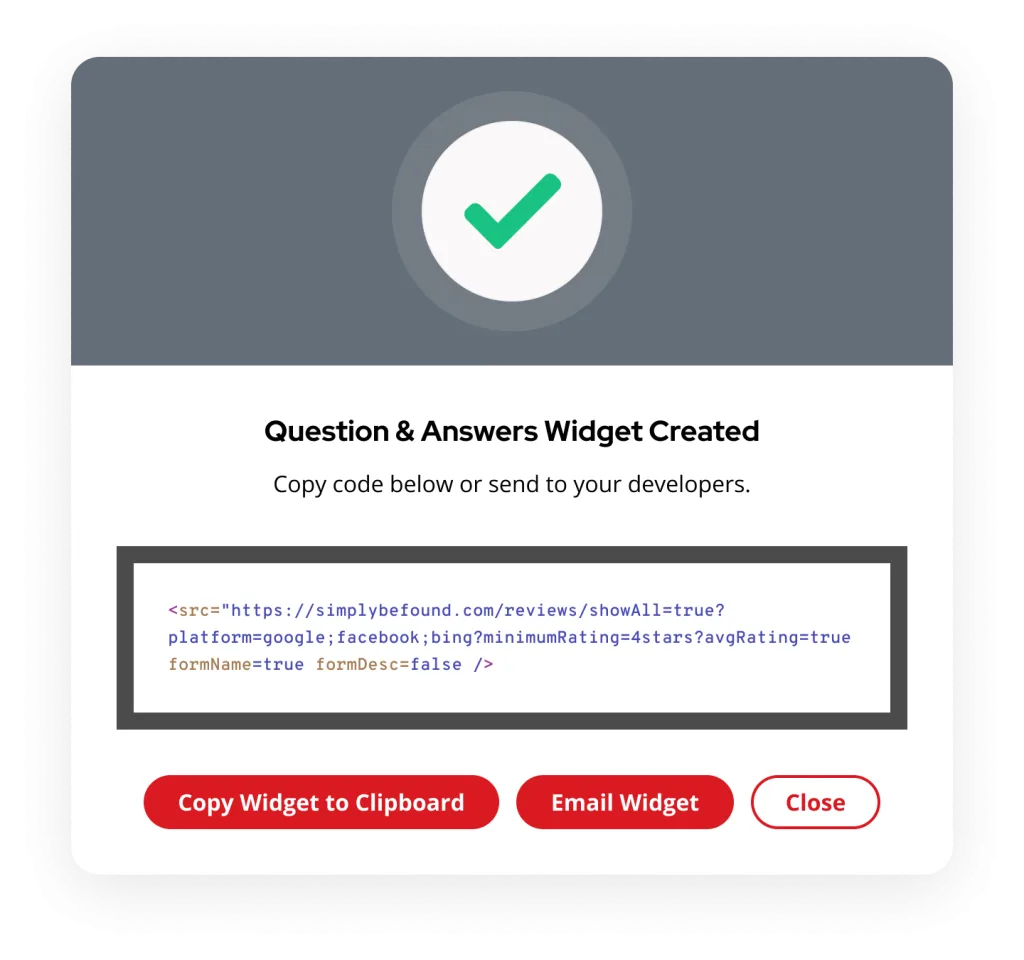
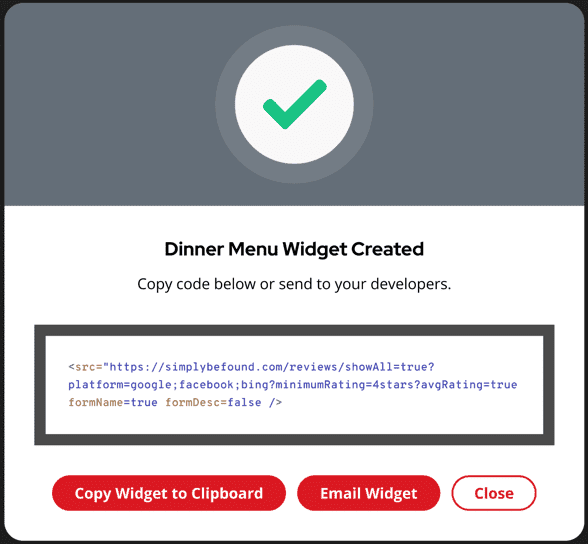
Creating Question and Answer Widget
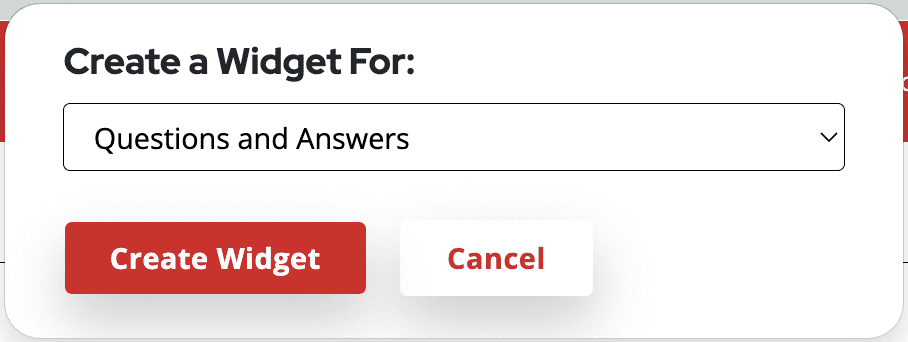
Configure Questions and Answers Widget
- How would you like your Questions and Answers Widget to display
- Stacked Layout
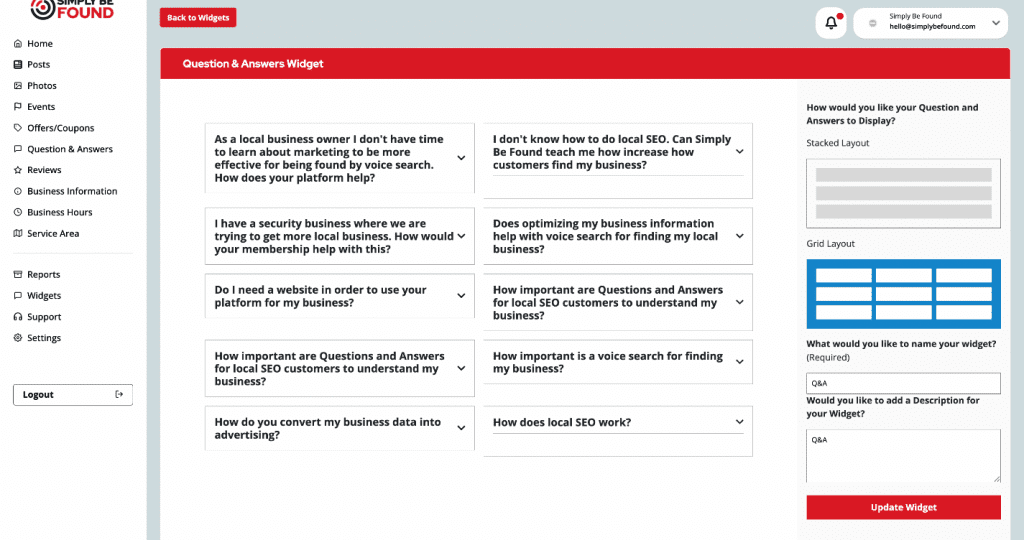
- Grid Layout

Click Next to setup the following
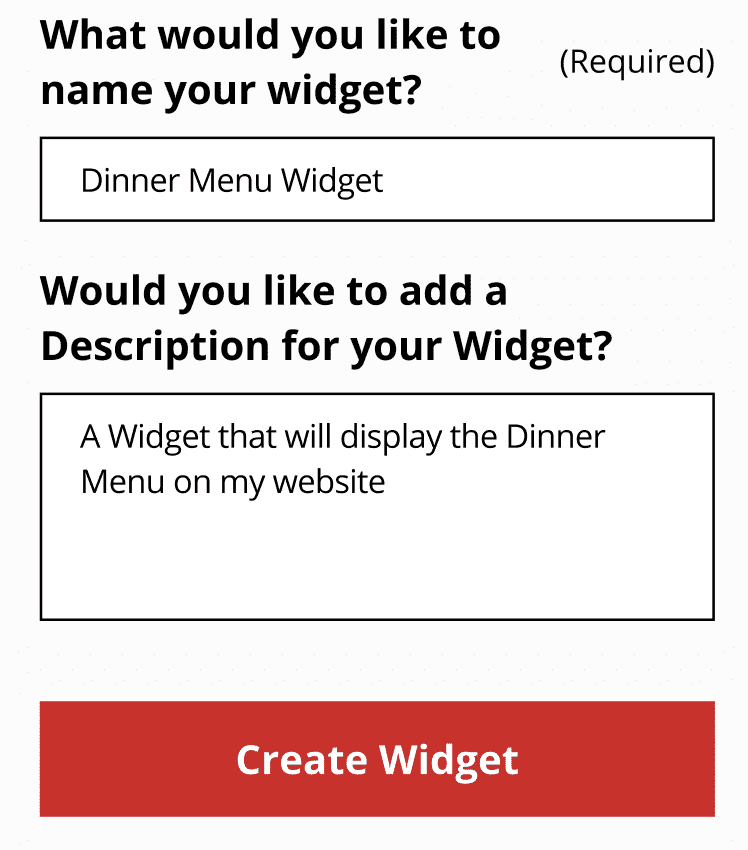
What would you like to name your widget?
- Enter your desired widget name
Would you like to add a description for your widget?
- Enter your desired widget description
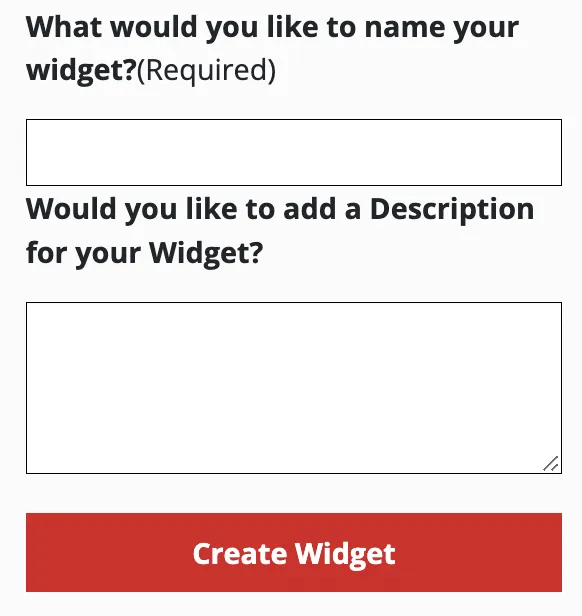
Click Create Widget
Creating Restaurant Menu Widget

Select the Menu that you want to be created
Configure Food Menu Widget
- How would you like your Questions and Answers Widget to display
- Stacked Layout
- Grid Layout

Click Next to setup the following
What would you like to name your widget?
- Enter your desired widget name
Would you like to add a description for your widget?
- Enter your desired widget description
Click Create Widget
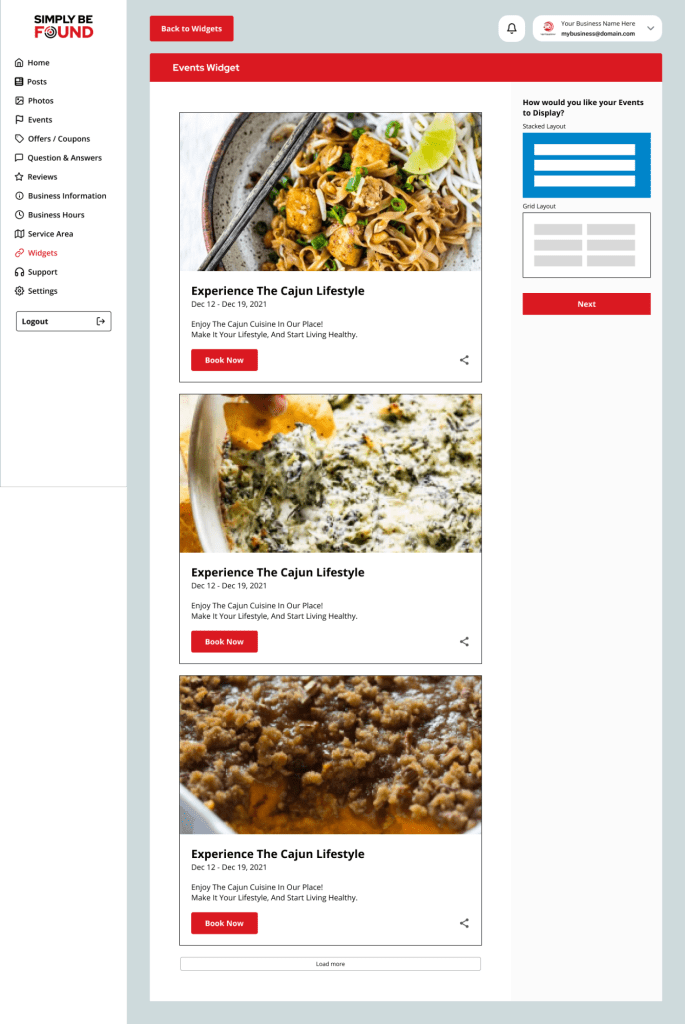
Creating Event Widget
Configure Event Widget
How would you like your Questions and Answers Widget to display
- Stacked Layout
- Grid Layout
Click Next to setup the following
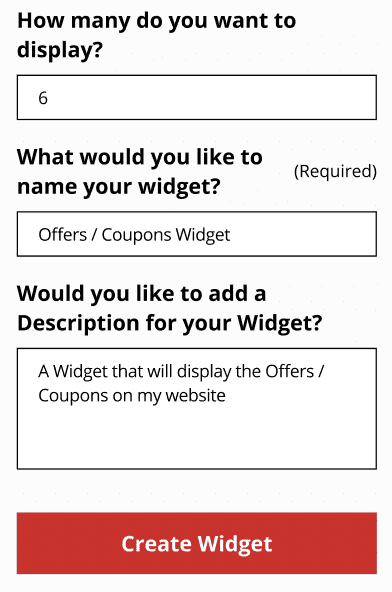
How many do you want to display?
- Enter desired number of events to be displayed
What would you like to name your widget?
- Enter your desired widget name
Would you like to add a description for your widget?
- Enter your desired widget description
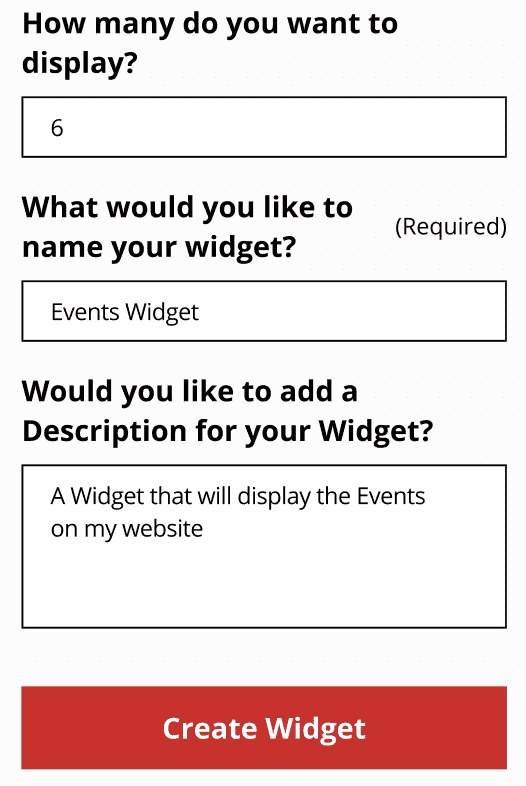
Click Create Widget
Creating Offers Widget
Configure Offers Widget
How would you like your Questions and Answers Widget to display
- Stacked Layout
- Grid Layout
Click Next to setup the following
How many do you want to display?
- Enter desired number of events to be displayed
What would you like to name your widget?
- Enter your desired widget name
Would you like to add a description for your widget?
- Enter your desired widget description
Click Create Widget
Widget Actionable Buttons
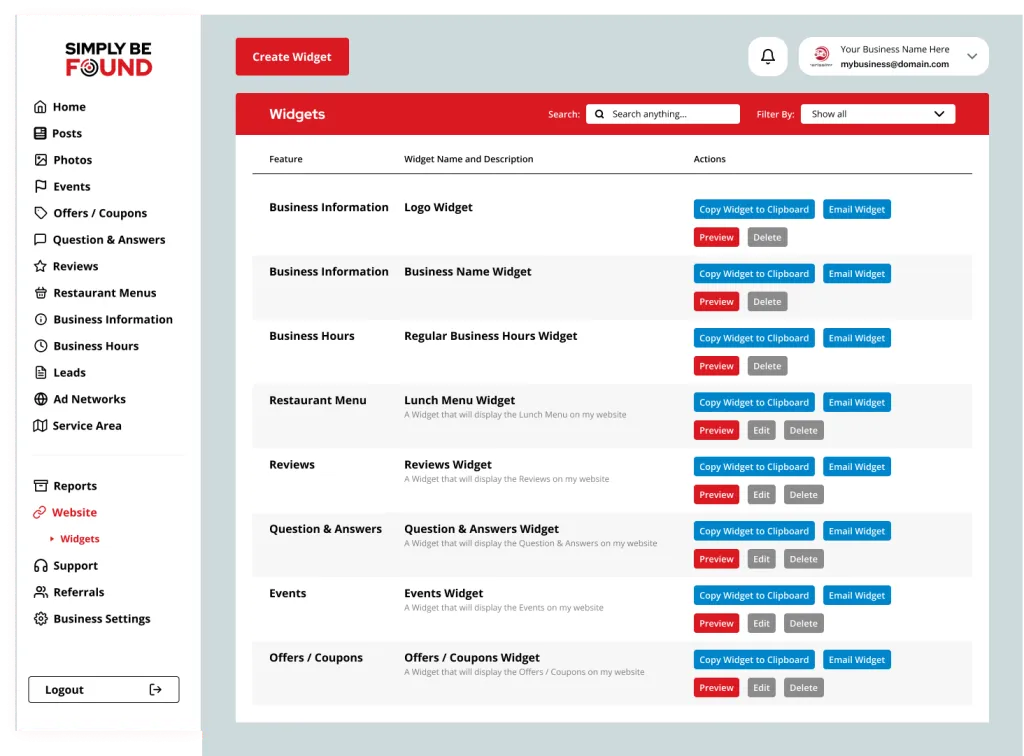
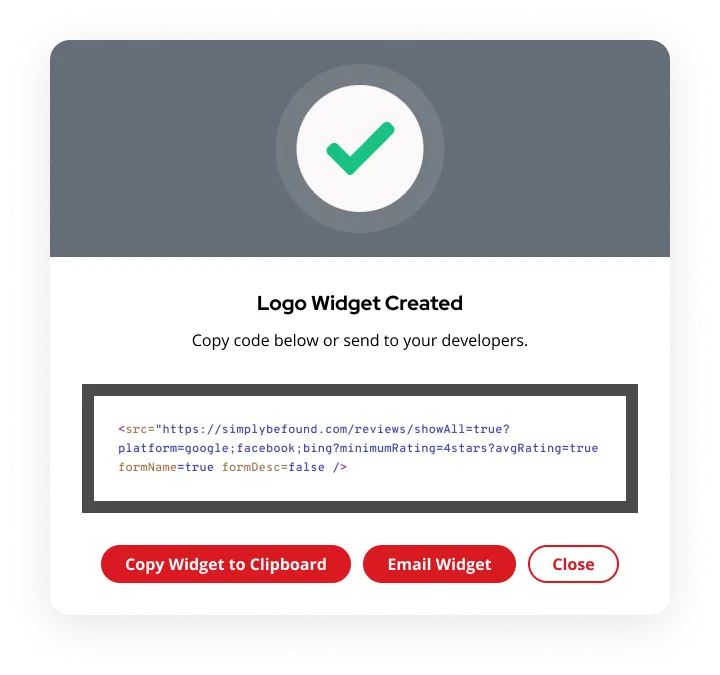
- Copy Widget to Clipboard – Widget’s code snippet will be copied to clipboard
- Email Widget – Email will open with the Widget’s code snippet
- Edit – Click to edit existing widgets
- Preview – When the “Preview” button is selected, it will show a preview of the Widget as shown in the example image below.
5. Delete – To delete the Menu, select the “Delete Menu” grey button. Once clicked, the pop-up like the example shown below will appear to confirm the deletion. This is to ensure that no Widget will be deleted by accident.
On the left side panel, select “Support”. This will at once load the Support’s Page on your screen.
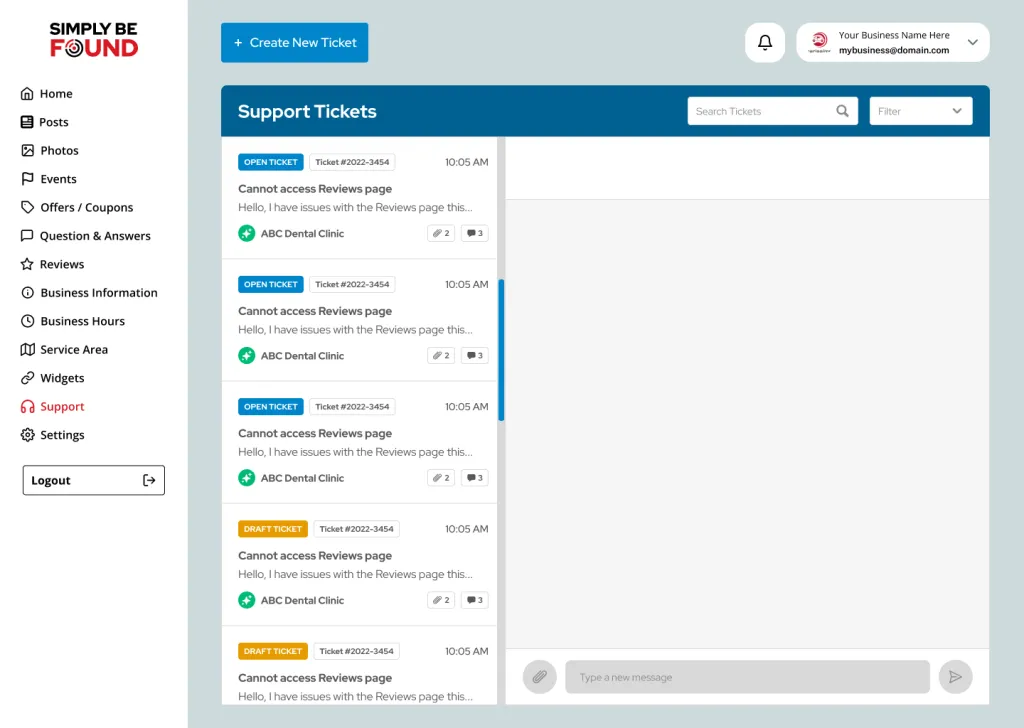
As shown in the image above, the Support’s Page has the Tickets that have been given to Simply Be Found for resolution on any technical issues that the user might have encountered. On the top left of this page, the user can select the “Create New Ticket” button to submit a new ticket concerning any issues related to the Simply Be Found Marketing Platform.
Creating a New Ticket
To create a New Ticket, select the “Create New Ticket” button at the top left of the Support’s Page. Once it has been selected, a pop-up like an example image below will appear.
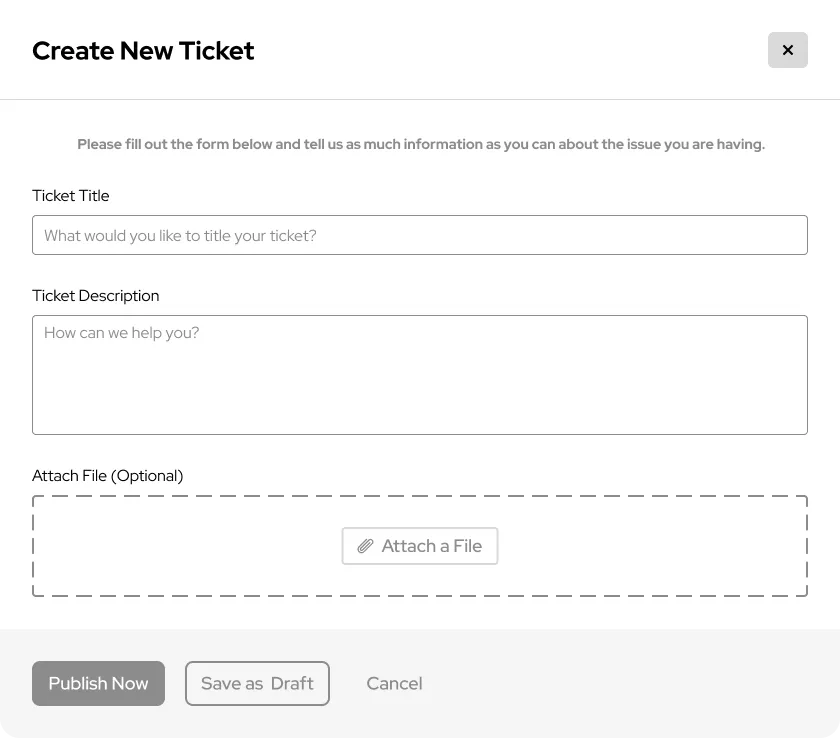
To submit a ticket, the “Create New Ticket” form needs to be completed. To do this, the user needs to fill in the following:
- Ticket Subject with the main concern that needs to be addressed.
- Provide more information about the concern in the Description box.
- Add attachments if there are any visuals to support your concern. (This is optional.)
- Click on the Publish button to submit the Ticket.
Once the ticket has been submitted it will show in your Tickets List.
Sorting and Filtering
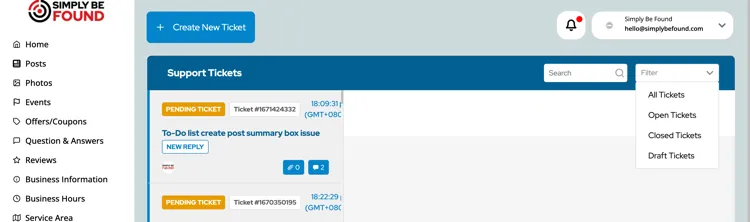
The Tickets can be Sorted by Date by clicking on the “Sort by Date” button at the upper right corner of the page.
There are 4 options to filter the Tickets by its status: “View All Tickets”, “Open Tickets”, and “Closed Tickets”.
Support Ticket List and Details

The Supports Ticket List shows all the Tickets created for this business location whether its status is Open or Closed. Each ticket has a preview on the Ticket list. It shows the following information:
- Ticket subject/Ticket topic
- Ticket Number for reference
- The name of the person who created it
- Ticket Status – whether it is Open or Closed.
- Date of Creation
Viewing the Tickets
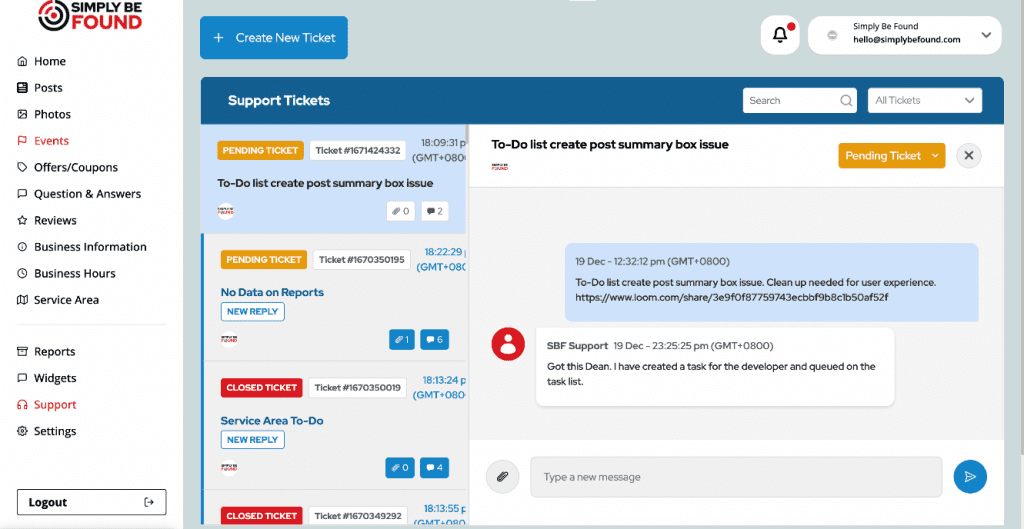
To view the ticket conversation, select the ticket you want to view from the main Tickets List, and it will load the conversation view of the tickets. As shown in the image above, The Tickets are on the left side and there is a pane where the conversation between the user and Simply Be Found support representative happens.
On the pane, you can see the following information:
- Ticket subject/Ticket topic
- Ticket Number for reference
- Ticket Status
- Ticket Creation Date and Time
- When the Ticket has been updated
- The message exchange from the beginning to the most recent
- Option to add/upload an attachment to provide more information
- Text box
Simply Be Found Business Settings
On the left side panel, select “Business Settings”. This will at once load the Business Settings’ Page on your screen.

The Business Settings’ Page has the following sections:
Profile Section
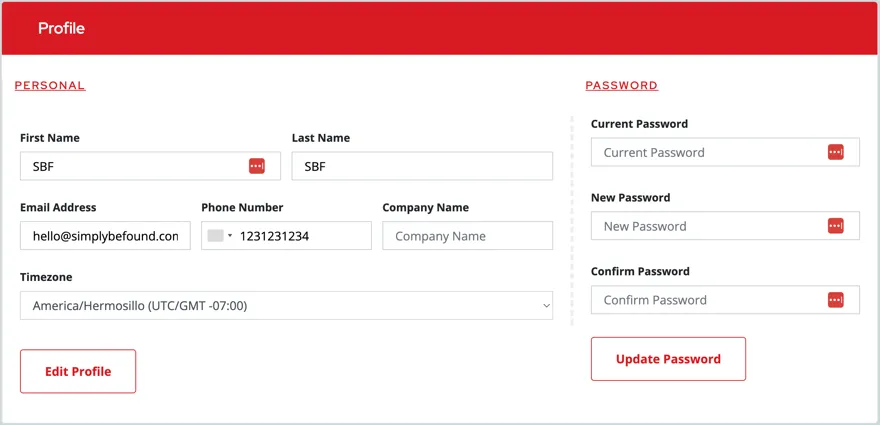
As shown on the image above, the profile section has the basic information of the business profile. From here, you can Edit the Profile and Update Password.
- Editing Profile
To edit the profile, select on the “Edit Profile” button. From there, you can start editing the following profile information:
- First Name
- Last Name
- Email Address
- Phone Number
- Company Name
- Time zone set for the business profile
Once you are done, click Save.
- Updating Password
To update the password, fill in the following text boxes:
- Current Password – type the current password
- New Password – type the preferred new password
- Confirm Password – retype the preferred new password
For the update to take effect, select on the “Update Password” button.
Billing, Connection and User with GBP Access
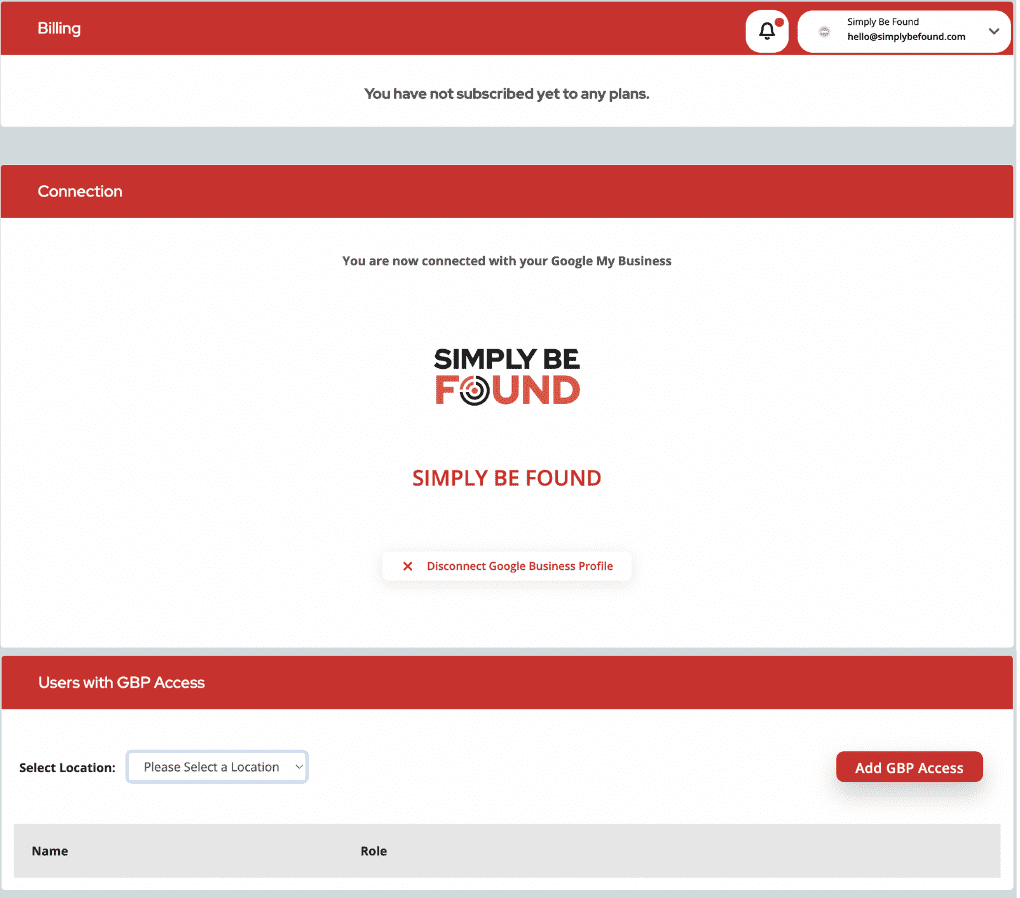
As shown on the image above, scrolling down the Business Settings will reveal the Billing and Connection sections.
Billing Section – This will show the current plan that the user has for this business profile.
Connection Section – This will show if you this user business profile is connected to the Google My Business profile.
Integrations
In this section of Settings is where you will find networks where you can connect your business and integrate into Simply Be Found.
Click the Connect button on the network where you want your business to be connected. You will be redirected to a login screen of the network you want to connect to
Billing
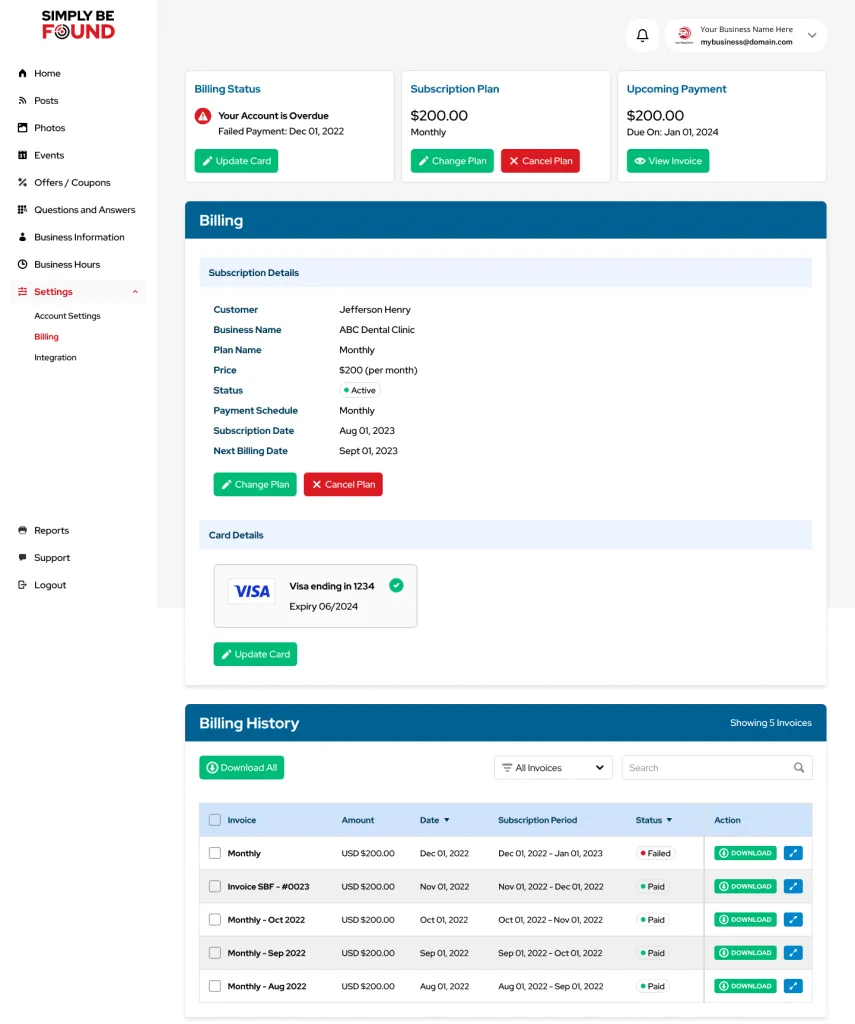
On this page is where you will find the complete details of your billing. On the upper part of the page, you will see the Billing Status, Subscription Plan and Upcoming Payment columns.
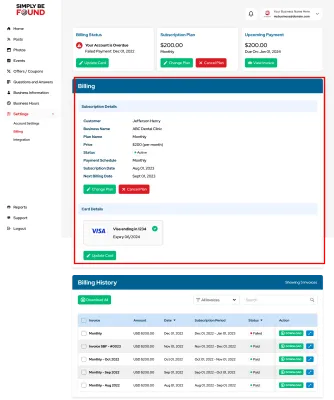
Billing section displays all the details of the subscription such as Business Name, Plan Name, Price, Payment schedule, Price, Subscription date, next billing date and card details
Billing History
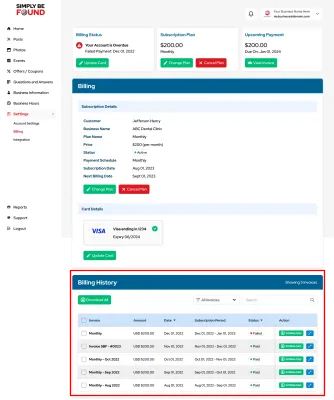
This will show all the invoices received for the account including the current billing. Download button will allow you to download the billing on a PDF format
Update Card

To update the card, fill in the fields then click the Update Credit Card button at the bottom of the popup screen
On the popup you can see the following fields:
- Card Holder Name
- Address
- Credit Card Number
- Card expiration date
- Card Security Code
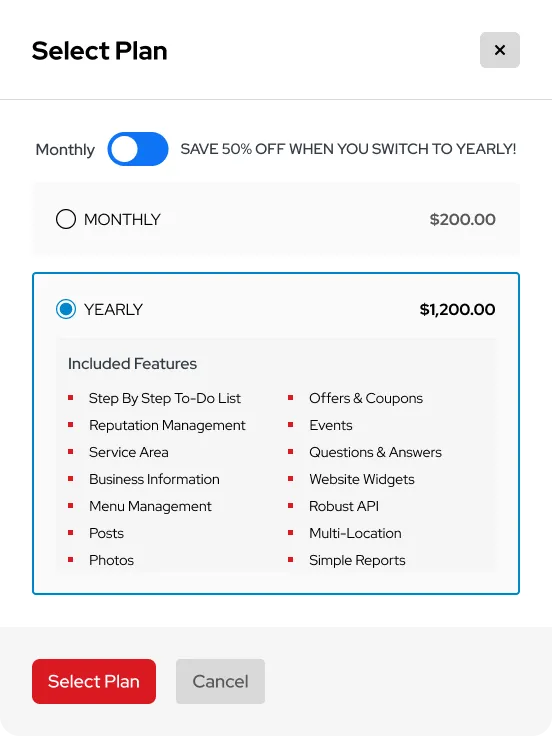
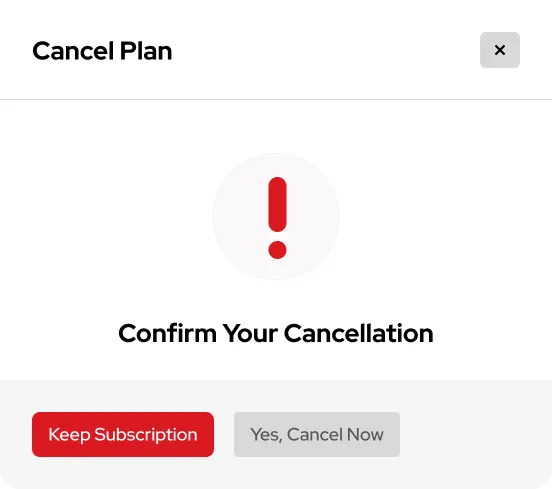
Change/Cancel Plan
Should you want to change your current plan, click on the Change Plan button. Choose on the plan options Monthly or Yearly and hit Select Plan.
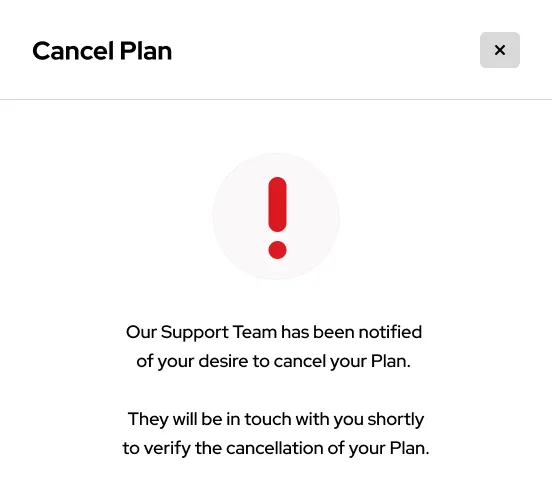
To Cancel your plan, click on the Cancel Plan button. Popup confirmation of plan cancellation will show up, click Yes Cancel Now. Support Team will receive a notification about the cancellation of your plan
View Invoice
To view your invoice, click on the button View invoice. Popup screen will show the following information:
- Invoice number
- Subscription summary
- Payment details.
For users that have a Restaurant business profile, the “Restaurant Menu” feature on the left panel is available.
For users that have a Restaurant business profile, the “Business Menu” feature on the left panel is available.
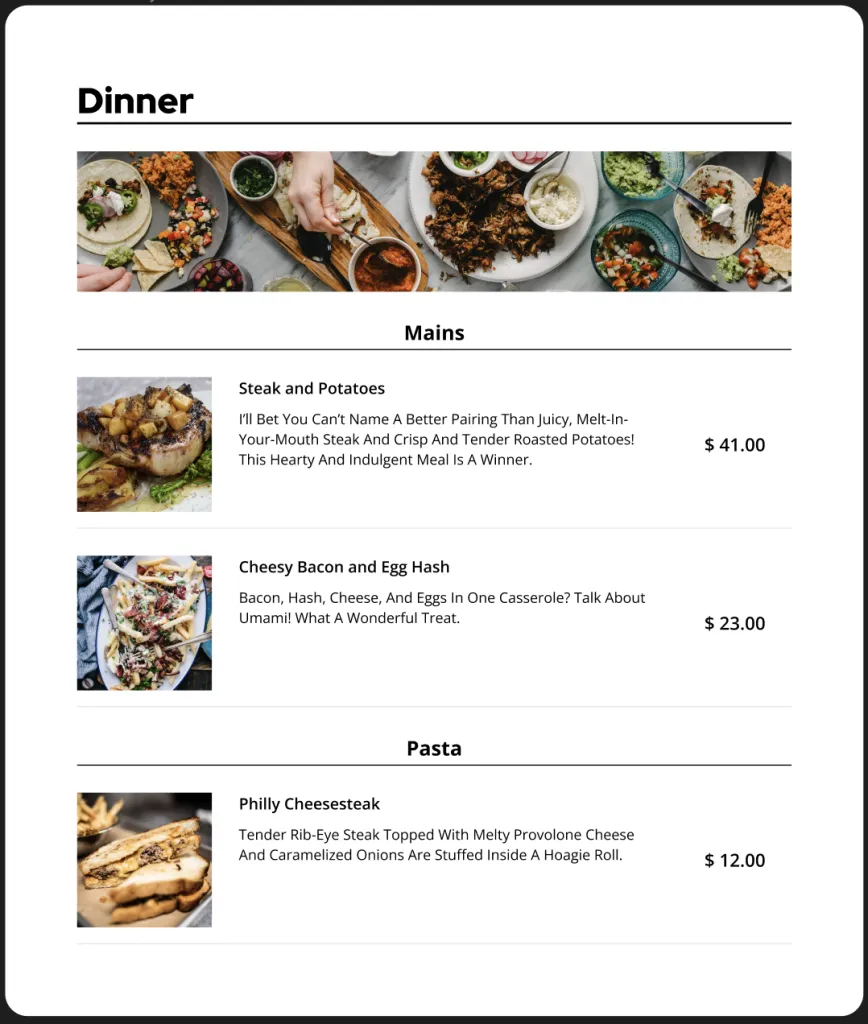
Simply Be Found Restaurant Menu
On the left side panel, select “Restaurant Menu”. This will at once load the Restaurant Menu Page on your screen.
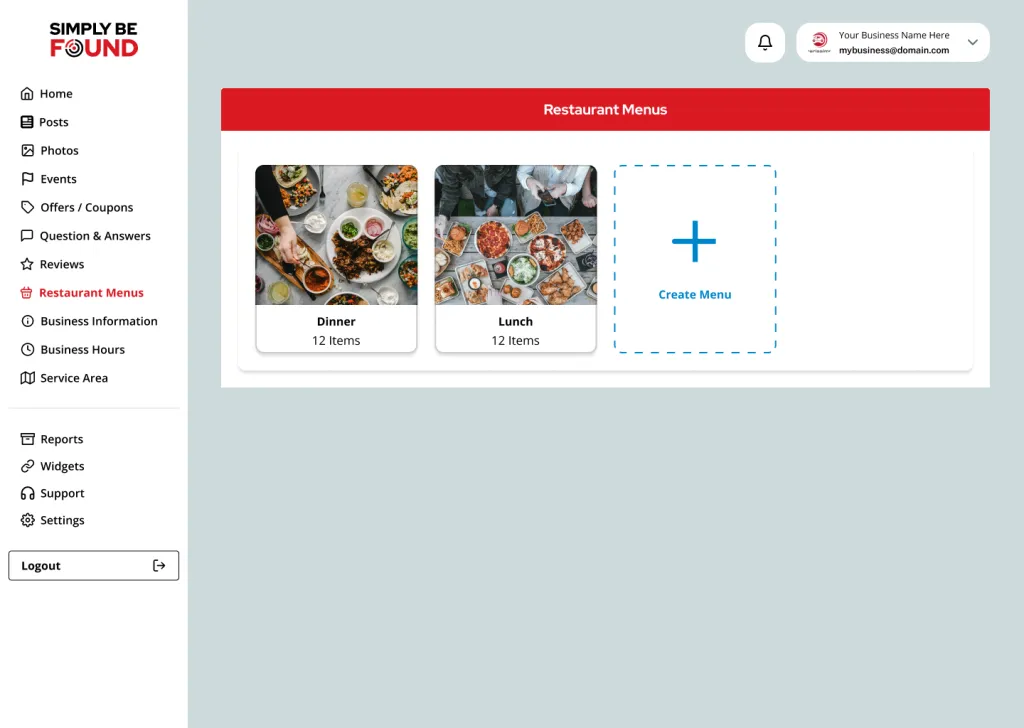
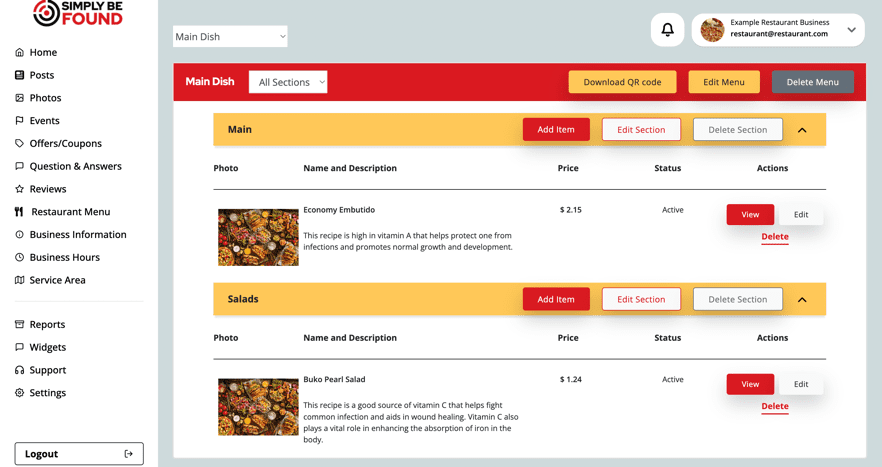
As shown from the image above, the Business Menu page shows the Restaurant Menu sections. On the example, it has the Main Dish section. To add a new section, click on the “+ Create Menu” and a pop-up will appear.
Creating a Menu
To create a Menu, click on the “+ Create Menu” and a pop-up will appear like the example shown below.
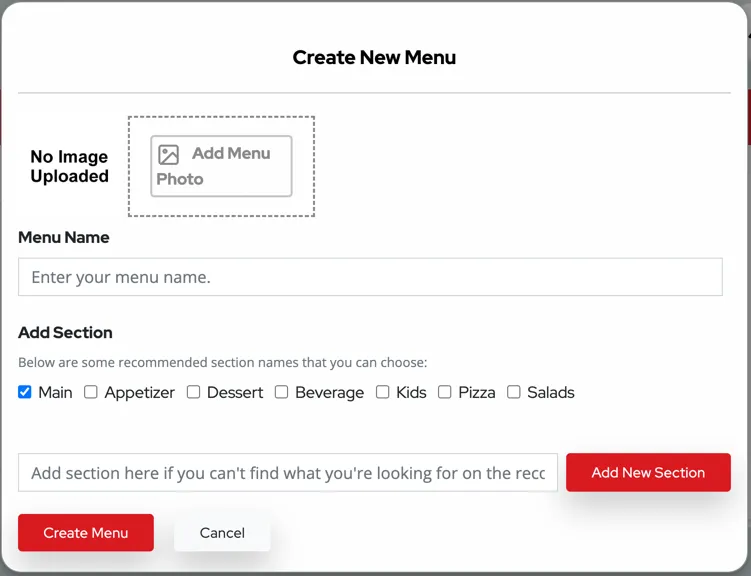
Fill in the following information:
- Add Menu Photo – This is where the user adds the photo of the dish or Menu.
- Menu Name – Main name of your Menu
- Add Section – There are pre-made sections that the user can tick to add as a section on this menu, however, the user can also create a new section on the textbox below the tick list and then select “Add New Section” to save the new section name.
Once all information has been filled in, save this Menu by selecting the “Create Menu” button. This menu will then show on the Restaurant Menu Page.
Once all information has been filled in, save this Menu by selecting the “Create Menu” button. This menu will then show on the Business Menu Page.
Restaurant Menu Actionable Buttons
1. Edit Menu Button

From the Main Restaurant Menu Page, select the Menu that needs to be updated. In this example, the “Main Dish” menu was selected.
At the top right of the list, there are two buttons; Edit Menu and Delete Menu. To edit the menu, select “Edit Menu” button. Once the button is selected, the image below will pop up.
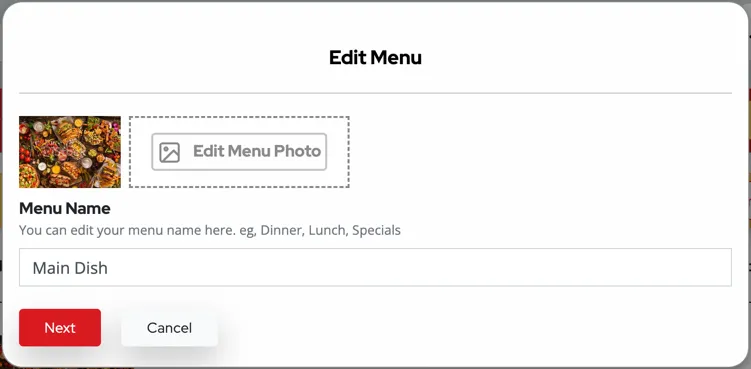
The Menu Photo can be updated by selecting the “Edit Menu Photo” and the Menu Name can be updated from here as well. Once done, click Next.
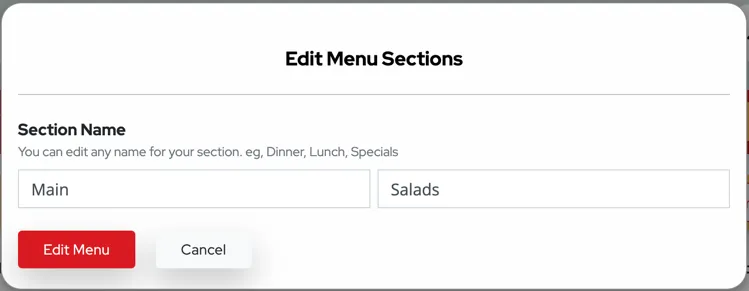
After updating the Menu Name and Photo, the user has an option to update the section names as well. Once the user is done updating or keeping the section names, click Edit Menu. This will save the changes that have been made.
2. Delete Menu Button

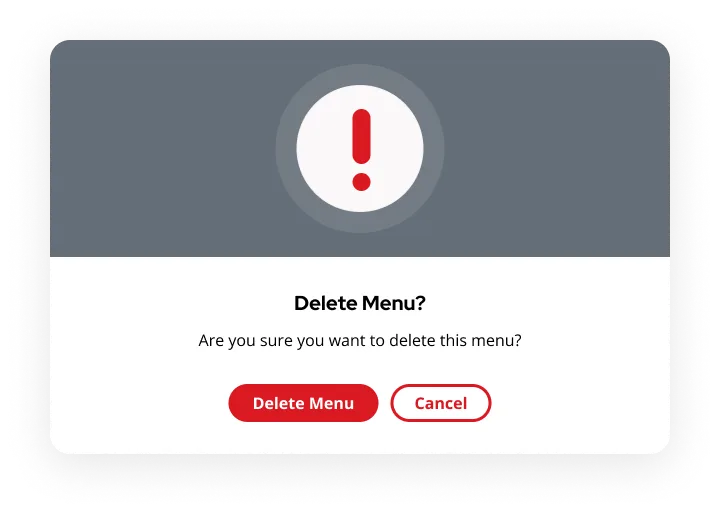
To delete the Menu, select the “Delete Menu” grey button found on the upper right of the selected Menu. In this example, the “Main Dish” menu was selected. Once clicked, the pop-up like the example shown below will appear to confirm the deletion. This is to ensure that no Menu will be deleted by accident.
3. Add Item Button
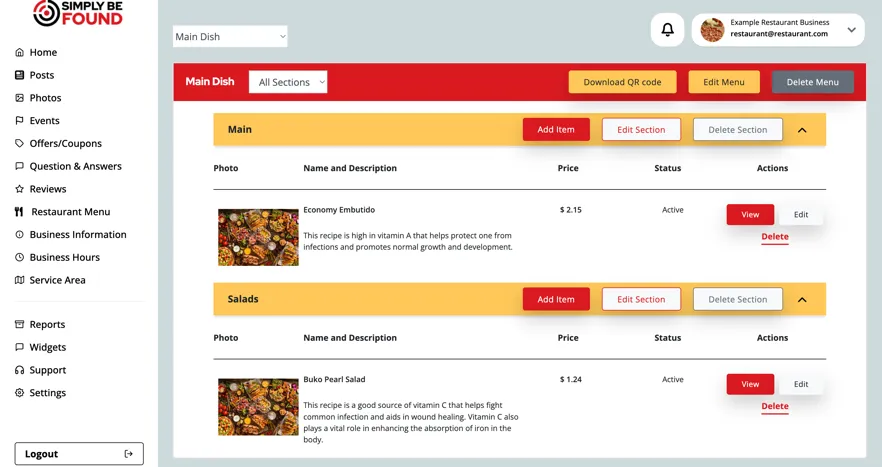
To add item in the section of a Menu, from the main Restaurant Menu Page, select the menu with the section that needs to be updated. In this example, the “Main Dish” menu was selected. As shown in the image above, inside the Menu are the sections. The section has 3 Actionable Buttons namely, Add Item, Edit Section, Delete Section. To add an Item, select the “Add Item” button.
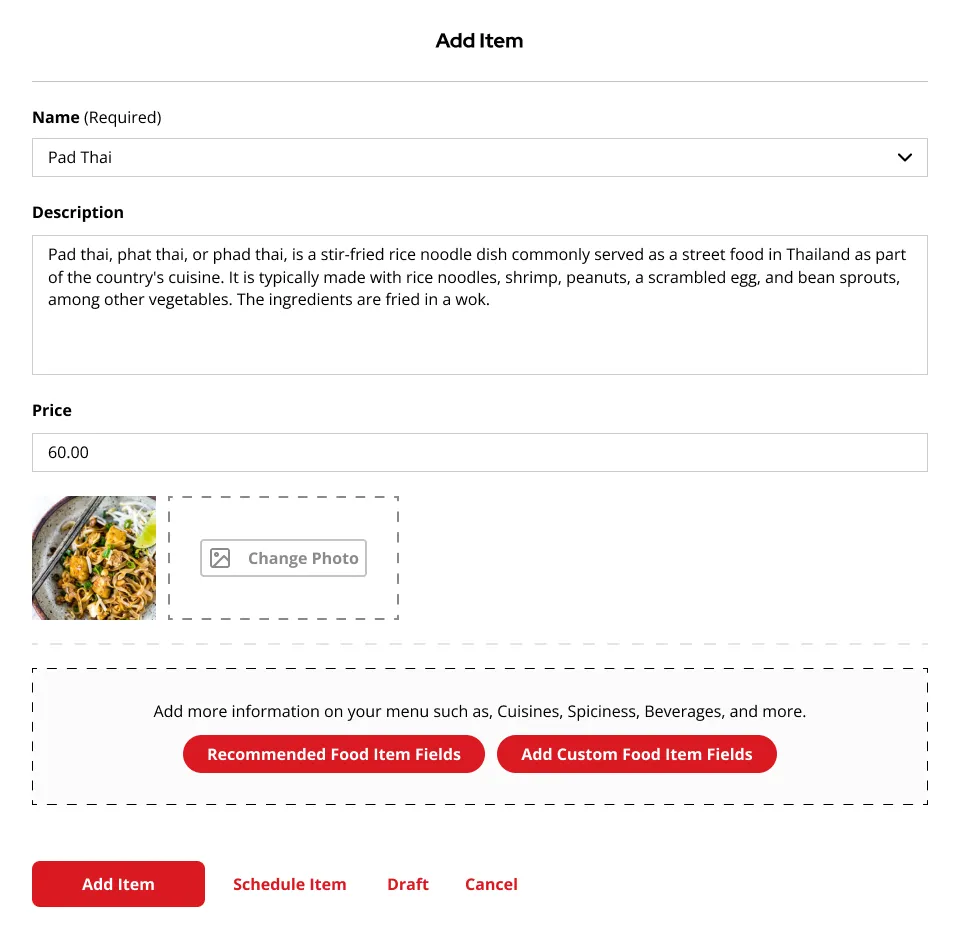
Once the “Add Item” button is selected, a pop-up like the image above will appear. Fill in the following information:
- Name – (Required Field) Add the name of the item or dish
- Description – Describe the item or dish that you are adding
- Price – Add the price of the item or dish
- Add Photo – Upload a photo of the item or dish
The user may also add more information about the item or dish by selecting the “Recommended Food Item Fields”. This button in the Add Item pop-up provides a more specific categorization of your item or dish. Please see below for the pre-created Food Item Fields.
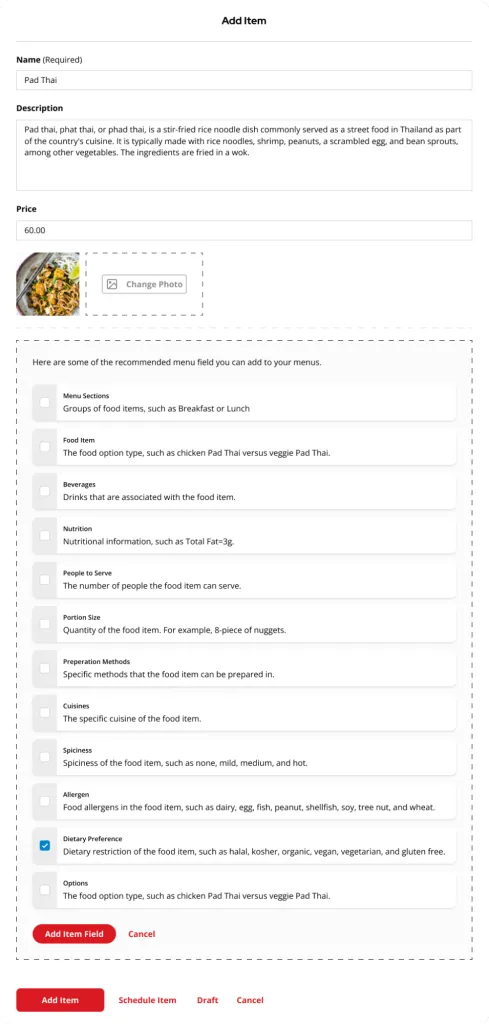
For the sake of demonstration, 4 fields have been selected in the “Recommended Food Item Fields”. After selecting the item fields, click “Add Item Field” button. It will add the item fields in the main pop-up view and the user may add specific information relative to the item field category. See the image below for preview.
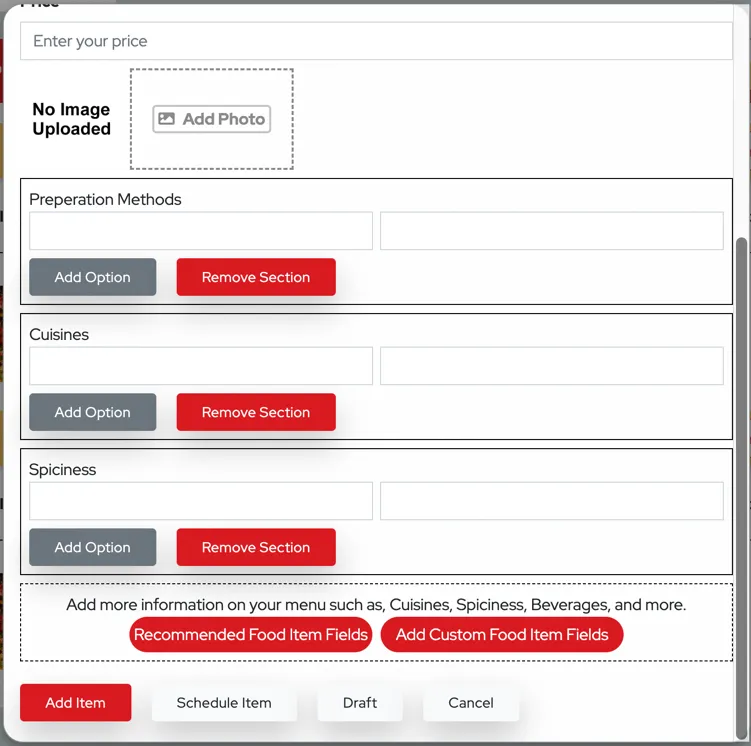
Another button inside the “Add Item” pop up is the “Add Custom Food Item Fields”. Utilize this button if the preferred Item Field is not in the Recommended Food Item Fields list. Once selected, the user may create a custom food item field. See the image below for preview.

Once the user has completed all the steps above, the next step is to select from one of the 4 buttons at the bottom of the “Add Item” pop up. They are as follows:
- Add Item – This will immediately add the item or dish in the section menu
- Schedule Item – This will schedule the item or dish at a later chosen time.
- Draft – This will keep the item or dish as draft and will not be visible to customers.
- Cancel – This will discard all the information you just added in the pop-up.
4. Edit Section Button

To edit the section in a Menu, from the main Restaurant Menu Page, select the menu with the section that needs to be updated. In this example, the “Main Dish” menu was selected. As shown in the image above, inside the Menu are the sections. The section has 3 Actionable Buttons namely, Add Item, Edit Section, Delete Section. To Edit Section, select the “Edit Section” button.

Once the Edit Section has been selected, the pop-up as shown in the example above will appear. The user may update the Section Name and select the Edit Menu button to save the changes.
5. Delete Section Button
To delete a section in a Menu, from the main Business Menu Page, select the menu with the section that needs to be updated. In this example, the “Main Dish” menu was selected. As shown in the image above, inside the Menu are the sections. The section has 3 Actionable Buttons namely, Add Item, Edit Section, Delete Section. To Delete Section, select the “Delete section” button.

Once the Delete Section has been selected, the pop-up as shown in the example above will appear to confirm the deletion of the section. This is to ensure that no Menu section will be deleted by accident.
Item List and Details

To view, edit, or delete an item or dish from a section of a Menu, from the main Restaurant Menu Page, select the menu with the section that needs to be updated. In this example, the “Main Dish” menu was selected. As shown in the image above, inside the Menu are the sections and under sections are the items. In the example, we only have 1 item per section.
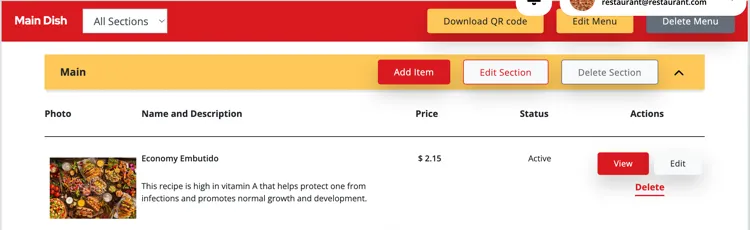
On this view you will see the following:
- Attached photo to the item or dish
- Name and Description of – to provide a brief overview of the item
- Price
- Status – can be “Active” or “Inactive”.
- Actions – actionable buttons that you can select.
Item Actionable Buttons
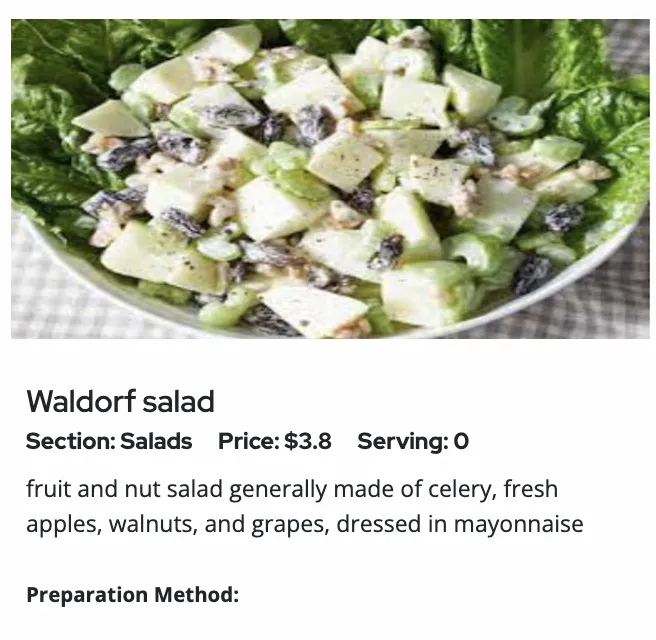
1. View Button
When the “View” button is selected, it will show a preview of the Item as shown in the example image below.
2. Edit Button
When the “Edit” button is selected, a pop-up of “Add Item” will appear, and the Item details can be updated from here. See the example image below.

3. Delete Button
When the “Delete” button is selected, a pop-up like an example below will appear. This is to ensure that no item will be accidentally deleted at one click.

